
User Guide


162 Chapter 5 - Removal and replacement EN
Left plate assembly
1 Separate the scanner from the printer (see pages 113 through
118) and remove the left side door and back cover (pages 129
and 130).
2 Remove the front cover, the print cartridge door, and the front
guide assembly (see pages 133 through 138).
3 Remove the formatter (see page 142).
4 Remove six screws (callout 1). If you have not already removed
the fuser, remove the fuser screw (callout 2).
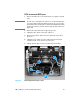
5 Remove the left plate assembly.
Figure 83. Removing the left plate assembly
2
2
2
1