
HP ProLiant ML110 G2 Lights-Out 100 Remote Management Processor User Guide


Configuration 8
Configuration
In this section
Configuring network access....................................................................................................................... 8
Establishing user accounts ......................................................................................................................... 9
Configuring network access
The server is connected to the network using a standard Ethernet cable. Through this connection, you can
access the remote management CLP, verify POST remotely, and access the BIOS setup utility remotely.
To configure network access:
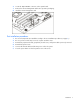
1. Connect a standard Ethernet cable between the onboard NIC on the server rear panel and a
network jack. By default, the remote management card has DHCP enabled and will automatically
negotiate an IP address. (The ProLiant ML110 G2 system also provides the ability to set up a static IP
address through the BIOS setup menu. Refer to the following "To set up a static IP address"
procedure.)
2. Obtain the DHCP IP address by using one of the following methods:
• Look at the DHCP clients table
• Read the IP address from BIOS setup menu (Press the F10 key during POST) under
Advanced/IPMI/LAN Setting.
3. On the target server, press the F10 key during POST to enter BIOS setup.
4. In the BIOS Setup utility, press the right arrow (→) key to navigate to the Advanced menu.
5. Press the down arrow (↓) key to scroll to IPMI. Press the Enter key.
6. Press the down arrow (↓) key to scroll to the LAN Settings submenu. Press the Enter key.
7. Press the down arrow (↓) key to scroll to the following settings, and set the parameters as needed
(the following example shows configuring for remote management processor access using telnet and
a Web page):
• BMC Telnet Service: [Enabled]
• BMC Ping Response: [Enabled]
• BMC HTTP Server: [Enabled]
8. Using the DHCP IP address, use telnet to log into the remote management CLP, or use a Web
browser to access the HTML interface.
To set up a static IP address:
1. On the target server, press the F10 key during POST to enter BIOS setup.
2. In the BIOS Setup utility, press the right arrow (→) key to navigate to the Advanced menu.
3. Press the down arrow (↓) key to scroll to IPMI. Press the Enter key.
4. Press the down arrow (↓) key to scroll to the LAN Settings submenu. Press the Enter key.
5. Set the IP Address Assignment to STATIC. This setting enables you to modify a static IP address
through the BIOS setup menu.