LASERJET PRO MFP User Guide M125-126 M127-128 M127-128
HP LaserJet Pro MFP M125, M126, M127, M128 User Guide
Copyright and License Trademark Credits © 2013 Copyright Hewlett-Packard Development Company, L.P. Adobe®, Acrobat®, and PostScript® are trademarks of Adobe Systems Incorporated. Reproduction, adaptation, or translation without prior written permission is prohibited, except as allowed under the copyright laws. Apple and the Apple logo are trademarks of Apple Computer, Inc., registered in the U.S. and other countries. iPod is a trademark of Apple Computer, Inc.
Table of contents 1 Product introduction ..................................................................................................................................... 1 Product comparison .............................................................................................................................................. 2 Product views ........................................................................................................................................................
Additional printing information ........................................................................................................ 29 Web-based printing ............................................................................................................................................... 2 HP ePrint ............................................................................................................................................ 31 HP ePrint software ..................................
HP Utility features ............................................................................................................................. 60 Product security features .................................................................................................................................... 62 Set or change the product password ................................................................................................ 62 Lock the product .................................................
Improve fax image quality .................................................................................................................................. 94 Check the scanner glass for dirt or smudges ................................................................................... 94 Check the send-fax resolution setting ............................................................................................. 94 Check the lightness/darkness setting .................................................
1 Product introduction ● Product comparison ● Product views ● Control panel overview Go to www.hp.com/support/ljMFPM125series, www.hp.com/support/ljMFPM126series, www.hp.com/ support/ljMFPM127series, or www.hp.com/support/ljMFPM128series for HP's all-inclusive help for your product: ● Solve problems. ● Download software updates. ● Join support forums. ● Find warranty and regulatory information. You can also go to www.hp.com/support for Worldwide support and other HP products.
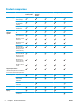
Product comparison M125a, M125r, M125ra, M126a Paper handling M125nw, M125rnw, M126nw M127fn, M128fn M127fp, M128fp M127fw, M128fw Input tray (150sheet capacity) Standard output bin (100-sheet capacity) Short-paper extender tool Supported operating systems Windows XP, 32bit Windows Vista, 32-bit and 64-bit Windows 7, 32-bit and 64-bit Windows 8, 32-bit and 64-bit Windows 2003 Server (32-bit and 64-bit), print and scan drivers only Windows 2008 Server (32-bit and 64-bit), print and scan drivers only W
M125a, M125r, M125ra, M126a Print Prints 20 pages per minute (ppm) on A4-size paper and 21 ppm on Letter-size paper Copy Flatbed scanner supports paper up to A4 or Lettersize M125nw, M125rnw, M126nw M127fn, M128fn M127fp, M128fp M127fw, M128fw Document feeder Copy resolution is 300 dots per inch (dpi) Scan Scan resolution up to 1200 dpi Scans in color Fax V.
Product views Product front view 1 2 6 3 5 4 4 7 1 Output bin 2 Scanner 3 Power on/off button 4 Control panel (tilts up for easier viewing and type varies by model) 5 Input tray 6 Document feeder 7 Short-paper extender tool Chapter 1 Product introduction ENWW
Product back view 1 2 3 4 5 6 ENWW 1 Slot for cable-type security lock 2 Hi-Speed USB 2.
Control panel overview ● M125a, M125r, M125ra, M126a ● M125nw, M125rnw, M126nw ● M127fn, M128fn, M127fp, M128fp ● M127fw and M128fw ● Control-panel Home screen (touchscreen only) M125a, M125r, M125ra, M126a 3 2 1 4 5 6 11 6 10 9 8 7 1 Setup button Opens the Setup menu 2 Left arrow button Moves the cursor to the left or scrolls through menu options 3 OK button Confirms a setting or confirms an action to proceed 4 Right arrow button Moves the cursor to the right or scrolls thr
10 Back button Returns to the previous screen 11 Start Copy button Starts a copy job M125nw, M125rnw, M126nw 3 2 1 4 5 6 13 7 12 11 10 9 8 1 Wireless button Enable/Disable wireless 2 Setup button Opens the Setup menu 3 Left arrow button Moves the cursor to the left or scrolls through menu options 4 OK button Confirms a setting or confirms an action to proceed 5 Right arrow button Moves the cursor to the right or scrolls through menu options 6 Power on/off button Turns the
M127fn, M128fn, M127fp, M128fp 3 2 1 4 5 6 15 14 7 13 8 12 11 10 9 8 1 Start Fax button Starts a fax job 2 Setup button Opens the Setup menu 3 Left arrow button Moves the cursor to the left or scrolls through menu options 4 OK button Confirms a setting or an action to proceed 5 Right arrow button Moves the cursor to the right or scrolls through menu options 6 Power on/off button Turns the product on or off 7 Cancel button Clears settings, cancels the current job, or exits th
M127fw and M128fw 1 9 2 8 3 7 4 5 6 1 Touchscreen display Provides access to the product features and indicates the current status of the product 2 Help button and light Provides access to the control-panel help system 3 Power on/off button Turns the product on or off 4 Right arrow button Moves the cursor to the right or moves the display to the next screen NOTE: 5 Cancel button Clears settings, cancels the current job, or exits the current screen NOTE: 6 Back button and light Left
Control-panel Home screen (touchscreen only) The Home screen provides access to the product features, and it indicates the product status. NOTE: Depending on the product configuration, the features on the Home screen can vary. The layout might also be reversed for some languages.
2 Paper trays ● Supported paper sizes and types ● Load the input tray Go to www.hp.com/support/ljMFPM125series, www.hp.com/support/ljMFPM126series, www.hp.com/ support/ljMFPM127series, or www.hp.com/support/ljMFPM128series for HP's all-inclusive help for your product: ● Solve problems. ● Download software updates. ● Join support forums. ● Find warranty and regulatory information. You can also go to www.hp.com/support for Worldwide support and other HP products.
Supported paper sizes and types ● Supported paper sizes ● Supported paper types Supported paper sizes NOTE: 12 To obtain the best results, select the correct paper size and type in the print driver before printing. Size Dimensions Letter 216 x 279 mm (8.5 x 11 in) Legal 216 x 356 mm (8.5 x 14 in) A4 210 x 297 mm (8.3 x 11.7 in) A5 148 x 210 mm (5.8 x 8.3 in) A6 105 x 148 mm (4.1 x 5.8 in) B5 (JIS) 182 x 257 mm (7.2 x 10.1 in) Executive 184 x 267 mm (7.3 x 10.
Supported paper types NOTE: ENWW To obtain the best results, select the correct paper size and type in the print driver before printing.
Load the input tray NOTE: When you add new paper, make sure that you remove all of the paper from the input tray and straighten the stack. Do not fan the paper. This reduces jams by preventing multiple sheets of paper from feeding through the product at one time. 1. Load the paper face-up with the top forward in the input tray. The orientation of the paper in the tray varies depending on the type of print job. For additional information, see Table 2-1 Input tray paper orientation on page 15. 2.
Table 2-1 Input tray paper orientation Paper type Duplex mode How to load paper Preprinted or letterhead 1–sided printing or 2–sided printing Face-up Top edge leading into the product Prepunched 1–sided printing or 2–sided printing Face-up Holes toward the left side of the product Envelopes 1-sided printing Face-up Top edge toward the right of the tray, postage end entering the product last ENWW Load the input tray 15
Tray adjustment for small paper sizes To print on paper shorter than 185 mm (7.3 in), use the short-paper extender to modify the input tray. 16 1. Remove the short-paper extender tool from the storage slot on the right side of the input area. 2. Attach the tool to the paper length guide on the input tray. 3. Load the paper into the tray, and then adjust the paper guides until they are snug against the paper.
4. Push the paper into the product until it stops, and then push the paper length guide in so the extender tool supports the paper. 5. When finished printing on short paper, remove the short-paper extender tool from the input tray, and then place it in the storage slot.
18 Chapter 2 Paper trays ENWW
3 Print ● Print tasks (Windows) ● Print tasks (Mac OS X) ● Web-based printing ● Set up HP Wireless Direct Printing Go to www.hp.com/support/ljMFPM125series, www.hp.com/support/ljMFPM126series, www.hp.com/ support/ljMFPM127series, or www.hp.com/support/ljMFPM128series for HP's all-inclusive help for your product: ● Solve problems. ● Download software updates. ● Join support forums. ● Find warranty and regulatory information. You can also go to www.hp.
Print tasks (Windows) ● How to print (Windows) ● Manually print on both sides (Windows) ● Print multiple pages per sheet (Windows) ● Select the paper type (Windows) ● Additional printing information How to print (Windows) The following procedure describes the basic printing process for Windows. 1. From the software program, select the Print option. 2. Select the product from the list of printers, and then click or tap the Properties or Preferences button to open the print driver.
3. Click or tap the Layout tab. 4. Select the appropriate duplex option from the Print on Both Sides Manually drop-down list, and then click or tap the OK button. 5. In the Print dialog box, click or tap the OK button to print the job. The product will print the first side of all the pages in the document first.
22 6. Retrieve the printed stack from the output bin, and place it with the printed-side facing down, top edge first in the input tray. 7. At the computer, click or tap the OK button to print the second side of the job. 8. If prompted, touch or press the appropriate control panel button to continue.
Print multiple pages per sheet (Windows) 1. From the software program, select the Print option. 2. Select the product from the list of printers, and then click or tap the Properties or Preferences button to open the print driver. NOTE: The name of the button varies for different software programs. 3. Click or tap the Layout tab. 4. Select the correct Orientation option from the drop-down list.
24 5. Select the correct number of pages per sheet from the Pages per sheet drop-down list, and then click or tap the Advanced button. 6. Select the correct Pages per Sheet Layout option from the drop-down list.
7. Select the correct Page Borders option from the drop-down list, click or tap the OK button to close the Advanced Options dialog box, and then click or tap the OK button to close the Properties or Preferences dialog box. 8. In the Print dialog box, click or tap the OK button to print the job. Select the paper type (Windows) 1. From the software program, select the Print option. 2.
3. Click or tap the Paper/Quality tab. 4. From the Media: drop-down list, select the correct paper type, and then click or tap the OK button to close the Properties or Preferences dialog box. 5. In the Print dialog box, click the OK button to print the job. Additional printing information Go to www.hp.
ENWW ● Select the paper size ● Select the page orientation ● Create a booklet ● Select the quality settings ● Select page borders Print tasks (Windows) 27
Print tasks (Mac OS X) ● How to print (Mac OS X) ● Manually print on both sides (Mac OS X) ● Print multiple pages per sheet (Mac OS X) ● Select the paper type (Mac OS X) ● Additional printing information How to print (Mac OS X) The following procedure describes the basic printing process for Mac OS X. 1. Click the File menu, and then click the Print option. 2. In the Printer menu, select the product. 3.
6. Retrieve the printed stack from the output bin, and place it with the printed-side facing down, top edge first in the input tray. 7. At the computer, click the Continue button to print the second side of the job. 8. If prompted, touch the appropriate control panel button to continue. Print multiple pages per sheet (Mac OS X) 1. Click the File menu, and then click the Print option. 2. In the Printer menu, select the product. 3.
30 ● Create and use printing shortcuts or presets ● Select the paper size, or use a custom paper size ● Select the page orientation ● Create a booklet ● Scale a document to fit a specific paper size ● Print the first or last pages of the document on different paper ● Print watermarks on a document Chapter 3 Print ENWW
Web-based printing Several options are available for remote printing over the Internet. HP ePrint Use HP ePrint to print documents by sending them as an email attachment to the product's email address from any email enabled device. To use HP ePrint, the product must meet these requirements: ● The product must be connected to a wired or wireless network and have Internet access. ● HP Web Services must be enabled on the product, and the product must be registered with HP Connected. LCD control panel 1.
registered to your HP Connected account. The target HP product can be at your desk or in a remote location, such as a branch office or across the globe. For Windows, the HP ePrint software also supports traditional direct IP printing to local network printers on the network (LAN or WAN) to supported PostScript® products. Go to www.hp.com/go/eprintsoftware for drivers and information. NOTE: The HP ePrint software is a PDF workflow utility for Mac, and is not technically a print driver.
Set up HP Wireless Direct Printing NOTE: This feature is available with wireless models only and the product might require a firmware update to use this feature. The HP Wireless Direct Printing feature lets you print from your wireless mobile device directly to an HP Wireless Direct-enabled product without requiring connection to an established network or the Internet.
34 Chapter 3 Print ENWW
4 Copy ● Make a copy ● Copy on both sides (duplex) ● Optimize copy quality Go to www.hp.com/support/ljMFPM125series, www.hp.com/support/ljMFPM126series, www.hp.com/ support/ljMFPM127series, or www.hp.com/support/ljMFPM128series for HP's all-inclusive help for your product: ● Solve problems. ● Download software updates. ● Join support forums. ● Find warranty and regulatory information. You can also go to www.hp.com/support for Worldwide support and other HP products.
Make a copy LCD control panel 1. Load the document on the scanner glass according to the indicators on the product. 2. Close the scanner. 3. At the product control panel, press the Number of Copies 4. Select the number of copies. 5. Press the Start Copy button. button to start copying. Touchscreen control panel 36 1. Load the document on the scanner glass according to the indicators on the product. 2. Close the scanner. 3.
Copy on both sides (duplex) 1. Load the document on the scanner glass according to the indicators on the product. 2. Close the scanner. 3. Start the copy job. LCD control panel: On the product control panel, press the Start Copy ● Touchscreen control panel: From the Home screen on the product control panel, touch the Copy button. button 4. Retrieve the printed page from the output bin, and place it with the printed-side facing down, top edge first in the input tray. 5.
Optimize copy quality The following copy-quality settings are available: ● Auto Select: Use this setting when you are not concerned about the quality of the copy. This is the default setting. ● Mixed: Use this setting for documents that contain a mixture of text and graphics. ● Text: Use this setting for documents that contain mostly text. ● Picture: Use this setting for documents that contain mostly graphics. LCD control panel 1.
5 Scan ● Scan by using the HP Scan software (Windows) ● Scan by using the HP Scan software (Mac OS X) Go to www.hp.com/support/ljMFPM125series, www.hp.com/support/ljMFPM126series, www.hp.com/ support/ljMFPM127series, or www.hp.com/support/ljMFPM128series for HP's all-inclusive help for your product: ● Solve problems. ● Download software updates. ● Join support forums. ● Find warranty and regulatory information. You can also go to www.hp.com/support for Worldwide support and other HP products.
Scan by using the HP Scan software (Windows) Use the HP Scan software to initiate scanning from software on your computer. You can save the scanned image as a file or send it to another software application. 1. Load the document on the scanner glass according to the indicators on the product. NOTE: For best results, load small-size paper (Letter, A4, or smaller) with the long edge of the paper along the left side of the scanner glass. 2.
Scan by using the HP Scan software (Mac OS X) Use the HP Scan software to initiate scanning from software on your computer. 1. Load the document on the scanner glass according to the indicators on the product. NOTE: For best results, load small-size paper (letter, A4, or smaller) with the long edge of the paper along the left side of the scanner glass. ENWW 2. Open the HP Scan software, which is located in the Hewlett-Packard folder inside the Applications folder. 3.
42 Chapter 5 Scan ENWW
6 Fax ● Connect and configure the product for fax ● Send a fax ● Create, edit, and delete speed-dial entries Go to www.hp.com/support/ljMFPM125series, www.hp.com/support/ljMFPM126series, www.hp.com/ support/ljMFPM127series, or www.hp.com/support/ljMFPM128series for HP's all-inclusive help for your product: ● Solve problems. ● Download software updates. ● Join support forums. ● Find warranty and regulatory information. You can also go to www.hp.
Connect and configure the product for fax ● Connect the product ● Configure the product ● Install the HP Fax software (Windows, optional) Connect the product The product is an analog device. HP recommends using the product on a dedicated analog telephone line. NOTE: Some countries/regions might require an adapter for the telephone cable that came with the product. 44 1. Connect the telephone cable to the fax port on the product and to the telephone jack on the wall. 2.
Configure the product How you configure the product varies depending on whether you set it up for standalone fax, with an answering machine, or with an extension phone. NOTE: Configuring the fax time, date, and header settings is required to use the fax feature.
4. Select the 12-hour clock or 24-hour clock. 5. Use the keypad to enter the current time, and then touch the OK button. 6. Select the date format. 7. Use the keypad to enter the current date, and then touch the OK button. 8. Select Fax Header. 9. Use the keypad to enter your fax number, and then touch the OK button. NOTE: The maximum number of characters for the fax number is 20. 10. Use the keypad to enter your company name or header, and then touch the OK button.
Touchscreen control panel 1. From the Home screen on the product control panel, select Setup 2. Select Fax Setup, and then select Fax Set-Up Utility. 3. Follow the on-screen prompts and select the appropriate response for each question. . NOTE: The maximum number of characters for the fax number is 20. The maximum number of characters for the fax header is 40.
Configure for an answering machine If you connect a telephone answering machine to the product, you need to configure the Rings to Answer and Answer Mode settings for the product. Follow these steps to configure the product: LCD control panel button. 1. On the product control panel, press the Setup 2. Select Fax Setup, and then select Fax Recv. Setup. 3. Select Rings to Answer. 4.
4. Make sure that the On option is selected. With this setting turned on, you can alert the product to pick up the incoming fax call by pressing 1-2-3 sequentially on the telephone keypad. Turn this setting off only if you use pulse dialing or if you have a service from your telephone company that also uses the 1-2-3 sequence. The telephone company service does not work if it conflicts with the product. 5. Press the Back 6. Select Answer Mode. 7. Select Fax/Tel, and then press the OK button.
Install the HP Fax software (Windows, optional) With the HP Fax software, you can fax electronic documents from a computer if you meet the following requirements: ● The product is connected directly to the computer or to a network to which the computer is connected. ● The product software is installed on the computer. ● The computer operating system is one that this product supports. NOTE: The HP Fax software that came with the product is the only computer fax program that works with the product.
Send a fax ● Send a fax by dialing manually from the product control panel ● Send a fax using the HP software (Windows) CAUTION: To prevent damage to the product, do not use an original that contains correction tape, correction fluid, paper clips, or staples. Also, do not load photographs, small originals, or fragile originals into the document feeder. Send a fax by dialing manually from the product control panel LCD control panel 1. Load the document.
3. Use the keypad to enter the fax number. NOTE: To use access codes, credit cards, or calling cards, you must dial the fax number manually to allow for pauses and dialing codes. To send a fax to an international destination, dial manually to allow for pauses and international dialing codes. You cannot use speed dials with access codes, credit cards, calling cards, or to dial international destinations. 4. Select Start Fax.
Create, edit, and delete speed-dial entries You can store frequently dialed fax numbers (up to 100 entries) as speed-dial entries. ● Create and edit speed-dial entries ● Delete speed-dial entries Create and edit speed-dial entries LCD control panel button. 1. On the product control panel, press the Setup 2. Select Fax Setup, and then select Phone Book. 3. Select Add/Edit. 4. Select an unassigned number for the new entry, and then press the OK button. 5.
3. Select Delete Entry. 4. Select the entry you want to delete, and then touch the OK button. NOTE: If you want to delete all speed-dial entries, select Delete All Entries.
7 Manage the product ● Change the product connection type (Windows) ● Use HP Web Services applications (touchscreen models only) ● HP Device Toolbox (Windows) ● HP Utility for Mac OS X ● Product security features ● Economy settings ● A Cartridge is low or Cartridge is very low message displays on the product control panel ● Replace the toner cartridge Go to www.hp.com/support/ljMFPM125series, www.hp.com/support/ljMFPM126series, www.hp.com/ support/ljMFPM127series, or www.hp.
Change the product connection type (Windows) If you are already using the product and you wish to change the way it is connected, use the Reconfigure your HP Device shortcut on your computer desktop to change the connection. For example, you can reconfigure the product to use a different wireless address, to connect to a wired or wireless network, or change from a network connection to a USB connection. You can change the configuration without inserting the product CD.
Use HP Web Services applications (touchscreen models only) Several innovative applications are available for this product that you can download directly from the Internet. For more information and to download these applications go to the HP Connected Web site at www.hpconnected.com. To use this feature, the product must be connected to a computer or network that has an Internet connection. HP Web Services must be enabled on the product. 1.
HP Device Toolbox (Windows) Use the HP Device Toolbox for Windows to check product status or to view or change product settings from your computer. This tool opens the HP Embedded Web Server for the product. NOTE: This tool is available only if you performed a full installation when you installed the product. Depending on how the product is connected, some features might not be available. 1. Click the Start button, and then click the Programs item. 2.
Tab or section Description Fax tab ● Phone Book: Add or delete entries in the fax phone book. ● Junk Fax List: Set fax numbers to block from sending faxes to the product. ● Fax Activity Log: Review recent fax activity for the product. Networking tab Provides the ability to change network settings from your computer. HP Web Services tab ENWW Network administrators can use this tab to control network-related settings for the product when it is connected to an IP-based network.
HP Utility for Mac OS X Use the HP Utility for Mac OS X to view or change product settings from your computer. You can use the HP Utility when the product is connected with a USB cable or is connected to a TCP/IP-based network. Open the HP Utility From the Finder, click Applications, click Hewlett-Packard, and then click HP Utility. If HP Utility is not included, use the following procedure to open it: 1.
Menu Item Description File Upload Transfer files from the computer to the product. You can upload the following types of files: ● HP LaserJet printer command language (.PRN) ● Portable document format (.PDF) ● Text (.TXT) HP Connected Access the HP Connected Web site. Information Message Center Display error events that have occurred with the product. Printer Settings Auto-off Configure the product to automatically turn off after a period of inactivity.
Product security features The product supports security standards and recommended protocols that help you keep the product secure, protect critical information on your network, and simplify the way you monitor and maintain the product. For in-depth information about HP's secure imaging and printing solutions, visit www.hp.com/go/ secureprinting. The site provides links to white papers and FAQ documents about security features.
4. Enter the new password in the New Password box and in the Verify Password box. 5. At the bottom of the window, click the Apply button to save the password. Lock the product 1. You can attach a security cable to the slot on the back of the product.
Economy settings ● Print with EconoMode ● Configure the Sleep/Auto Off After setting Print with EconoMode This product has an EconoMode option for printing drafts of documents. Using EconoMode can use less toner. However, using EconoMode can also reduce print quality. HP does not recommend the full-time use of EconoMode. If EconoMode is used full-time, the toner supply might outlast the mechanical parts in the toner cartridge.
Touchscreen control panel 1. From the Home screen on the product control panel, touch the Setup 2. Open the following menus: 3. ● System Setup ● Energy Settings ● Sleep/Auto Off After button. Select the time for the Sleep/Auto Off delay. NOTE: The default value is 15 Minutes. 4. The product automatically wakes when it receives jobs or when you touch the screen on the product control panel. You can change which events cause the product to wake.
A Cartridge is low or Cartridge is very low message displays on the product control panel A Cartridge is low or Cartridge is very low message displays on the product control panel, and the product does not print. NOTE: Toner level warnings and indicators provide estimates for planning purposes only. When an indicator shows low-toner levels, consider having a replacement cartridge available to avoid possible printing delays. You do not need to replace cartridges until print quality becomes unacceptable.
3. ● Black Cartridge ● Very Low Setting Select one of the following options: ● Select the Stop option to set the product to stop printing until you replace the toner cartridge. ● Select the Prompt option to set the product to stop printing and prompt you to replace the toner cartridge. You can acknowledge the prompt and continue printing. ● Select the Continue option to set the product to alert you that the toner cartridge is very low, but to continue printing.
Replace the toner cartridge When a toner cartridge approaches the end of useful life, you are prompted to order a replacement. You can continue printing with the current cartridge until redistributing the toner no longer yields acceptable print quality. 68 1. Lift the scanner assembly. 2. Open the top cover. 3. Remove the toner cartridge.
4. Remove the new toner cartridge from the bag. Place the used toner cartridge in the bag for recycling. 5. Grasp both sides of the toner cartridge and distribute the toner by gently rocking the cartridge. CAUTION: Do not touch the shutter or the surface of the roller. 6. Bend the tab on the left side of the cartridge until the tab breaks loose. Pull the tab until all the tape is removed from the cartridge. Place the tab and tape in the toner cartridge box to return for recycling.
70 7. Align the toner cartridge with the tracks inside the product, and then insert the toner cartridge until it is firmly seated. 8. Close the top cover. 9. Lower the scanner assembly.
8 Solve problems ● Control panel help system (touchscreen models only) ● Restore the factory-set defaults ● Solve paper feed or jam problems ● Clear jams from the input tray ● Clear jams in the toner-cartridge area ● Clear jams in the output bin ● Clear jams in the document feeder ● Improve print quality ● Improve copy and scan quality ● Improve fax image quality ● Solve wired network problems ● Solve wireless network problems ● Solve fax problems Go to www.hp.
Control panel help system (touchscreen models only) The product has a built-in Help system that explains how to use each screen. To open the Help system, touch the Help button in the upper-right corner of the screen. For some screens, the Help opens to a global menu where you can search for specific topics. You can browse through the menu structure by touching the buttons in the menu. Some Help screens include animations that guide you through procedures, such as clearing jams.
Restore the factory-set defaults Restoring the factory-set defaults returns all of the product and network settings to the factory defaults. It will not reset the page count, tray size, or language. To restore the product to the factory-default settings, follow these steps. CAUTION: Restoring the factory-set defaults returns all of the settings to the factory defaults, and it also deletes any pages that are stored in the memory. 1. On the product control panel, press or touch the Setup 2.
Solve paper feed or jam problems If the product has recurring problems with paper feeding or with jams, use the following information to reduce the number of occurrences. The product does not pick up paper If the product does not pick up paper from the tray, try these solutions. 1. Open the product and remove any jammed sheets of paper. 2. Load the tray with the correct size of paper for your job. 3. Make sure the paper size and type are set correctly on the product control panel. 4.
a. From the Home screen on the product control panel, touch the Setup b. Touch the Service menu. c. Touch the Cleaning Page button. d. Load plain letter or A4 paper when you are prompted. e. Touch the OK button to begin the cleaning process. button. The product prints the first side and then prompts you to remove the page from the output bin and reload it in Tray 1, keeping the same orientation. Wait until the process is complete. Discard the page that prints. 5.
Clear jams from the input tray A Jam in tray 1. Clear Jam and press [OK] message displays on the product control panel. 76 1. Remove any loose paper from the input tray. 2. Lift the scanner assembly. 3. Open the top cover.
4. Remove the toner cartridge. 5. Remove any jammed paper visible in the input tray area. Use both hands to remove jammed paper to avoid tearing the paper. 6. Remove any jammed paper from the tonercartridge area.
78 7. Reinsert the toner cartridge. 8. Close the top cover. 9. Lower the scanner assembly.
Clear jams in the toner-cartridge area A Jam in cartridge area message displays on the product control panel. 1. Lift the scanner assembly. 2. Open the top cover. 3. Remove the toner cartridge.
80 4. Remove any jammed paper from the tonercartridge area. Use both hands to remove jammed paper to avoid tearing the paper. 5. Reinsert the toner cartridge.
6. Close the top cover. 7. Lower the scanner assembly.
Clear jams in the output bin A Jam in output bin message displays on the product control panel. 82 1. Lift the scanner assembly. 2. Open the top cover. 3. Remove any jammed paper from the output bin area. Use both hands to remove jammed paper to avoid tearing the paper.
4. Remove the toner cartridge. 5. Remove any jammed paper from the tonercartridge area. 6. Reinsert the toner cartridge.
84 7. Close the top cover. 8. Lower the scanner assembly.
Clear jams in the document feeder A Jam in the document feeder message displays on the product control panel. 1. Remove any loose paper from the input tray of the document feeder. 2. Remove any jammed paper visible in the input tray area. Use both hands to remove jammed paper to avoid tearing the paper. 3. Lift the document-feeder input tray. 4. Lift the jam-access cover in the document feeder.
86 5. Remove any jammed paper. 6. Close the jam-access cover. 7. Close the document-feeder input tray.
Improve print quality ● Print from a different software program ● Set the paper-type setting for the print job ● Check the toner-cartridge status ● Print a cleaning page ● Inspect the toner cartridge for damage ● Check the paper and printing environment ● Check the EconoMode settings Print from a different software program Try printing from a different software program. If the page prints correctly, the problem is with the software program from which you were printing.
3. By default, the print driver displays the Copies & Pages menu. Open the menus drop-down list, and then click the Finishing menu. 4. Select a type from the Media-type drop-down list. 5. Click the Print button.
3. Touch the Cleaning Page button. 4. Load plain letter or A4 paper when you are prompted. 5. Touch the OK button to begin the cleaning process. The product prints the first side and then prompts you to remove the page from the output bin and reload it in Tray 1, keeping the same orientation. Wait until the process is complete. Discard the page that prints. Inspect the toner cartridge for damage 1. Remove the toner cartridge from the product, and verify that the sealing tape has been removed. 2.
Check the product environment Verify that the product is operating within the environmental specifications listed in the product Warranty and Legal Guide. Check the EconoMode settings HP does not recommend the full-time use of EconoMode. If EconoMode is used full-time, the toner supply might outlast the mechanical parts in the toner cartridge. If print quality begins to degrade and is no longer acceptable, consider replacing the toner cartridge.
Improve copy and scan quality Check the scanner glass for dirt and smudges Over time, specks of debris might collect on the scanner glass and white plastic backing, which can affect performance. Use the following procedure to clean the scanner. 1. Press the power button to turn the product off, and then disconnect the power cable from the electrical outlet. 2. Open the scanner lid. 3.
Optimize for text or pictures The following copy-quality settings are available: ● Auto Select: Use this setting when you are not concerned about the quality of the copy. This is the default setting. ● Mixed: Use this setting for documents that contain a mixture of text and graphics. ● Text: Use this setting for documents that contain mostly text. ● Picture: Use this setting for documents that contain mostly graphics. LCD control panel 1.
Clean the pickup rollers and separation pad in the document feeder If the document feeder experiences paper-handling problems, such as jams or multiple-page feeds, clean the document-feeder rollers and separation pad. 1. Lift the document-feeder input tray. 2. Use a moist, lint-free cloth to wipe both pickup rollers and the separation pad to remove dirt.
Improve fax image quality ● Check the scanner glass for dirt or smudges ● Check the send-fax resolution setting ● Check the lightness/darkness setting ● Check the Error Correction setting ● Check the Fit-to-Page setting ● Clean the pickup rollers and separation pad in the document feeder ● Send to a different fax machine ● Check the sender's fax machine Check the scanner glass for dirt or smudges Over time, specks of debris might collect on the scanner glass and white plastic backing, which
3. Select Advanced Setup, and then select Fax Resolution. 4. Select the desired resolution setting, and then touch OK. Check the lightness/darkness setting If the fax output is too light or too dark, check the lightness/darkness setting to make sure it is appropriate for the fax job. LCD control panel button. 1. On the product control panel, press the Setup 2. Select Fax Setup. 3. Select Fax Send Setup, and then select Def. Light/Dark. 4.
Check the Fit-to-Page setting If the product printed a fax job off the page, turn on the fit-to-page feature from the product control panel. NOTE: Make sure that the default paper size setting matches the size of the paper in the tray. LCD control panel button. 1. On the product control panel, press the Setup 2. Select Fax Setup, and then select Recv. Fax Setup. 3. Select Fit to Page, and then select On. Touchscreen control panel 1.
2. Use a moist, lint-free cloth to wipe both pickup rollers and the separation pad to remove dirt. CAUTION: Do not use abrasives, acetone, benzene, ammonia, ethyl alcohol, or carbon tetrachloride on any part of the product; these can damage the product. Do not place liquids directly on the glass or platen. They might seep and damage the product. 3. Close the document-feeder input tray.
Solve wired network problems Check the following items to verify that the product is communicating with the network. Before beginning, print a configuration page from the product control panel and locate the product IP address that is listed on this page.
a. Open a command-line prompt on your computer. For Windows, click Start, click Run, type cmd, and then press Enter. b. Type ping followed by the IP address for your product. For Mac OS X, open the Network Utility, and then supply the IP address in the correct field in the Ping pane. c. 2. If the window displays round-trip times, the network is working.
Solve wireless network problems ● Wireless connectivity checklist ● The product does not print after the wireless configuration completes ● The product does not print, and the computer has a third-party firewall installed ● The wireless connection does not work after moving the wireless router or product ● Cannot connect more computers to the wireless product ● The wireless product loses communication when connected to a VPN ● The network does not appear in the wireless networks list ● The wi
The product does not print after the wireless configuration completes 1. Make sure that the product is turned on and in the ready state. 2. Turn off any third-party firewalls on your computer. 3. Make sure that the wireless network is working correctly. 4. Make sure that your computer is working correctly. If necessary, restart the computer. 5. Verify that you can open the product HP Embedded Web Server from a computer on the network.
The wireless network is not functioning 1. Make sure that the network cable is not connected. 2. To verify if the network has lost communication, try connecting other devices to the network. 3. Test network communication by pinging the network. a. Open a command-line prompt on your computer. For Windows, click Start, click Run, type cmd, and then press Enter. b. Type ping followed by the router IP address.
ENWW ● Keep the wireless devices away from large metal objects, such as filing cabinets, and other electromagnetic devices, such as microwaves and cordless telephones. These objects can disrupt radio signals. ● Keep the wireless devices away from large masonry structures and other building structures. These objects can absorb radio waves and lower signal strength. ● Position the wireless router in a central location in line of sight with the wireless products on the network.
Solve fax problems ● Check the hardware setup ● Faxes are sending slowly ● Fax quality is poor ● Fax cuts off or prints on two pages Check the hardware setup ● Several possible fixes are available. After each recommended action, retry faxing to see if the problem is resolved. ● For best results during fax problem solving, make sure the line from the product is connected directly to the wall phone port. Disconnect all other devices that are connected to the product. 1.
f. When the download is complete, follow the on-screen instructions to install and run the utility. The utility checks for firmware updates for your HP product. If updates are found, the utility installs the available update. g. 4. When firmware updates are complete, try to resend the fax. Verify that the fax was set up when the product software was installed. From the computer, in the HP program folder, run the Fax Setup Utility. 5. Verify that the telephone service supports analog fax.
LCD control panel ● Touchscreen control panel button. 1. On the product control panel, press the Setup 2. Select Fax Setup, and then select All Faxes. 3. Select Fax Speed, and then select the correct setting. 1. From the Home screen on the product control panel, touch the Setup button. 2. Select Fax Setup, and then select Advanced Setup. 3. Select Fax Speed, and then select the correct setting. Change the fax settings on the control panel to a lower resolution.
Fax cuts off or prints on two pages ● Set the Default Paper Size setting. Faxes print on a single size of paper based on the Default Paper Size settings. LCD control panel Touchscreen control panel button. 1. On the product control panel, press the Setup 2. Select System Setup, and then select Paper Setup. 3. Select Def. Paper Size, and then select the correct setting. 1. From the Home screen on the product control panel, touch the Setup button. 2.
108 Chapter 8 Solve problems ENWW
9 Parts, supplies, and accessories ● Order parts, accessories, and supplies ● Customer self-repair parts ● Accessories Go to www.hp.com/support/ljMFPM125series, www.hp.com/support/ljMFPM126series, www.hp.com/ support/ljMFPM127series, or www.hp.com/support/ljMFPM128series for HP's all-inclusive help for your product: ● Solve problems. ● Download software updates. ● Join support forums. ● Find warranty and regulatory information. You can also go to www.hp.
Order parts, accessories, and supplies HP original toner cartridges and paper www.hp.com/go/suresupply Order genuine HP parts or accessories www.hp.com/buy/parts Order through service or support providers Contact an HP-authorized service or support provider. Customer self-repair parts The following customer self-repair parts are available for the product.
Index A accessories ordering 110 part numbers 110 AirPrint 32 applications downloading 57 Apps menu 57 B bins, output locating 4 C cartridge replacing 68 checklist wireless connectivity 100 cleaning glass 91 paper path 88 control panel buttons and lights 6 help 72 Home screen 10 locating 4 copy quality improving 91 copying edges of documents 92 multiple copies 36 optimizing for text or pictures 92 quality, adjusting 38 setting paper size and type 91 single copies 36 two-sided documents 37 covers, locating
media supported sizes 12 memory included 2 multiple pages per sheet printing (Mac) 29 printing (Windows) 23 N network password, changing 62 password, setting 62 network installation 56 networking 2 networks installing the product 56 number of copies, changing 36 O on/off button, locating 4 online help, control panel 72 ordering supplies and accessories 110 output bin locating 4 P pages per minute 2 pages per sheet selecting (Mac) 29 selecting (Windows) 23 paper jams 75 ordering 110 selecting 89 supported si
© 2013 Hewlett-Packard Development Company, L.P. www.hp.