
HP EliteBook 820 G2 Notebook PC and HP EliteBook 720 G2 Notebook PC - Maintenance and Service Guide
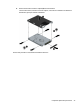
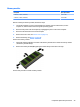

Hard drive/solid-state drive
NOTE: Hard drive or solid-state drive spare part kits do not include the hard drive bracket, hard drive
connector adapter, or screws. The hard drive bracket, hard drive connector adapter, and screws are included
in the Hard Drive Hardware Kit, spare part number 730539-001.
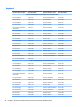
Description Spare part number
Hard drive (does not include hard drive bracket, hard drive connector adapter, or screws):
NOTE: The hard drive bracket, hard drive connector adapter, and screws are included in the Hard Drive Hardware Kit, spare part
number 730539-001.
1-TB, 5400-rpm, SATA, 7.0-mm hard drive 762990-001
500-GB, 7200-rpm, SATA, 7.0-mm hard drive 703267-001
500-GB, 7200-rpm, SED, 7.0-mm hard drive 703268-001
500-GB, 5400-rpm, SATA, FIPS, 7.0-mm hard drive 730946-001
500-GB, 5400-rpm, SATA, 7.0-mm, hybrid SSD hard drive 732000-001
320-GB, 7200-rpm, SATA, 7.0-mm hard drive 778184-001
Solid-state drive, 2.5-inch (does not include hard drive bracket, hard drive connector adapter, or screws):
NOTE: The hard drive bracket, hard drive connector adapter, and screws are included in the Hard Drive Hardware Kit.
512-GB, SATA-3, solid-state drive 781850-001
512-GB, SATA-3, solid-state drive, TLC 834733-001
256-GB, SATA-3, SED, Opal 2, solid-state drive 781849-001
256-GB, SATA-3, TLC, solid-state drive 798956-001
256-GB, M.2, PCIe, solid-state drive 781853-001
240-GB, SATA-3, solid-state drive 781847-001
180-GB, SATA-3, SED, Opal 2, solid-state drive 781846-001
180-GB, SATA-3, solid-state drive 781843-001
128-GB, SATA-3, TLC, solid-state drive 798955-001
128-GB, SATA-3, solid-state drive 781842-001
Before removing the battery, follow these steps:
1. Turn o the computer. If you are unsure whether the computer is o or in Hibernation, turn the
computer on, and then shut it down through the operating system.
2. Disconnect the power from the computer by unplugging the power cord from the computer.
3. Disconnect all external devices from the computer.
4. Remove the service cover (see Service cover on page 37).
5. Remove the battery (see Battery on page 39).
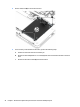
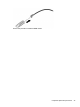
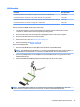
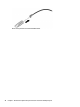
Remove the hard drive:
1. Loosen the four Phillips captive screws (1) that secure the hard drive to the computer.
Component replacement procedures 41