
User Guide - Windows 8.1
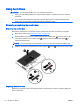


1. Tilt down the service door to align the front edge of the service door near the front edge of the
computer (1).
2. Insert the alignment tabs (2) on the rear edge of the service door with the notches on the
computer.
3. Slide the service door toward the battery bay until the service door snaps into place.
4. With the battery bay toward you, slide the service door release latch to the left (3), and if you
choose to, insert and tighten the optional screw (4) to hold the service door in place. Slide the
release latch to the right to lock the service door (5).
NOTE: If you do not want to use the optional screw, you can store it inside the service door.
5. Insert the battery (see Inserting a battery on page 48).
Replacing or upgrading the hard drive
CAUTION: To prevent information loss or an unresponsive system:
Shut down the computer before removing the hard drive from the hard drive bay. Do not remove the
hard drive while the computer is on, in the Sleep state, or in Hibernation.
If you are not sure whether the computer is off, turn the computer on by pressing the power button.
Then shut down the computer through the operating system.
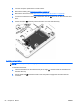
Removing the hard drive
To remove a hard drive:
1. Save your work and shut down the computer.
2. Disconnect AC power and external devices connected to the computer.
ENWW Using hard drives 63