
SX1018HP Ethernet Managed Blade Switch User Guide for HP c-Class BladeSystems

Removing the Mellanox SX1018HP Ethernet Switch for ServiceRev 1.0
Mellanox Technologies
22
4 Removing the Mellanox SX1018HP Ethernet Switch
for Service
Put the HP 10K series rack and the HP BladeSystem c7000 enclosure into a safe and stable state
for component removal and bring the component to an appropriate state for removal. You must
ensure that you can reach the component easily and handle it safely.
For more information about removing c-Class components from the c-Class enclosure, see the
HP BladeSystem c7000 Enclosure Service and Maintenance Guide:
http://www.hp.com/go/bladesystem/documentation
To remove the switch, follow these steps:
1. Disconnect and remove each cable until all of the networking ports are unplugged.
When disconnecting the cables, ensure that you do not bend them more than the recommended
bend radius. It might be necessary to loosen the releasable cable ties enough to remove the cable
from the switch. HP recommends that you do not remove the cables from the releasable cable ties
on the c-Class cable management bracket.
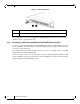
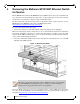
2. Press the switch blade handle release button and slide the switch all the way out of the HP
BladeSystem c7000 enclosure.
Figure 12: Removing the Blade
If you are unsure of the process to remove a switch for service, contact an HP service representa-
tive. Also check the HP BladeSystem Technical Resources web page frequently for updates to
this guide:
http://www.hp.com/go/bladesystem/documentation
HP provides various cable management solutions. Installation and removal of the Mella-
nox SX1018HP Ethernet Switch might depend on which type of cable management
bracket is used to support the cables used in your configuration.