
VISTA Plus for MPE User's Guide


Viewing a Report
3-33
Creating Columns
Follow the instructions in this section to create columns.
1. From the VISTA Functions menu, select Column Management and press Enter or F6, Select.
The first set of column management function keys is displayed.
2. Scroll the report so that the top line being displayed contains a line which can be used as a
template for setting column markers. Displaying a typical line of data at the top of the screen
may be the most useful.
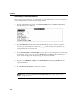
3. Press F4, Create Columns. VISTA creates columns based on spaces it finds between data
elements on the first line being displayed.
4. If the columns are fundamentally flawed, use F6, Clear Columns, and repeat steps 2 and 3.
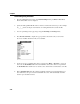
5. If the placement is basically correct, use the additional function keys to fine-tune the columns.
Use F3 and F4, Margin Left and Margin Right, to adjust the boundaries of each column.
To move between columns, press Tab and Shift+Tab. You can also press Esc+W to widen and
Esc+O to shrink columns. Once the columns look the way you want them to, you can save them,
print the report in this format, or download it. Additionally, you can make calculations based on a
column’s contents. You can also reorganize the report, sorting it by a column’s contents.
Note. When loading a comma-delimited file into a PC application, use the Import
command in the PC application.