
User Guide - Windows 10


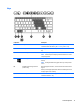


Table Of Contents
- Welcome
- Components
- Network connections
- Screen navigation
- Entertainment features
- Using a webcam (select products only)
- Using audio
- Using video
- Connecting video devices by using a VGA cable (select products only)
- Connecting video devices using an HDMI cable (select products only)
- Discovering and connecting wired displays using MultiStream Transport
- Discovering and connecting to Miracast-compatible wireless displays (select products only)
- Discovering and connecting to Intel WiDi certified displays (select Intel products only)
- Power management
- Shutting down (turning off) the computer
- Setting power options
- Security
- Protecting the computer
- Using passwords
- Using antivirus software
- Using firewall software
- Installing critical security updates
- Using HP Client Security (select products only)
- Using HP Touchpoint Manager (select products only)
- Installing an optional security cable (select products only)
- Using a fingerprint reader (select products only)
- Maintenance
- Backup and recovery
- Computer Setup (BIOS), TPM, and HP Sure Start
- HP PC Hardware Diagnostics (UEFI)
- Specifications
- Electrostatic Discharge
- Accessibility
- Index

Changing your computer's settings
You can change view and screen brightness.
Changing your computer's view
Your computer's orientation, or view, changes automatically from landscape to portrait view, or from portrait
to landscape view.
1. To change the view of your computer from landscape view to portrait view:
Hold the computer vertically, and then turn it 90 degrees to the right (in a clockwise direction).
2. To change the view of your computer from portrait view to landscape view:
Hold the computer vertically, and then turn it 90 degrees to the left (in a counter-clockwise direction).
Adjusting your computer's autorotate lock
To adjust your computer's autorotate lock when the computer is undocked:
▲
When the computer is on, press the rotate lock button to lock the autorotate feature of the display. To
unlock the autorotate feature, press the button again.
Adjusting your computer's screen brightness
To adjust the screen brightness:
●
Type control panel, and then tap Windows Mobility Center. A vertical slider displays that controls
the screen brightness.
- or -
●
Type control panel, and then tap Power Options. A vertical slider displays that controls the screen
brightness.
NOTE: From the Windows desktop, you can also tap the Power Meter icon in the notification area at the far
right of the taskbar, tap the Adjust screen brightness icon, and then move the slider next to Screen
brightness at the bottom of the screen.
Labels
The labels affixed to the computer provide information you may need when you troubleshoot system
problems or travel internationally with the computer.
IMPORTANT: Check the following locations for the labels described in this section: the bottom of the
computer, inside the battery bay, under the service door, or on the back of the display.
●
Service label—Provides important information to identify your computer. When contacting support,
you will probably be asked for the serial number, and possibly for the product number or the model
number. Locate these numbers before you contact support.
Your service label will resemble one of the examples shown below. Refer to the illustration that most
closely matches the service label on your computer.
Changing your computer's settings 15