Pointing Devices and Keyboard User Guide
© Copyright 2008 Hewlett-Packard Development Company, L.P. Windows is a U.S. registered trademark of Microsoft Corporation. The information contained herein is subject to change without notice. The only warranties for HP products and services are set forth in the express warranty statements accompanying such products and services. Nothing herein should be construed as constituting an additional warranty. HP shall not be liable for technical or editorial errors or omissions contained herein.
Table of contents 1 Using pointing devices Setting pointing device preferences ..................................................................................................... 1 Using the TouchPad ............................................................................................................................. 2 Connecting an external mouse ............................................................................................................. 2 2 Using the keyboard Using hotkeys .....
iv
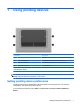
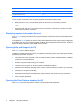
1 Using pointing devices Component Description (1) TouchPad* Moves the pointer and selects or activates items on the screen. (2) Left TouchPad button* Functions like the left button on an external mouse. (3) Right TouchPad button* Functions like the right button on an external mouse. (4) TouchPad scroll zone Scrolls up or down. *This table describes default settings. To view or change TouchPad preferences, select Start > Control Panel > Printers and Other Hardware > Mouse.
Using the TouchPad To move the pointer, slide your finger across the TouchPad surface in the direction you want the pointer to go. Use the TouchPad buttons like the corresponding buttons on an external mouse. To scroll up and down using the TouchPad vertical scroll zone, slide your finger up or down over the lines. NOTE: If you are using the TouchPad to move the pointer, you must lift your finger off the TouchPad before moving it to the scroll zone.
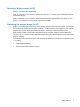
2 Using the keyboard Using hotkeys Hotkeys are combinations of the fn key (1) and either the esc key (2) or one of the function keys (3). The icons on the f1 through f9 and f11 and f12 keys represent the hotkey functions. Hotkey functions and procedures are discussed in the following sections. NOTE: Your computer may look slightly different from the illustration in this section. Function Hotkey Display system information. fn+esc Open Help and Support. fn+f1 Open the Print Options window.
Function Hotkey Increase speaker sound. fn+f11 Decrease speaker sound. fn+f12 To use a hotkey command on the computer keyboard, follow either of these steps: ● Briefly press the fn key, and then briefly press the second key of the hotkey command. – or – ● Press and hold down the fn key, briefly press the second key of the hotkey command, and then release both keys at the same time.
Opening a Web browser (fn+f3) Press fn+f3 to open your Web browser. Until you have set up your Internet or network services, the fn+f3 hotkey opens the Windows Internet Connection Wizard. After you have set up your Internet or network services and your Web browser home page, you can press fn+f3 to quickly access your home page and the Internet. Switching the screen image (fn+f4) Press fn+f4 to switch the screen image among display devices connected to the system.
Initiating Standby (fn+f5) CAUTION: To reduce the risk of information loss, save your work before initiating Standby. Press fn+f5 to initiate Standby. When Standby is initiated, your information is stored in memory, the screen is cleared, and power is conserved. While the computer is in Standby, the power light blinks. The computer must be on before you can initiate Standby.
Increasing speaker sound (fn+f12) Press fn+f12 to increase speaker sound. Hold down the hotkey to increase speaker sound incrementally.
3 Using the HP Quick Launch Buttons control panel NOTE: The features of the Quick Launch Buttons that are described in this section may not be available on all computers. The HP Quick Launch Buttons control panel allows you to manage several tasks, including the following: ● Add, modify, and remove items on the Q Menu ● Set tiling preferences NOTE: For on-screen information about any item in the Quick Launch Buttons control panel, click the Help button in the upper-right corner of the window.
Accessing the Quick Launch Buttons control panel You can open the HP Quick Launch Buttons control panel in either of the following ways: ● Select Start > Control Panel > Printers and Other Hardware > Quick Launch Buttons.
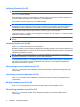
4 Using keypads The computer has an embedded numeric keypad and also supports an optional external numeric keypad or an optional external keyboard that includes a numeric keypad. 10 Component Description (1) fn key Executes frequently used system functions when pressed in combination with a function key or the esc key. (2) Embedded numeric keypad Can be used like the keys on an external numeric keypad.
Using the embedded numeric keypad The 15 keys of the embedded numeric keypad can be used like the keys on an external keypad. When the embedded numeric keypad is turned on, each key on the keypad performs the function indicated by the icon in the upper-right corner of the key. Enabling and disabling the embedded numeric keypad Press fn+num lk to enable the embedded numeric keypad. Press fn+num lk again to return the keys to their standard keyboard functions.
5 Cleaning the TouchPad and keyboard Dirt and grease on the TouchPad can cause the pointer to jump around on the screen. To avoid this, clean the TouchPad with a damp cloth, and wash your hands frequently when using the computer. WARNING! To reduce the risk of electric shock or damage to internal components, do not use a vacuum cleaner attachment to clean the keyboard. A vacuum cleaner can deposit household debris on the keyboard surface.
Index B buttons TouchPad 1 D display image, switching 5 screen brightness hotkeys 6 F fn key 3 function keys 3 H Help and Support hotkey 4 hotkeys decreasing screen brightness 6 decreasing speaker sound 6 description 3 displaying system information 4 increasing screen brightness 6 increasing speaker volume 7 initiating QuickLock 6 initiating Standby 6 muting speaker sound 6 opening Help and Support 4 opening Print Options window 4 opening Web browser 5 switching screen image 5 using 4 K keyboard hotkeys,