
Owner's manual


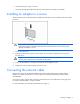
Table Of Contents
- HP NC340T PCI-X Quad-Port Gigabit Server Adapter User Guide
- Copyright
- Contents
- Technician notes
- Introduction
- Installing an adapter
- Specifications
- Regulatory compliance notices
- Regulatory compliance identification numbers
- Federal Communications Commission notice
- Class A equipment
- Class B equipment
- Declaration of conformity for products marked with the FCC logo, United States only
- Modifications
- Cables
- Canadian notice (Avis Canadien)
- European Union regulatory notice
- Japanese notice
- Korean class A notice
- BSMI notice
- Disposal of waste equipment by users in private households in the European Union
- Electrostatic discharge
- Acronyms and abbreviations
- Index

Installing an adapter 9
• Avoid touching pins, leads, or circuitry.
• Always be properly grounded when touching a static-sensitive component or assembly.
Installing an adapter in a server
See the HP ProLiant server documentation for additional information on how to safely install a PCI card in
the server.
CAUTION: If the server is not PCI Hot Plug compliant, power it down and unplug the power
cord from the power outlet before removing the server access panel. Failure to do so may
damage the adapter or server.
1. Power down the server.
2. Remove the power cord and server access panel. Then remove the expansion slot cover from a
PCI/PCI-X slot.
WARNING: To reduce the risk of personal injury from hot surfaces, allow the drives and the
internal system components to cool before touching them.
3. Firmly seat the adapter in a PCI/PCI-X slot and secure the adapter bracket.
4. Replace the access panel and plug in the power cord.
Connecting the network cable
Network connections for the NC340T adapter can employ existing UTP CAT5 (or better) cable for
Gigabit over copper transmissions. For new installations, CATe (enhanced CAT5) or better cable is
recommended.
To secure the cable, plug the cable connector into the RJ-45 port. Ensure that the tab on the plug clicks
into position indicating that it is properly seated.
For more information, see UTP cable specifications (on page 11).