HP NC-Series ServerEngines iSCSISelect User Guide Part Number 609163-001 March 2010 (First Edition)
© Copyright 2010 Hewlett-Packard Development Company, L.P. The information contained herein is subject to change without notice. The only warranties for HP products and services are set forth in the express warranty statements accompanying such products and services. Nothing herein should be construed as constituting an additional warranty. HP shall not be liable for technical or editorial errors or omissions contained herein. Confidential computer software.
Contents Overview ..................................................................................................................................... 5 iSCSI Overview............................................................................................................................................ 5 Constructing a basic iSCSI SAN .................................................................................................................... 5 Managing an iSCSI session..........................
Overview iSCSI Overview The Internet Small Computer System Interface (iSCSI) is an IP-based standard for linking data storage devices over a network and transferring data by carrying SCSI commands over IP networks. An iSCSI network consists of one or more iSCSI storage units (targets) connected through a copper or optical networking cable to 10Gb Ethernet network switches or IP routers.
• Allows negotiation of various parameters iSCSI Login An iSCSI session has two phases: • Login Phase. iSCSI parameters are negotiated using login requests and responses. • Full Featured Phase. After security or authentication has occurred and operational parameters have been set, the initiator performs SCSI I/Os. Security Security is a necessary and critical party of the iSCSI protocol because it operates within the Internet environment.
iSCSISelect Overview of iSCSISelect The HP NC-Series ServerEngines iSCSISelect is an Int 13h option ROM resident utility used to configure and manage the HP NC-Series ServerEngines adapter in an iSCSI SAN environment. By configuring your initiator, you can use iSCSISelect to automatically contact network devices and set up iSCSI boot targets.
Configuring and managing the iSCSI Initiator iSCSI Initiator Before you begin, gather the following facts about your network: • Target IP address (for at least your bootable target) • Initiator IQN name • Initiator IP address • Initiator Subnet Mask In addition, you need to verify that the initiator’s IQN name you choose is listed in the target’s Access Control List (ACL) so that the targets are configured to recognize the iSCSI initiator name.
1. Log into HP NC-Series ServerEngines iSCSISelect by pressing Ctrl+S when prompted at boot. The iSCSI Initiator Configuration menu displays. 2. Tab to iSCSI Initiator Name and press Enter. If there are multiple controllers in your system, the iSCSI Initiator name may be different for each controller. When this occurs a POST error message indicating an Initiator iSCSI Name mismatch displays. You must Save a new initiator name on this menu so that the iSCSI Initiator Name on all the controllers match.
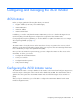
The following is an example of the Controller Configuration menu showing two physical adapters with two controllers (dual-port) each. 1. To select a controller, select Controller Configuration and press Enter. The Controller Selection Menu displays. 2. Select a controller and press Enter. The Configuration Controller menu displays. From this menu, you can continue to configure and manage your iSCSI Initiator and target by selecting the options. 3.
Enabling DHCP You can use DHCP to provide the initiator with an IP address by enabling DHCP from the Network Configuration menu. If you are using the DHCP server to obtain an IP address for your iSCSI Initiator, it is recommended that you set up a reservation. A reservation assigns a specific IP address based on the MAC address of your iSCSI function. If you do not reserve an IP Address through DHCP, then you must set the lease length for the iSCSI Initiator IP address to unlimited.
The DHCP IP Address displays the IP address settings. 4. Press Enter to select OK and Esc to return to the Network Configuration menu. Configuring a Static IP Address If there is no DHCP server available, you must statically configure an IP address by completing these steps: 1. From the Network Configuration menu, tab to Configure Static IP Address and press Enter. If you have a DHCP Enabled, a warning displays that the DHCP IP Address will be lost. Press Y to continue. 2.
4. Enter the Default Gateway information, if necessary. 5. Tab to Save and press Enter to save the settings and then press Y to confirm that you want to save the changes. 6. Press Esc to return to the Network Configuration menu. Configuring VLAN ID/Priority A Virtual Local Area Network (VLAN) is a way of partitioning the network. If the LAN is made up of all devices within a broadcast domain, a VLAN is a broadcast domain made up of switches.
• IP Address. The unique address that specifies the location of each device or workstation in the Network. This address is required for communication to the iSCSI SAN. An initiator with its own network interface must be assigned an IP address in the same range as the iSCSI SAN. • Subnet Mask. Provides a way of segmenting networks. All hosts (iSCSI initiators or targets) on the same physical network will usually have the same subnet mask.
Not all controllers have LEDs that are visible externally. If you are using an add-in card in a blade server environment, the Port Identification or beaconing feature will not work. Confirming network settings After you have configured the initiator, confirm the network settings to verify the connection to the network. You can do this easily with the ping feature. Ping verifies that the IP address is on the network.
• Check VLAN settings For more information on what to do if a target verification fails, see "Troubleshooting (on page 37)." Target discovery through DHCP If using target discovery through DHCP, you must add the root path to the DHCP server. When you have finished adding the root path to the DHCP server, you can enable the Discover Boot Target via the DHCP option through iSCSISelect.
Configuring and managing iSCSI targets iSCSI targets An iSCSI target is any device that receives iSCSI commands. The device can be an end node, such as a storage device, or it can be an intermediate device, such as a bridge between IP and Fibre Channel devices. Each iSCSI target is identified by a unique IQN, and each port on the controller (or on a bridge) is identified by one or more IP addresses. As the client system, the initiator initiates disk I/O.
Configuring an iSCSI target With iSCSISelect, you can easily configure an iSCSI target by selecting and enabling values on the Add/Ping iSCSI Target menu. From this menu, you can configure your target and perform a login to the target to establish your iSCSI network connection. Before you begin your login session, you must know the following: • iSCSI Target Name (only for manual configuration). The name of the target to be added. The iSCSI Target Name is not entered if you are using SendTargets discovery.
You must enable Boot Target after you have added the target via SendTargets (see the last step in this section). 6. Enter an ISID Qualifier, if needed. A unique ISID value is needed if you are connecting dual sessions to the same target portal group. You can enter a number up to 65535. For more information, see "Setting an ISID value (on page 23)." 7. If you want to enable Header Digest, tab to Header Digest and press Yes.
After you have added your targets, the iSCSI Target Configuration menu displays and you can view your newly added Target information. 14. If you set the Boot Target option (in an earlier step) before adding the target, Boot Target registers No on this menu. To enable Boot Target or make other changes to your target or targets, select the target and press Enter. The Edit/Ping iSCSI Target menu displays and from this menu, you can edit the target. Using manual configuration to add an iSCSI target 1.
4. Enter the TCP Port number (the default target port number is 3260). 5. Tab to Boot Target and select Yes, if you want to enable the target as a Boot Target. 6. Enter an ISID Qualifier if needed. A unique ISID value is needed if you are connecting dual sessions to the same target portal group. You can enter a number up to 65535. For more information, see "Setting an ISID value (on page 23)." 7. Tab to Header Digest and press Y if you want to enable Header Digest.
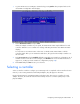
The following is an example of a target detail menu. Editing a target configuration After you have added a target, you can edit your iSCSI target configuration or apply other management options to your target. 1. From the iSCSI Target Configuration menu select a target and press Enter. The Edit/Ping iSCSI Target menu displays for the target you selected. From this menu you can view the properties for any target you have added and you can edit any of the properties displayed in the blue font. 2.
A unique ISID value is needed if you are connecting dual sessions to the same target portal group. You can enter a number up to 65535. See "Setting an ISID value (on page 23)." 4. If you want to enable the Header Digest, tab to Header Digest and press Yes. When set to Yes and the iSCSI Initiator is set accordingly, the integrity of an iSCSI PDUs’ header segment is protected by CRC32C checksum. No, is the default. 5. If you want to enable the Data Digest, tab to Data Digest and press Yes.
1. From the Controller Configuration menu, select iSCSI Target Configuration, then select Add New iSCSI Target. 2. Follow steps 2 -8 in "Configuring an ISCSI target (on page 18)." 3. From the Add/Ping iSCSI Target menu, tab to Authentication Method, and select One-Way Chap and press Enter. 4. Tab to enter the Target CHAP Name and Target Secret, and press OK. The Target CHAP Name and Target Secret can be any name or sequence of numbers over 12 characters but less than 16 characters.
The Target/Initiator CHAP Name and Target/Initiator Secret can be any name or sequence of numbers over 12 characters but less than 16 characters. However, the name and secret on the Target side must match the name and secret on the Initiator side. After you have successfully enabled the CHAP authentication, the Add/Ping iSCSI Target menu displays. Pinging a target Before you add a target, you may want to verify that you can connect to the target.
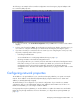
2. From the Ping Target menu, enter the IP address of the target you want to ping, tab to Ping and press Enter. 3. If your ping is unsuccessful you will receive a failed message. Otherwise, you are notified that your ping is successful. The following is an example of a Successful Ping. After you have added your target, you should see the target status as Connected on the iSCSI Configuration menu. If the target is listed as Disconnected, ping the target from the Edit/Ping iSCSI Target menu.
Displaying advanced target properties After you have logged into a target, you can display more information about that target in the advanced target properties. From the Edit/Ping iSCSI Target menu, tab to Advanced and press Enter. Configuring LUN settings A LUN represents an individually addressable logical device that is part of a target. An initiator negotiates with a target to establish connectivity to a LUN.
By pressing F3, you can set the Boot LUN if the target is a boot target. By setting the LUN to bootable you can confirm that you have the boot target configured properly and see from which LUN you are booting. By reviewing the LUN size, you can determine the LUN order. The target gives the LUN order in the LUN order listed. The BladeEngine 2 controller supports a maximum of 8 LUNs on a boot target. If you select LUNs further down on the list, the first LUN is used as the boot LUN.
Configuration data is erased for both ports on the selected controller. The Initiator Name and Boot support are global for all HP NC-Series ServerEngines adapters in the system. If you have more than one adapter and you erase the configuration on the first adapter, the Erase Configuration resets the initiator name and boot support back to their default values.
Configuring iSCSI boot support Setting up a basic iSCSI boot configuration This section provides an overview on how to set up a basic boot configuration. For more detailed information on setting up an iSCSI initiator and adding an iSCSI target, see "Configuring and managing the iSCSI Initiator (on page 8)" and "Configuring and managing iSCSI targets (on page 17)." 1. Log into HP NC-Series ServerEngines iSCSISelect by pressing Ctrl+S when prompted. 2.
6. From the Controller Selection menu, select your controller and port and press Enter. 7. After you have selected a controller, the Controller Configuration menu displays. Tab to select Network Configuration and press Enter. 8. Set up an IP Address by either enabling DHCP or setting up a Static IP Address. If using target discovery through DHCP, add the root path to the DHCP server and enable DHCP discovery through iSCSISelect. To enable DHCP, o Tab to DHCP , select Enabled, and then press Enter.
o If you have a Static IP Address configured, a warning displays that the Static IP Address will be lost. Press Y to continue. Or, to enable a Static IP Address, 9. o From the Network Configuration menu, tab to Configure Static IP Address and press Enter. o If you have DHCP Address configured, a message displays that the DHCP address will be lost. Press Y to continue. o Enter the IP address and the Subnet Mask. o Enter the Default Gateway, if needed. o Tab to Save and press Enter.
16. Tab to Save/Login and press Enter. If the firmware logs in the target, a Login Successful message is displayed. The iSCSI Target Configuration menu displays with the newly added Target information. 17. After you have successfully configured the iSCSI initiator and target, reboot the system.
Setting up an iSCSI MPIO boot configuration iSCSI MPIO boot MPIO support allows the initiator to login dual sessions to the same target. In this way I/O can be sent over either TCP/IP connection to the target. If one connection fails another connection can continue processing I/O without interruption to the application. In iSCSI target configuration, you have the option of setting dual network paths to a single boot LUN.
e. Select the same LUN you chose for your initial boot LUN, then press F3 to set it to bootable. 10. After Linux boots up, the MPIO installs drivers on the second path and then prompts you to reboot. Reboot the system. Windows Server 1. Log into HP NC-Series ServerEngines iSCSISelect by pressing Ctrl+S when prompted. 2. Log into a target from one HBA and configure it for boot by following the steps in "Setting up a basic iSCSI boot configuration (on page 30).
3. If iSCSISelect is configured properly, a message displays at boot that the iSCSI disk was successfully connected. 4. Install an ESX Server 3.5 operating system over the iSCSI LUN. 5. After ESX Server is installed, install MPIO software and reboot the system. ESX Server is set to MPIO by default. 6. Using iSCSISelect add an additional boot path to the same iSCSI LUN. To do this, follow these steps: a.
Troubleshooting Problem Solution 1 ServerEngines iSCSI BIOS banner is not displayed during system post Go to your motherboard BIOS configuration and make sure that Option ROM is enabled is set for the PCI-E slot into which the BladeEngine 2 board is inserted. 2 Unable to Ping iSCSI target IP address • Check cable connections and make sure they are securely connected at both ends. Make sure the link light is on at both ends of the cable.
Problem Solution a bootable LUN, then refer to the solutions provided in #5. 7 If Problems 1-3, and 5-6 all fail Use the iSCSISelect utility to erase the Controller Configuration. • From the Controller Configuration menu select Erase Configuration, then press Enter. • A message appears asking if you want to erase the current configuration. Press Y. • You are cautioned that the operation removes any existing configuration permanently. Press Y.
Technical support Before you contact HP Be sure to have the following information available before you call HP: • Technical support registration number (if applicable) • Product serial number • Product model name and number • Product identification number • Applicable error messages • Add-on boards or hardware • Third-party hardware or software • Operating system type and revision level HP contact information For the name of the nearest HP authorized reseller: • See the Contact HP worldwi
Acronyms and abbreviations ACL Access Control List CHAP Challenge Handshake Authentication Protocol DHCP Dynamic Host Configuration Protocol DNS domain name system HBA host bus adapter ICMP Internet Control Message Protocol IPsec IP Security protocol iSCSI Internet Small Computer System Interface LUN logical unit number MAC Media Access Control SAN storage area network TCP/IP Transmission Control Protocol/Internet Protocol Acronyms and abbreviations 40
VLAN virtual local-area network Acronyms and abbreviations 41
Index A L adding iSCSI targets 17 LUN settings 27 B M boot support 9 booting 28 MPIO 34 C configuring iSCSI devices 17, 18 configuring VLAN IDs 13 Connecting to the iSCSI target 28 controller 9 controller configuration 9, 10 controller selection 9 D DHCP, enabling 10, 16 discovering targets 16 N network configuration 10, 15 O overview 5, 7 P PING 25 port identification 13 port LED 13 R E removing a target 28 editing a target 22 enabling DHCP 10, 16 S G gateway IP 10, 13, 30 H SAN configu
Index 43