NetMail/3000 Menu Interface Users Guide Menu Interface 2-1
NetMail/3000 Menu Interface Users Guide What You Need to Know About Sending Electronic Mail For mail users, NetMail/3000 tries to provide a user interface for the computer novice, as well as shortcuts for the computer pro. Most commands are available via the terminal function keys on HP terminals as well as being enterable (with appropriate shortcuts) from the keyboard.
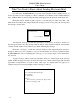
NetMail/3000 Menu Interface Users Guide To provide uniformity, standard office memos usually begin with headings something like you see on this memo. Though most people don’t begin personal letters like this, businesses often adapt these headings to aid in filing the messages for future reference, and to allow quick and accurate scanning of the messages to determine their priority.
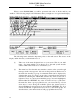
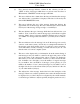
NetMail/3000 Menu Interface Users Guide When you run NetMail/3000, you will be presented with a list of all the mail in your “mailbox”. The following sample screen illustrates what you might see on a typical mail display: The following items outline the important points on the mail screen. The arrows on the display outline the areas you should take note of: 2-4 (1) Take note of the name displayed here on your screen.
NetMail/3000 Menu Interface Users Guide (3) New (unread) message indicator column. In this column you will see “NEW” in front of messages which have not yet been read. Note that on HP terminals, “URGENT” unread messages will blink. (4) This arrow indicates the column where the date and time that the message was delivered into your mailbox is displayed. The date is followed by the time in HOUR:MINUTE format.
NetMail/3000 Menu Interface Users Guide What Are Mail Addresses? Mail addresses come in many different types and forms. NetMail/3000 uses mail addresses that look like this: johndoe@mysys.admin.ourcorp ^ ^ Mailname | Host computer name Your mail address will look something like this. You will find your mail address displayed in the upper right corner of your terminal display whenever you are in the NetMail program. Most other mail addresses you will encounter will look something like this format also.
NetMail/3000 Menu Interface Users Guide Running the NetMail Program The first thing you need to know is how to start up NetMail. For MPE users you merely enter: :RUN NETMAIL.SYS.THREEK If you see a “[NetMail/INBOX]” when you start up NetMail/3000, then you are in “command mode.” To change your display to “menu mode” (this manual deals with the menu mode interface) enter the command “SET MODE=MENU” and hit return (leave off the quotes).
NetMail/3000 Menu Interface Users Guide Basic Operations Whenever you run NetMail/3000 in menu mode, you will see the menu bar painted across the top of the screen, and a message display area below where messages in the current folder are listed. For those of you used to standard applications on HP3000s, you need to be aware that NetMail/3000 actually lets you use the terminal’s arrow keys (up, down, left, right) - you may not be used to using these in an HP3000 application.
NetMail/3000 Menu Interface Users Guide The ALT Key Something PC users may find more intuitive is the separation of the menu bar and the window below. On PCs you typically use the “ALT” key to toggle between the menu bar and the application window; since we don’t have “ALT” keys on HP terminals (and on PCs running emulation packages we still don’t have access to it from the HP3000) we use a function key to simulate it.
NetMail/3000 Menu Interface Users Guide Cursor Keys In the message display area, you use the arrow keys (up/down) to point to the message you want to “operate” on (read, delete, whatever).
NetMail/3000 Menu Interface Users Guide Function Keys You’ll notice some special function keys while you are in the message display area. The function keys you will see include the “HELP” key (f1), “Zoom In<->Out” (f2), “Menu Bar” (f3), “Delete Message” (f4), “Refresh” (f5), “Tag this Message” (f7), and “EXIT” (f8). First and foremost, the “HELP” key functions at any point while in the program, and will pop up a window describing where you are and what is expected.
NetMail/3000 Menu Interface Users Guide Message Options Once you activate the menu bar, the first selection you encounter are the message options. This is a pull-down menu (when you get to it, use the down arrow or RETURN key to view the menu). Under this selection are the NetMail/3000 commands relating to sending and processing messages in your current folder. Options to send, delete, file, etc.
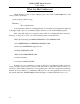
NetMail/3000 Menu Interface Users Guide Compose/Send Message The first selection under message options is “Compose/send”. This is the selection you use to actually compose and/or send a message. Notice that the “fast select” character for this option is “C” (the underlined character in the selection). This means you can merely type a “C” when the menu is pulled down to invoke this option.
NetMail/3000 Menu Interface Users Guide This box will pop-up over your message display and prompts you to provide information about the message you want to send. The first field you encounter is the “message subject”. You can enter any text you want in this field (or leave it blank, but the subject is useful to recipients reviewing the message). When you have entered the text you want in the subject field, hit the “RETURN” key to move on to the next field.
NetMail/3000 Menu Interface Users Guide If you specified “8BIT” as the “Type”, you must now select an “Encoding”. The default encoding for “8BIT” messages is the MIME standard “Quoted Printable” encoding. The technical description of how this works is involved, but basically you only need to remember that you will normally choose “Quoted Printable” encoding when sending messages with non-english (8-bit) characters in them.
NetMail/3000 Menu Interface Users Guide MPE filename (traditional MPE syntax or Posix/HFS syntax if you are on MPE/iX 4.5 or later). If the “On” field specifies “PC” then you may enter a fully qualified path and filename for the file to be retrieved off your PC (or Macintosh).
NetMail/3000 Menu Interface Users Guide signature file specified but specified that it must ALWAYS be included, the “Add Signature” field will also be skipped over, but will be turned on (an “X” in it). If you specified a signature file but did not specify that it ALWAYS be used, the “Add Signature” box will be enabled by default, but you can turn it off (by typing a space over it). The next field on the screen is the “Attachments” box.
NetMail/3000 Menu Interface Users Guide If you selected USTEXT then you’re done here, and you will proceed too either compose your message or attach files.
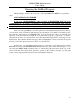
NetMail/3000 Menu Interface Users Guide When you are done composing the message (or supplied a filename in the Send Mail window above) you will then be prompted with the “Attach Files” window pictured above. At this point you have composed a message in the editor (or provided an external message) and you now have the option of attaching other files to the message before sending it.
NetMail/3000 Menu Interface Users Guide After providing a filename (and specifying PC or HP for the source) you will be asked to pick a description for the file from the list available (the “TYPE” of the attachment file). This allows NetMail/3000 to decide how the file should be “encoded” (and if it in fact needs to be encoded) for transport to its destination.
NetMail/3000 Menu Interface Users Guide This field describes how the attachments you just specified will be “encoded” to meet the e-mail standard requirements (non text messages must be encoded somehow to be transported over a network).
NetMail/3000 Menu Interface Users Guide After you have selected the encoding (for any value other than “NONE”) you will be presented with the “Emulator” field. The “Emulator” selections are only relevant if you are attaching an HP3000 (non text) file. For any other file type, use the default of “None”. For HP3000 files, NetMail/3000 must add special “characteristics” of the file - information that is unique to HP3000s - but must be preserved to transport (and reconstruct) the attachment on another system.
NetMail/3000 Menu Interface Users Guide selecting the “DONE” field. Once you are done specifying file attachments, you then proceed to the prompt for message recipients.
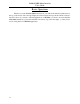
NetMail/3000 Menu Interface Users Guide Recipients Here you will be prompted to enter the ids of mailboxes to send the message to. Recipients of mail messages fall under three categories: To: (Primary) Recipients: NetMail/3000 prompts for the primary recipients of each message first. At the “To:” prompt, you enter mail ids (or foreign mail addresses) of users to receive the message. These recipients will be listed first in the heading of the message sent to everyone.
NetMail/3000 Menu Interface Users Guide Help Finding Mail Names At any To:, Cc:, or Bcc: prompt you may enter a question mark or use the function key labelled “Search for Name” (f2), and you will be prompted for a search criteria and will be provided a list of mailbox names (and potentially mailing list names). The search value will be used to scan the mail database for any user information containing the string you specified.
NetMail/3000 Menu Interface Users Guide look something like this: You can then choose from the names listed in the selection window. Use your arrow keys to move up or down the display til you have the choice you want highlighted, then hit “RETURN” to accept that name and add it to the list of recipients. After the message is submitted, it begins its electronic journey.
NetMail/3000 Menu Interface Users Guide Delete Message At some point, after reading mail in your mailbox, you’ll need to delete old messages. While you are free to keep important messages for any amount of time (even after you have read them), because there is limited space in the mail database and all users share this database for mail storage, you will need to delete old messages at some point. The “DELETE” option is used to remove mail messages from your mailbox (and the mail database).
NetMail/3000 Menu Interface Users Guide a file or “SAVE Attachment” to save selected parts of messages. After copying them to file(s), you can then delete the message(s) from your mailbox (and thus free up space for new messages) while still keeping a copy of important messages on the system. For those messages which you desire to keep for future reference, filing the message in another folder may make your mailbox easier to manage. See the “File Away” command and folder options later in this chapter.
NetMail/3000 Menu Interface Users Guide File Away Message Messages in the mailbox can be “filed” into other folders with the “File Away” command. By default, incoming messages are placed into the system folder “INBOX”. However, to aid in the management and tracking of potentially large amounts of held mail messages, NetMail/3000 allows the user to create as many “mail folders” as he or she wishes.
NetMail/3000 Menu Interface Users Guide Forward Message You may send on an exact copy of a message in your mailbox to someone else with the “FORWARD” command. Forwarding a message makes a copy of a message you have received in your mailbox and sends that copy on to another person (or people) you specify. You can forward a specific message to as many people as you like. The “FORWARD” command operates on the current (highlighted) message.
NetMail/3000 Menu Interface Users Guide The first field you encounter is the “Subject” field. This will already contain “Fw:” (an abbreviation for a forwarded message) followed by the subject of the message you are forwarding. You are free to type over and modify the subject if you wish. The “On” and “Filename” fields are pre-filled in with information about the message being forwarded and cannot be edited here.
NetMail/3000 Menu Interface Users Guide If you specified that you wanted to attach files, you will get the “attach file” box where you can specify the file(s) you want to attach. See the discussion of the “Compose/Send” command for details on the file attachment process. You will be prompted for (To, Cc, and Bcc) until you are done (entering “//” without the quotes or just hitting the RETURN key until you get return to the message window).
NetMail/3000 Menu Interface Users Guide Print Message To actually print a copy of any message(s) in your mailbox, use the “PRINT” command. This will print a copy of the message(s) that you specify on the printer that is designated for you (see the SET PRINTER command). Only the text portion of messages are printed (i.e. not nontext attachments).
NetMail/3000 Menu Interface Users Guide Read Message There are two means of reading messages listed on the current display. The first and simplest, is to simply highlight it (using the arrow keys) and hit “RETURN”. This will display the contents of the current message for you, after which you will be returned to the message list. The other way to read a message (or several at a time) is to activate the menu bar, pull down the message menu, and select the “READ” option.
NetMail/3000 Menu Interface Users Guide rarily by hitting the “CNTL S” (control S) key sequence, and resume with the “CNTL Q” (control Q) key sequence. In addition, you may end the listing of a mail message by hitting the “CNTL Y” (control Y) key sequence. You may also have NetMail/3000 pause after displaying each “screen” full of text whenever you read mail by setting the “PAUSE” option (see “SET PAUSE” under the Display menu, described later in the manual).
NetMail/3000 Menu Interface Users Guide Reply to Message It is common in electronic communications to receive a message from someone which you wish to respond to. This might be a message from an individual discussing a particular topic, or a message from a mailing list or discussion group to which you would like to respond or add some comments.
NetMail/3000 Menu Interface Users Guide At this point, you will be placed in your selected editor where you can edit, delete, or add to the text of the original message.
NetMail/3000 Menu Interface Users Guide After completing this form, you are placed at the same “To:” prompt as when you normally send a message, except you will notice that NetMail/3000 already provided one recipient for you, NetMail/3000 automatically determines the “address” to reply to based on Internet rules and the message headers in the message you replied to (if there are more than one choice, you will be presented with a window listing the different potential reply-to addresses and you will be allow
NetMail/3000 Menu Interface Users Guide Write to File To save a copy of a message as a permanent disc file you may use the ‘Write to file’ command. This command makes a copy of the mail message and writes it to a disc file that will be created for you. This command only writes the text part of the message to the file - if there are any non-text attachments with the message, an indicator will be included in the file that “there was a non-text attachment here”, but the attachment will not be copied.
NetMail/3000 Menu Interface Users Guide You now need to select where the message(s) you are writing will be written to. You first need to specify if the file will be “On” the HP3000 (HP) or on your PC or Mac (PC). Of course, if you’re using an HP terminal, you won’t need to select HP or PC and the field will be set to “HP” automatically and the field will be skipped over.
NetMail/3000 Menu Interface Users Guide Save Attachment You can extract and save a file that is attached to a mail message with the “Save Attachment” command. As you read a message, you will see special blocks denoting that there is an “attached” file at that point in the message. Attachments are listed with the “name” of the attached file (if available) and each attachment is numbered.
NetMail/3000 Menu Interface Users Guide When saving an attachment to the HP3000, the file will automatically be converted to either 1) its original format if it was an HP3000 file originally, or 2) a text file if it is a plain text attachment, or 3) a binary file in all other cases. As with other options, you have the choice of saving the attachment to the HP3000’s disc, or, if you are using a terminal emulator, saving the attachment directly to the PC or Macintosh.
NetMail/3000 Menu Interface Users Guide will then be prompted with one more selection: Select “Binary” or “Ascii” for the file “Type”, as appropriate for the attachment you selected. Ascii should be used only for plain text attachments, while “Binary” should be used for all other types of file attachments. After choosing the appropriate option, hit the “RETURN” key, at which point the message attachment will be saved where you specified.
NetMail/3000 Menu Interface Users Guide Option Selections The Options menu selection groups mail configuration and other commands. By selecting and “pulling down” this menu (use the left or right arrow keys to highlight the “Options” item then use the down arrow or “RETURN” key to view the menu).
NetMail/3000 Menu Interface Users Guide (Set) Signature NetMail allows each user to create what Internet mailers refer to as “signature” files. This is a file containing the user’s name, e-mail address, and optionally company name, telephone number, or any other information relevant to people whom you might send electronic mail to. (Many users also include humorous anecdotes in their electronic signatures.
NetMail/3000 Menu Interface Users Guide worldwide. Signature files must be created (with your favorite file editor) and kept in a group that you will have read access to when you run NetMail. Files can be as long as you like (though very long signature files tend to annoy mail users and eat up network bandwidth) and should be ascii files with a record size up to 80 bytes per record. The file must remain available (it is NOT loaded by the mail system until each time it is accessed).
NetMail/3000 Menu Interface Users Guide Verify Delete You may select whether you want to be prompted for verification when you delete a mail message by setting the “VERIFYDELETE” ON. If ON, then whenever you delete a message you will be prompted to verify that you really want to delete that message. If OFF, then deletes occur automatically when you specify and there is no further prompting. The current setting of the verify delete option is displayed to the right of the selection.
NetMail/3000 Menu Interface Users Guide (Set) Printer Whenever you choose to print a message on a printer, NetMail/3000 automatically sends the message to the printer which has been designated as the output device for your mail user. You will see the current setting of your print device by selecting “Printer” under the “Options” menu.
NetMail/3000 Menu Interface Users Guide (Set) Notification You can specify the type of message notification (how you are notified when new mail arrives for you) and what type of messages you want to be notified of by setting the NOTIFY option. By selecting the “Notification” selection under the Options menu, you can both view and change the setting of your mail notification.
NetMail/3000 Menu Interface Users Guide sages only for URGENT mail (no message if “QUIET” and not URGENT) 2-50 4= Always use interruptive mail notification (URGENT or normal) 5= Notify users with interruptive message for URGENT mail, no notification for normal priority mail messages
NetMail/3000 Menu Interface Users Guide (Set) Editor The file editor you use to edit and compose messages can be set with the “EDITOR” command under the Options menu or by the mail system administrator. You may set the editor yourself to any allowable editor, though certain restricted editors can only be assigned by the mail systems administrator. By default, NetEDIT is established as the editor for message composition (unless changed by the mail administrator). Also, EDITOR (HP’s EDITOR.PUB.
NetMail/3000 Menu Interface Users Guide (Set) Auto Spell Checking You may select whether you want to be prompted for spell checking when you send a message by using the “AUTOSPELL” setting under the Options menu. This only applies if your system has a spelling checker available and it has been set up by your mail system administrator, in fact, you won’t even be able to select it if you do not have a spelling checker installed and set up by your mail system administrator.
NetMail/3000 Menu Interface Users Guide (Set) Password You may change or initially set a password to protect access to your mailbox with the “PASSWORD” selection under the Options menu. Once a password is set, any attempt to gain access to your mailbox (when NetMail/3000 is run) will result in the user being prompted to enter the appropriate password. If the correct password is not supplied, access to the mail system will not be granted.
NetMail/3000 Menu Interface Users Guide (Set) Language Each user can select their own language of choice for their user interface by choosing the “LANGUAGE” option. If there are other language catalogs available on your system (you will be presented a list of the available languages when you select the “LANGUAGE” selection) you can select any language catalog you wish. All prompts and commands will then be presented and parsed in that language.
NetMail/3000 Menu Interface Users Guide (Set) Auto Reply If you have been “allowed” by the mail administrator, you can disable the automatic read receipt function of NetMail/3000. Normally, when you read a message that has been sent with a “read receipt” requested, the mail system automatically generates the return message confirming that you have read the specified message.
NetMail/3000 Menu Interface Users Guide Mailbox Names You can search for mailbox names (without having to actually compose or send a message) with the “MAILBOX NAMES” choice under the Options menu.
NetMail/3000 Menu Interface Users Guide Spellcheck a File If you have a spelling checker installed on your system and enabled in NetMail/3000, you can spell-check any file by using the “SPELLCHK A FILE” command. You provide a filename to spell check, and the spelling checker on your system will be invoked to process that file. Each spell checker works slightly different, but basically you browse through the file, being prompted to correct or ignore spelling errors as they are encountered.
NetMail/3000 Menu Interface Users Guide Display Selections Under the Display menu choice you will find options which control various aspects of how messages (and the list of messages) are displayed for you. Below, we’ll describe each selection.
NetMail/3000 Menu Interface Users Guide (Set) Pause Display “PAUSE” determines whether NetMail/3000 will automatically pause the display when reading mail messages at 23 line intervals. The pause (if set) will stop the output of a message being read every 23 lines and prompt you to stop the display, display one more line, one more page, or the rest of the message without further interruptions. The current setting for “Pause” is displayed in the menu following “Pause”.
NetMail/3000 Menu Interface Users Guide (Set) Headings By default all mail messages are listed with many lines of “header” information. These include the standard headers such as “From”, “To”, “Date”, “Subject”, and “Cc”, as well as potentially many others.
NetMail/3000 Menu Interface Users Guide (Set) Auto MultiMedia The ”AUTO MM“ setting controls the handling of multimedia attachments to mail messages. See the discussion of multimedia enhancements at the end of this chapter for details, but you can designate whether multimedia attachments which your PC can handle are automatically downloaded and launched when you read the message they are “attached” to with the setting of this command.
NetMail/3000 Menu Interface Users Guide (Set) Listing The listing setting determines what (if any) messages in the current folder are automatically displayed in the message window. It can be set such that all messages in the current folder are listed, or that only unread messages are listed. Listing can be ALL, where all messages in the current folder are listed; and NEW, where only new (unread) messages are listed.
NetMail/3000 Menu Interface Users Guide (Set) Interface NetMail/3000 supports two separate interface types - the PC style menu interface which this manual describes, and a command line interface (also used in batch mode operations). If you wish to switch to the command line interface you can use the “Interface” option under the Display menu. Move the cursor to the Interface item and hit “RETURN” to switch the program into command line mode.
NetMail/3000 Menu Interface Users Guide (Set) MIME By default, NetMail/3000 understands the MIME standard for encoding message attachments. The “MIME” Display option, however, allows the user to disable MIME encoding (when reading messages) temporarily. This option is for debugging and its use is discouraged, but it can allow a malformed MIME message (possibly from a broken MIME mailer somewhere) to be viewed in raw form.
NetMail/3000 Menu Interface Users Guide (Set) Uuencode By default, NetMail/3000 understands UUENCODED message attachments. The “UUENCODE” Display option, however, allows the user to disable the interpretation of UUENCODED message attachments (when reading messages) temporarily. This option is for debugging and its use is discouraged, but it can allow a malformed attachment (possibly from a broken mailer somewhere) to be viewed in raw form.
NetMail/3000 Menu Interface Users Guide (Set) Binhex By default, NetMail/3000 understands BINHEX message attachments. The “BINHEX” Display option, however, allows the user to disable the interpretation of BINHEX message attachments (when reading messages) temporarily. This option is for debugging and its use is discouraged, but it can allow a malformed attachment (possibly from a broken mailer somewhere) to be viewed in raw form. Binhex is a format commonly used by Macintosh computers.
NetMail/3000 Menu Interface Users Guide Folder Selections Once you start accumulating large numbers of messages in your mailbox, you may find it useful (or even necessary) to start organizing them into groups. NetMail/3000 provides “folders” for this purpose. Folders hold messages in your mailbox and organize them into logical groups. You create whatever folders you like (assign each folder a name) and then “File” messages into the appropriate folder.
NetMail/3000 Menu Interface Users Guide Goto (Folder) You may change the current mail folder with the “GOTO” command under the folders options. The “current” folder is the one from which you are viewing messages - if you have not changed it, every time you start up NetMail/3000 you begin in the “INBOX” folder. You may switch to any folder you have created or the default folder “INBOX”. The folder name is displayed in the status area below the message list on your screen.
NetMail/3000 Menu Interface Users Guide Create (Folder) You can create a new mail folder with the “CREATE” command. Mail folders can be any string of continuous characters (up to 16 characters long) including any printable special characters, all of which are automatically upshifted. You will be prompted to supply a name and a description for the folder (which will be available whenever you “GOTO” another folder in the list that is provided for you).
NetMail/3000 Menu Interface Users Guide Destroy (Folder) You can destroy (delete) an empty mail folder with the “DESTROY” command. If you have mail folders which you no longer need, you can delete them with the “DESTROY” command. The folder must exist and must be empty -- it cannot have any messages filed in it or it will not be deleted. All created folders use some disc space, so it helps all if unused folders are removed when they’re no longer needed.
NetMail/3000 Menu Interface Users Guide Mailing List Selections Anyone used to electronic communication can appreciate the usefulness of “mailing lists”. A mailing list is a list of electronic mail addresses grouped under one “name”. Each list can have only one, or it can have several hundred members.
NetMail/3000 Menu Interface Users Guide Add (Mailing List) You may have noticed that some electronic mail addresses can be long and difficult to remember. To help you in remembering these names, you can create “mailing lists” which contain one or more full electronic addresses, all conveniently referenced by a “list name” which you define. Mailing list names can be up to 16 characters long. You create a mailing list with the “ADD” mailing list command.
NetMail/3000 Menu Interface Users Guide ence the list by using it when sending a message. You can view the entries you have entered on a list at any time with the “EXPAND” command, and can add or remove entries from a list with the “EDIT” mailing list command.
NetMail/3000 Menu Interface Users Guide Remove (Mailing List) You get rid of private mailing lists with the “REMOVE” command. When you select the “REMOVE” mailing list command, you will be provided with a list of all your private mailing lists, and you can then select the list that you want to delete (use the arrow keys til you have the proper entry highlighted). The mailing list will ONLY be deleted if there are no more entries on the list (just in case you accidentally try to remove it).
NetMail/3000 Menu Interface Users Guide Edit (Mailing List) When you need to add addresses to a private mailing list, remove names from a list, or modify names on a mailing list, use the “EDIT” maillist command. When you select the EDIT command, you will be presented with a list of all the mailing lists you own and you can then select one of the mailing lists to work on (using the arrow keys until the list you want is highlighted).
NetMail/3000 Menu Interface Users Guide doesn’t have any entries in it yet. As you see above, you are prompted to enter a mailing list address to be added to the list. The address can be long, thus the field is four lines long. After the e-mail address, you can enter the “real name” of the person whom you are adding to the list. The “real name” is used only as a descriptive comment for you to identify the address.
NetMail/3000 Menu Interface Users Guide : You now get a list of the names and addresses already on the list, and can select one of the entries to change (by using the arrow keys to move the current record pointer until that entry is highlighted), you can delete the entry you have highlighted (by hitting the “Delete Entry” function key (f3)), or you can elect to add another entry to the list (with the “Add a New User” function key (f4)).
NetMail/3000 Menu Interface Users Guide Subscribe (Mailing List) NetMail/3000 supports three types of mailing lists; private, system, and public. Public mailing lists are created by the mail administrator, but any mail user can join them with the “SUBSCRIBE” command. Once you have subscribed to a mailing list, you will then get copies of all messages sent to that list.
NetMail/3000 Menu Interface Users Guide Unsubscribe (Mailing List) To remove yourself from a public mailing list you are subscribed to use the “ UNSUBSCRIBE” mailing list command. When you select the Unsubscribe command, you will be presented with a list of all the public mailing lists which you belong to - simply select the one you want to unsubscribe from by using the arrow keys then hit ‘RETURN” or the “Select List” function key (f6).
NetMail/3000 Menu Interface Users Guide Expand (Mailing List) You may view the members of any public or system mailing list, or a list which you own with the “EXPAND” command under the Mailing List options.
NetMail/3000 Menu Interface Users Guide lists, and then hit the “Cancel” (f8) key to return to the menu. In this example, we selected the mailing list called “FRIENDS” to expand. You then see the window overlay pop-up that lists the three members of the mailing list. If there were more entries, you could scroll up and down the list (with the arrow or page-up/page-down keys) to view all the entries on the list.
NetMail/3000 Menu Interface Users Guide Show All (Mailing Lists) You can display all the available mailing lists (all those lists that you could use as recipients for a message) with the “Show All” mailing list command. This will present you with a list of all the public, system owned, and (your own) private mailing lists - basically the same listing as you would get from the expand command though here you only get a list of the mailing list names.
NetMail/3000 Menu Interface Users Guide Help An important feature of NetMail/3000’s pc-style menu interface is the on-line help subsystem. You can browse through the help contents by selecting the “Help” menu topic which will present you with the main help window, allowing you to jump to other topic areas of interest.
NetMail/3000 Menu Interface Users Guide program where you left off. You can select the “Index” key at any point to return to the main help index window.
NetMail/3000 Menu Interface Users Guide Exit By selecting the “Exit” menu option, you will end the program, returning you to the MPE prompt (or menu system - or whatever you were in before running NetMail/3000).
NetMail/3000 Menu Interface Users Guide NetMail in Batch Jobs NetMail/3000 can be easily invoked in batch jobs by simply invoking the NetMail/3000 user agent (NETMAIL.SYS.THREEK) and providing input for the prompts which are generated. If only one command is to be executed, the command can be provided via the “INFO=” parameter, which will cause NetMail to process the single command (prompting for whatever information it needs) then to automatically terminate.
NetMail/3000 Menu Interface Users Guide prompts in your batch job.From the previous example, we’ll go through the sample job line by line. 1)!JOB user.acct1 2)!RUN NETMAIL.SYS.THREEK;INFO=”SEND” 3) 4)ADD 5)This is a sample message which came from a batch 6)job! enjoy. 7)// 8)E 9) 10)Message subject... 11)MANAGER 12)// 13)!EOJ Line 2 actually runs the NetMail/3000 user agent. The INFO string provided here tells NetMail/3000 to send a message, then terminate.
NetMail/3000 Menu Interface Users Guide nate. Note that in line 12 we used the “//”, which terminates the list of all recipients (a shortcut) and ends the command. This saved a few blank lines but the blank lines could also have been used. The “////” would not normally be used in batch mode, as it cancels the message entirely, even cancelling any recipients al- ready entered. (It corresponds to the “CANCEL MESSAGE” function key.
NetMail/3000 Menu Interface Users Guide Programmatic Access NetMail/3000 can be invoked as a son process to send electronic messages or files under programmatic control. The rules are similar to those used for batch processes - invoke the program NETMAIL.SYS.THREEK (with an appropriate INFO= parameter if necessary) and supply it the input fields it will need when processing the commands.
NetMail/3000 Menu Interface Users Guide MultiMedia Mail NetMail/3000 adds some exciting new multimedia features for users of Reflection for Windows. Using the MIME standard for encapsulating non-text message parts, NetMail users can not only send multimedia messages, but can even have their contents displayed or invoked automatically when the message is read.
NetMail/3000 Menu Interface Users Guide 1) A personal computer with a 386 or later microprocessor. 2) Microsoft Windows, running in 386 enhanced mode (not standard mode). 3) WRQ’s Reflection 1 for Windows. (Version 4.0 or later adds some additional capabilities, but earlier versions will work.) 4) You will need programs/applications on your PC to handle the message attachments you wish to process (i.e.
NetMail/3000 Menu Interface Users Guide MultiMedia Installation and Setup To process multimedia messages on your PC, special software is required. This software is provided with NetMail/3000, and will install automatically for you once you tell it to. To tell NetMail/3000 that you want the multimedia software installed on your PC, you need to add a special “variable” to your AUTOEXEC.BAT file, somewhere before the line that invokes MS Windows (if you run Windows from your AUTOEXEC.
NetMail/3000 Menu Interface Users Guide MultiMedia Operation Once you have set up the multimedia functions in NetMail/3000, you are ready to process messages with multimedia attachments. Of course, you might just be asking, “just what IS multimedia?” and “what would I use that for?” Both are good questions, and a good understanding of the answers could radically change the way you work with electronic mail. Multimedia means “more than one media.
NetMail/3000 Menu Interface Users Guide processed automatically; OFF causes a prompt to be displayed, and you are offered the option of processing the attachment or skipping it. To “send” a multimedia message attachment, you simply “attach” a pc file to any message you compose (at the “ATTACH FILE?” window). Specify a fully qualified PC file name (a filename with an appropriate extension). If you send a .WAV file but the file is named soundz.jnk (not .
NetMail/3000 Menu Interface Users Guide MultiMedia Customization When the NetMail/3000 PC software installs, one of the processes scans the MS Windows control file (WIN.INI) to get an idea of the types of applications you have installed on your PC. NetMail/3000 generates a list of the file types and applications which process them in a compressed (but readable) format in a file called NMLAUNCH.INI in the directory you defined in with the NETMAILMM variable (C:\NETMAIL by default).
NetMail/3000 Menu Interface Users Guide installation process and you might want to add the following line to the NMLAUNCH.INI file: wav = soundrec.exe This will allow NetMail/3000 to process .WAV files attached to messages and pass them to the PC to be played.
NetMail/3000 Menu Interface Users Guide Special Terminal Types If you need to run NetMail/3000 and you are connecting to the HP3000 over an X.25 network or use a terminal type other than the default (termtype 10), you will notice that NetMail/ 3000 treats your terminal as a non-HP terminal and will not use HP escape sequences necessary to handle some of the special display enhancements NetMail/3000 usually uses.
NetMail/3000 Menu Interface Users Guide HP AdvanceLink Terminal Emulator For users running HP’s Advancelink for DOS terminal emulator, there are some special setup steps you need to perform in order to be able to allow NetMail/3000 to automatically upload and download files between the HP3000 and your PC.
NetMail/3000 Menu Interface Users Guide Minisoft’s MS92 Terminal Emulator For users running Minisoft’s MS92 terminal emulator, there are some special setup steps you need to perform in order to be able to allow NetMail/3000 to automatically upload and download files between the HP3000 and your PC. If you do not take these steps, you will still be able to run NetMail/3000 and have all the capabilities of an HP terminal, but will not have the option of attaching files from your PC or saving them to the PC.
NetMail/3000 Menu Interface Users Guide Unison Software’s Business Session Terminal Emulator Users running any current version of Unison Software’s Business Session terminal emulators for Windows or Macintosh will not need to perform any special setup (other than that mentioned in the multimedia installation section earlier).
NetMail/3000 Menu Interface Users Guide WRQ’s Reflection Terminal Emulator Users running any of WRQ’s Reflection 1 or Reflection 7 terminal emulators will not need to perform any special setup (other than that mentioned in the multimedia installation section earlier). All capabilities are automatically enabled and all current Reflection software versions are automatically recognized by NetMail/3000 whether using a serial or a network connection.
NetMail/3000 Menu Interface Users Guide 2-102