HP NetServer LC User Guide m HEWLETT« PACKARD HP Part Number 5965-2494 Printed November 1997
Notice The information contained in this document is subject to change without notice. Hewlett-Packard makes no warranty of any kind with regard to this material, including, but not limited to, the implied warranties of merchantability and fitness for a particular purpose. Hewlett-Packard shall not be liable for errors contained herein or for incidental or consequential damages in connection with the furnishing, performance, or use of this material.
Contents 1 Installation Overview............................................................................................... 1 Verify Contents.............................................................................................................................. 1 View the Readme File...................................................................................................................1 Test the System Hardware (Optional)..................................................................
Information Assistant Overview................................................................................................. 27 Using Information Assistant........................................................................................................27 Getting Help............................................................................................................................ 27 Finding Information........................................................................................
Power Supply...............................................................................................................................54 Acoustic Emissions......................................................................................................................55 B Regulatory Information......................................................................................... 57 Regulatory Notices - Electromagnetic Compliance.................................................................
other Countries....................................................................................................................... 75 Self-HelpTools..............................................................................................................................75 Supplemental Warranty Service and Support.......................................................................... 76 Notice for Consumers in Australia:..............................................................................
1 Installation Overview This chapter contains simplified setup information about your HP NetServer LC II. For complete setup instructions, consult the HP NetServer LCII Installation Road Map. Verify Contents Unpack and verify the contents of the shipping box against the Contents Checklist included with your HP NetServer. If anything is missing or damaged, contact your reseller.
Chapter 1 Installation Overview 1. If you are not already running HP Navigator on the HP NetServer LC II, boot the HP NetServer LC II from the HP Navigator CD-ROM: a. Press the power-on button. Press the CD-ROM drive eject button. Place the HP Navigator CD-ROM in the drive, and press the eject button again to close the drive. Turn the power off, wait 10 seconds, and turn the power on again. If the system fails to start, follow the diagnostic instructions on the screen. b. Go to the HP Navigator Main Menu.
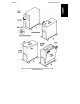
Chapter 1 Installation Overview Figure 1-1.
Chapter 1 Installation Overview To remove the covers, refer to Figure 1-1 and do the following: 1. Turn off the HP NetServer and disconnect the power cord. WARNING Before removing the cover, always disconnect the power cord and unplug telephone cables. Disconnect the power cord to avoid exposure to high energy levels that may cause burns when parts are short-circuited by metal objects such as tools or jewelry. Disconnect telephone cables to avoid exposure to shock hazard from telephone ringing voltages.
Chapter 1 Installation Overview 5. If you are installing any accessory boards or additional mass storage devices (other than hot swap disk drive modules), also remove the side cover farthest from the system board: a. Grasp the two tabs at the top of the side cover. b. Pull upward and outward to lift the side cover off. CAUTION Handle the side cover only by its top and bottom edges to avoid damaging the EMI spring Angers inside its side edges.
Chapter 1 Installation Overview
Chapter 1 Installation Overview Lay the system board component-side up on a static-dissipating work surface with the metal cross piece on the top rear corner of the system board extending off the work surface, as shown in Figure 1-3. Crosspiece must be OFF work surface. System Board Figure 1-3. Insert the DIMM CAUTION Only install DIMMs on a system board lying ^at on a staticdissipating work surface. The metal crosspiece indicated by the arrow in Figure 1-3 must be OFF the work surface.
Chapter 1 Installation Overview Follow these steps to install each DIMM in a DIMM socket on the system board. DIMMs can be 32 MB, 64 MB, or 128 MB in any combination. They can be installed in any order in any of the DIMM sockets on the system board. 1. Remove an HP DIMM fTom its container, handling the module by its edges. If you must set it down, place it on an antistatic mat. 2. Locate the socket where you will install the DIMM, and spread outward the two retaining clips shown in Figure 1-3. 3.
Chapter 1 Installation Overview Install All Accessory Boards Raise the System Board If you are installing accessory boards in slot 5 or 6, raise the system board (if it is not already raised) to provide easier access to those accessory board slots. To raise the system board, use the retaining latches to start lifting the system board.
Chapter 1 Installation Overview Install Accessory Boards Install all accessory boards at this time. The backplane in the HP NetServer has live PCI-only slots (Slots 2-6) and one combined PCI/ISA slot (Slot 1). Boards can be identilied by the shape of their connectors, as shown in Figure 1-5. PCI Board — left-side offset ISA Board — right-side offset Figure 1-5.
Chapter 1 Installation Overview e. Configuration Advisor displays the Configuration Advisories. You can print them out by saving them to disk (diskette) and later printing out from the diskette. Read the documentation supplied with the accessory boards. If you are installing an fSA non-Plug-and-Play board, write down the switch andjumper settings and all system resource requirements (such as memory range, I/O port range, DMA channel, and IRQ level).
Chapter 1 Installation Overview Figure 1-6. Replace All Covers 1. If the system board is in the raised position, lift the handles of its retaining latches to vertical, and push the system board down to seat it firmly in its slot. Lower the retaining latches simultaneously to secure the board. NOTE 12 Lower both retaining latches at the same time to avoidjamming the system board.
Chapter 1 Installation Overview 2. If a side cover was removed, insert the channel on its lower edge onto the lip at the bottom of the chassis. Press the top of the side cover against the chassis to snap it into place. 3. To replace the top cover, do the following: a. Align both of its rear corners against the similar metal on the rear of the HP NetServer. b.
Chapter 1 Installation Overview 3. Use the arrow keys to move the cursor, press ENTER to select an option, and press ESC to exit. For more details, including default settings, refer to Information Assistant. Reserve Resources for ISA Non-Plug-and-Play Board If you have installed an ISA non-Plug-and Play accessory board, you must reserve system resources for it.
Chapter 1 Installation Overview Install HP TopTools HP TopTools is browser-based management software that provides remote administration and monitoring of critical server components. You must install TopTools before technical support can be provided. Refer to the HP NetServer ManagementReference Guide, and install TopTools.
2 HP Navigator Contents of the HP NetServer Navigator CD-ROM Before the HP Navigator Main Menu is displayed, you may be prompted to set the language and the time and date. You can also set the language that the BIOS displays. The Main Menu of HP Navigator directs you to modules where you can perform con^guration tasks or access online system documentation.
Chapter 2 HP Navigator • If you need to verify or modify SCSI host adapter settings, or if you need to low-level format SCSI disks or verily SCSI disk media, run the SCSISelect utility. Refer to "Run SCSISelect Utility" in Chapter 1, "Installation Overview." • If you have installed an ISA non-Plug-and Play accessory board, you must reserve system resources for it. Refer to the "Installing ISA Non-Plug-andPlay Boards" in Chapter 4, "Accessories," for instructions.
Chapter 2 HP Navigator 0 Select No for manual NOS installation. Perform a manual NOS installation if you are installing a NOS other than certain versions of Novell NetWare / IntranetWare or Microso^ Windows NT Server, or if you have replaced any HP components. • View Configuration Advisories: Read the con^guration advisories, and print them out if necessary. You can change your hardware at this time to conform to the advisories.
Chapter 2 • HP Navigator For Manual NOS Installation Only: Before you perform a manual NOS installation, you must print out instructions and manually create NOSspeci^c drivers diskettes, as follows: 0 Create Drivers Diskette(s): On the Create Drivers Diskette(s) screen, select Create Drivers Diskette(s) to create one or more customized diskettes containing HP drivers and con^guration ^les to use when you install the NOS.
Chapter 2 HP Navigator Remote Assistant, select Configure Remote Management on the Configure Remote Management screen. 0 Configure Disk Array: If you have an HP disk array, you must configure it with the disk array utility. Select Execute on the Configure Disk Array screen. 0 Execute Card Utilities: When HP Navigator finds installed boards for which there are additional configuration utilities on the CD-ROM, this option becomes available to complete the configuration of the boards.
Chapter 2 • HP Navigator For Manual NOS Installation Only: Before you perform a manual NOS installation, you must print out instructions and manually create NOSspeci^c drivers diskettes, as follows: 0 Create Drivers Diskette(s) : On the Create Drivers Diskette(s) screen, select Create Drivers Diskette(s) to create one or more customized diskettes containing HP drivers and con^guration ^les to use when you install the NOS.
Chapter 2 • HP Navigator View demonstrations ofHP Remote Assistant and other third-party management applications. On the HP Navigator CD-ROM, select HP Management Solutions on the Main Menu, and then select Execute HP Management Solutions Demonstration. TopTools for Servers HP TopTools for Servers is new browser-based management software that provides remote administration and monitoring of critical server components.
Chapter 2 HP Navigator • If your system came with this version of the CD-ROM, then TopTools is located on the CD-ROM. See the TopTools Administrator Guide for detailed installation instructions. • If your system came with a version of the HP Navigator CD earlier the G.01.55, please download the TopTools software and documentation ^om the HP NetServer Web Site at http://www.hp.com/go/netserver/management See the TopTools Administrator Guide on the HP Web Site for detailed installation instructions.
Chapter 2 HP Navigator Information Assistant HP NetServer Information Assistant gives you complete access to all the HP NetServer information and documentation. The information includes the complete user and service information available in online format that can be viewed on the screen and printed. The information includes system and accessory installation documentation, NOS Guides, troubleshooting, error messages, part numbers, replacement information, and other important information.
Chapter 2 HP Navigator • Print or View Information: Allows you to print or view the current system configuration, including details of which boards are detected in the system and which resources are allocated to the boards. • System BIOS Update Utility: Allows you to update the BIOS of your HP NetServer. User Preferences User Preferences lets you change the language and the system date and time. You can also change the language of the BIOS.
3 HP Information Assistant Information Assistant Overview The HP Navigator CD-ROM contains Information Assistant, which contains the entire set of documentation for your HP NetServer in online form. Information Assistant provides a quick and ef^cient means to locate information about installing, managing and servicing your HP NetServer.
Chapter 3 HP Information Assistant Finding Information Information Assistant provides many ways to navigate through its topics and locate information. For example, you can: Select a topic from the Map. Displays a window with an outline of every module and topic in the Information Assistant for the selected product. The Map enables you to view the contents of the Information Assistant in outline view, and then select a topic to view. Search for a word or phrase using Search.
Chapter 3 HP Information Assistant You can also navigate between topics by using hot spots and by using the History button to revisit previously viewed topics. For example: • Jump to other topics. Click on hot spots in graphics and text that link to other topics or to more information about the current topic. Hot spot text appears as bold green text. Identic hot spots on graphics by moving the pointer over the graphic. When you point to a hot spot, the pointer changes to a hand.
Chapter 3 HP Information Assistant 1. Turn on your computer and CD-ROM drive. 2. Run Windows and display the Program Manager. 3. Insert the HP NetServer Navigator CD-ROM into the CD-ROM drive. 4. From Program Manager, select the File menu and choose Run. 5. At the command prompt, type the following: drive: \infoasst\setup where drive is the letter of the CD-ROM drive. 6. Follow the instructions that appear on your screen.
4 Accessories Installing Accessories If you are installing an ISA non-Plug-and-Play accessory board, follow the directions in the HP NetServer LC lUnstaUation Road Map. If it is not available, refer to Information Assistant. Refer to "Con^guring ISA Non-Plug-and-Play Board" in this chapter to reserve system resources for the board. If you are installing additional memory (DIMMs), PCI accessory boards, or SCSI mass storage devices follow the instructions in the HP NetServer LC lllnstaUation Road Map.
Chapter 4 Accessories Configuring ISA Non-Plug-and-Play Board If you installed an ISA non-Plug-and-Play accessory board (such as certain modem boards, network interface boards, or multi-port boards) in an HP NetServer, you must reserve system resources for the board by using the Setup utility. 1. Read the documentation for the accessory board and determine what system resources it requires. These resources may include memory range, I/O port range, DMA channel, and interrupt (IRQ) level.
Chapter 4 Accessories 11. Use the up and down arrow keys to select the DMA channel that corresponds to the DMA channel required for the ISA board you are installing, and press the + or - key on the keypad to reserve it. Reserve all DMA channels needed for the board. 12. When all the necessary DMA channels are reserved, press ESC to return to the DSA non-Plug-and-Play Devices submenu. 13. Usethe up and down arrow keys to highlight I/O Resources, and press ENTER to select that submenu. 14.
5 Installation in Rack (Optional) Rack Installation Overview Before you install the HP NetServer in a rack assembly, install any optional hardware in the HP NetServer. You can con^gure the HP NetServer before or after you install it in the rack. Before you start, read the rack installation kit instructions. Also refer to the HP NetServer RackAssembly and Cabling Reference Guide.
Chapter 5 Installation in Rack (Optional) When you have finished installing the HP NetServer LC II in the rack assembly, return to the HP NetServer Rack Installation Road Map. Pedestal Removal You must remove the anti-tip pedestal from the HP NetServer before you install it in a rack assembly. You may also need to remove it to facilitate shipping the HP NetServer.
Chapter 5 Installation in Rack (Optional) Figure 5-1.
Chapter 5 Installation in Rack (Optional) 2. Hold down both plastic buttons, and slide the HP NetServer forward on the pedestal, as shown in Figure 5-2, to disengage the hooks holding the pedestal. Figure 5-2. Slide the HP NetServer Forward 3. Lift the HP NetServer off the pedestal.
6 Troubleshooting Precautions WARNING Before removing the cover, always disconnect the power cord and unplug telephone cables. Disconnect telephone cables to avoid exposure to shock hazard ^om telephone ringing voltages. Disconnect the power cord to avoid exposure to high energy levels that may cause burns when parts are shortcircuited by metal objects such as tools orjewelry. Note that the power switch does NOT turn off the standby power.
Chapter 6 Troubleshooting 0 Diskette Library: Enables you to conveniently generate any flexible diskette available on the HP Navigator CD-ROM. For example, you can create the following diskettes: BIOS Update, NOS Drivers, and Diagnostic Assistant. • For problems with hard disk drives, refer to the HP NetServer Hard Disk Drive Troubleshooting Guide. • For problems with integrated Remote Assistant, refer to the HP NetServer LC HRemote Administrator Guide or information Assistant.
Chapter 6 Troubleshooting Troubleshooting Sequence To troubleshoot an installation problem, do the following: • First make sure that the system is configured properly. Most system problems are the result of incorrect system and SCSI subsystem con^gurations. • If it is a network-related error, determine if the HP NetServer has enough memory and hard disk drive capacity. Consult your network operating system manual.
Chapter 6 Troubleshooting Error Message Is Displayed There are two kinds of error messages that may prevent the HP NetServer from booting. These are: • Highlighted error messages (white text on gray background). Press ENTER to see a definition of the message and what action to take to remedy the problem. • Error messages displayed in normal video.
Chapter 6 Troubleshooting Message Corrective Action Keyboard error Check that the keyboard is connected to the correct connector (not the mouse connector) at the rear of the system. Replace the keyboard. If the problem persists, contact your HP support organization. Mouse error Check that the mouse is connected to the correct connector (not the keyboard connector) at the rear of the system. Replace the mouse. If the problem persists, contact your HP support organization.
Chapter 6 Troubleshooting 9. Check that the voltage regulator module (VRM) is fully seated in the upper VRM socket on the system board. If two CPU modules are installed, check that both VRMs are fully seated. See the Technical Reference Label inside the top cover for the location of the VRM(s). After Installing an Accessory 1. Turn off the display, the computer, and any external devices. 2. Unplug all cables from the power outlet. 3. Remove the front bezel, top cover, and side cover.
Chapter 6 Troubleshooting Clearing the System Configuration You may need to clear the system configuration if the configuration has been corrupted by a program, or if incorrect settings made in the Setup utility have made the display unreadable.
Chapter 6 46 Troubleshooting
Chapter 6 Troubleshooting To clear the system configuration: 1. Turn off power to the HP NetServer, and unplug the power cord. Remove the front bezel and top cover. 2. Refer to Figure 6-1 and the Technical Reference Label inside the top cover, and move the configuration memory switch, switch 5 on the system board, to the "ON 2 CLEAR CONFIG" position. 3. Plug in the power cord, and turn on power to the HP NetServer.
Chapter 6 Troubleshooting 1. If nothing is displayed on the screen, but the computer starts and, the keyboard, flexible disk drive, other disk drives, and other peripheral devices seem to operate properly, do the following: 0 Check that the monitor is plugged in and power is turned on. 0 Check that the brightness and contrast controls of the display are properly set. 0 Check that the display video cable is securely connected to the computer.
Chapter 6 Troubleshooting 4. Clean the mouse ball and rollers by using a lint-free cloth. 5. If the screen is blank, video blanking may be enabled. If the keyboard lock LED is illuminated, type the password to disable video blanking. The CD-ROM Drive Does Not Work 1. Check that a CD-ROM is inserted in the drive. 2. Check that the power and data cables are correctly connected to the device. 3.
Chapter 6 Troubleshooting Password Problems If you have forgotten the password, your HP NetServer will function normally, but you will not be able to change the system con^guration settings in the Setup utility. To reset the password: 1. Turn off power to the HP NetServer, and unplug the power cord. 2. Remove the ^ont bezel and top cover. 3. Refer to Figure 6-1, and move switch 6 on the system board (labeled "Clear Password") to the ON position. 4.
Chapter 6 Troubleshooting To Install a Replacement Battery 1. Turn off power to the HP NetServer, and unplug it. 2. Remove the ^ont bezel and top cover. 3. Remove the old battery, which is shown in Figure 6-2. System Switches 4. Insert the new battery with the positive sign (+) facing out, and ensure that it is seated completely. Make sure that the retaining clip is in place, and holds the battery ^-mly. 5. Replace the top cover and the ^ont bezel, and reconnect the power cord.
Chapter 6 Troubleshooting 4. Secure the auxiliary battery. 5. Remove the old battery, which is shown in Figure 6-3. 6. Replace the top cover and the front bezel, and reconnect the power cord.
A Specifications The specifications listed below can vary if you install a mass storage device in your HP NetServer that has more stringent environmental limits. Make sure that the operating environment is suitable for all the mass storage devices that you are using.
Appendix A Specifications Weight and Dimensions System Processing Unit (SPU) Height 552 mm (21.7 in) without pedestal 568 mm (22.3 in) with pedestal Width 217 mm (8.5 in) without pedestal 346 mm (13.6 in) with pedestal Depth 527 mm (20.7 in) with or without pedestal Weight 21-28 kg (46-60 LB) with pedestal Weight excludes monitor and keyboard. System footprint 0.12 m (1.28 ^) without pedestal 0.20 m (2.11 ^) with pedestal 0.84 m (8.34 ^) with pedestal and all clearances Keyboard Height 35 mm (1.
Appendix A Specifications General Cord Set Requirements Cord set approved or recognized by safety agency in country of use 125VAC, lOA 250VAC, lOA Maximum length: 2.
B Regulatory Information Regulatory Notices - Electromagnetic Compliance Electromagnetic Compatibility (EMC) requirements have been established in many countries to regulate the radio frequency energy generated by Information Technology Equipment (ITE). This energy is generated during the normal and intended use of this equipment and so it is limited by country regulations to levels intended to minimize potential interference to other electrical equipment, including public safety services.
Appendix B Regulatory Information • Reorient or relocate the receiving antenna. • Increase the separation between the equipment and the receiver. • Connect the equipment into an outlet on a circuit different from that to which the receiver is connected. • Consult the dealer or an experienced radio/television technician for help. Hewlett-Packard’s system certi^cation tests were conducted with HP-supported peripheral devices and HP shielded cables, such as those you receive with your computer.
Appendix B Regulatory Information For products labeled as Class B: This equipment is in the Class B category information technology equipment based on the rules ofVoluntary Control Council For Interference by Information Technology Equipment (VCCI). Although aimed for residential area operation, radio interference may be caused when used near a radio or TV receiver. Read the instructions for correct operation.
Appendix B Regulatory Information Class A Equipment : Please note that this equipment has been approved for business purposes with regards to electromagnetic interference, if purchased in error for use in residential area, you may wish to exchange the equipment where you purchased it. Class B Equipment : Please note that this equipment has been approved for non-business purposes with regards to electromagnetic interference. This equipment can be allowed for use in all areas as well as residential areas.
Appendix B Regulatory Information Notice for the United Kingdom: General Approval This HP NetServer LC II Product is approved under approval number NS/G/ 1234/J/100003 for indirect connection to Public Telecommunication Systems in the UK.
Appendix B Regulatory Information Declaration of Conformity (US, EU, Australia) DECLARATION OE CONEORMITY according to ISO/IEC Guide 22 and EN 45014 Manufacturer's/Supplier Name: Hewlett-Packard Company Manufacturer's/Supplier Address: 5301 Stevens Creek Blvd, Santa Clara, CA 95052 USA deelares, that the produet Product Name: Model Number(s): Product Optious: Network Server HP NetServer EC11 ALL couforms to the followiug Product Specificatious: Safefi': lEC 950: I99I+AI, A2, A3, A4 / EN 60950: 1992
Appendix B Regulatory Information Regulatory Notices - Product Safety The following information applies only to servers with factory-installed drives. CD-ROM Electrical Safety Statement WARNING To prevent ^e or shock hazard, do not expose the unit to rain or moisture. To avoid electrical shock, do not open the cabinet. Refer servicing to quali^ed personnel only.
Appendix B Regulatory Information LASER Safety - Finland LASERTURVALLISUUS LUOKAN 1 LASERLAITE KLASS1 LASER APPARAT HP NetServer LC II - verkkopalvelimeen voidaan asentaa lisavarusteena laitteensisainen CD-ROM-lukulaite,joka on laserlaite. Kyseinen CD-ROM-lukulaite on kayttajan kannalta turvallinen luokan I laserlaite. Normaalissa kaytossa lukulaitteen suojakotelo estaa laserateen paasyn laiteen ulkopuolelle. Laitteen turvallisuusluokka omn maaritetty standardin EN 60825 (I99I) mukaisesti.
Appendix B Regulatory Information CLASS 1 LASER PRODUCT This CD-ROM Drive Unit is classified as a CLASS 1 LASER PRODUCT. LASSER KLASSE 1 PRODUKT The CLASS 1 LASER PRODUCT label is located on the top of the drive. Bei diesem CD-ROM-Laufwerk CDU56S handelf es sich um ein Laser-Produkf der Klasse f. Ein enfsprechender Aufkelber mif der Beschriffung LASER KLASSE f PRODUKT befmdef sich der Obersiefe des Geräfs. Batteries This produci uses a lifhium battery.
Appendix B Regulatory Information Noise Declaration and Ergonomics Germany Sound Pressure: LpA < 55 dB (A) am Arbeitsplatz, Beobachter Position (workplace, bystander position) normaler Betrieb (normal operation) nach DIN 45635 T. 19 (per ISO 7779) This product has not been evaluated for compliance with the ZH1/618 ergonomic requirements.
C Warranty and Software License Hardware Product Limited Warranty HP warrants this hardware product against defects in materials and workmanship, under normal use, for the period speci^ed in the HP NetServer Limited Warranty Table section below. The warranty commences on receipt of this product by Customer ^om HP or an Authorized HP Reseller (herea^er referred to as "Reseller"). Some newly-manufactured products may contain remanufactured parts equivalent to new in performance.
Appendix C Warranty and Software License accordance with the third-party warranty statement accompanying the product. On site visits caused by third-party software products are subject to standard perincident travel and labor charges. Hardware Accessories Limited Warranty Hewlett-Packard Hardware Accessories HP warrants this HP NetServer Hardware Accessory against defects in material and workmanship, under normal use, for the period specified in the HP NetServer Limited Warranty Table section below.
Appendix C Warranty and Software License Pre-Failure Warranty During the warranty period of the HP NetServer system processor unit, selected HP Hardware components monitored by HP NetServer Assistant (NSA) version 2.0 and higher are eligible for the HP Pre-Failure Warranty. HP NSA performs predictive disk failure analysis on the components, and if a pre-established threshold is exceeded, the monitored component can be replaced prior to an actual failure.
Appendix C Warranty and Software License 3. Incidental, special, or consequential damages (including lost profits, loss of use. Customer downtime, cost of data recovery/re-creation), even ifHP is informed of their possibility; 4. Third-party claims against Customer for losses or damages. HP NetServers are not speci^cally designed, manufactured or intended for sale as parts, components or assemblies for the planning, construction, maintenance, or direct operation of a nuclear facility.
Appendix C Warranty and Software License h. Obtaining any necessary licenses or permits with regard to information provided to HP or Reseller; 2. Travel and labor charges for on-site repairs caused by third-party hardware or software; 3. Loss of, or damage to, an HP NetServer in transit when Customer is responsible for the transportation charges. For on-site service, Customer must provide the following: 1. Access to the product, 2.
Appendix C Warranty and Software License replacement of the component; and pay shipping charges, duty, and taxes for part(s) to be returned to HP. Return to HP/Reseller If on-site warranty service is not applicable, the product must be returned to a service facility designated by HP or Reseller. Customer must enclose a copy of a document proving date of purchase. Customer shall prepay shipping charges (and shall pay all duty and taxes) for products returned to HP or Reseller for warranty service.
Appendix C Warranty and Software License HP NetServer Limited Warranty Coverage Warranty Coverage Periods Product Year1 Year! Year" HP NetServer L Series On-site' On-site On-site HP NetServer E Series On-site' n/a n/a HP Internal Accessories (i.e.
Appendix C Warranty and Software License 2. Execute the diagnostics provided and record the information. Consult the accompanying documentation for instructions. 3.
Appendix C Warranty and Software License Germany: 0180 525 8143 Ireland: 01 662 5525 Italy: 02 2 641 0350 Netherlands: 020 6068751 Norway: 22 11 6299 Portugal: 01 441 7199 Spain: 902 321 123 Sweden: 08 619 2170 Switzerland: 084 880 1111 United Kingdom: 0171 512 5202 International (English): 44 171 512 5202 tn "o) lU _ Other Countries For hardware service, contact your local Reseller or HP sales office. For telephone support, contact your Reseller.
Appendix C Warranty and Software License Supplemental Warranty Service and Support Enhanced hardware warranty services, such as after-hour or weekend coverage, faster response time, and service in an HP Excluded Travel Area, may be available from HP or Reseller at additional charge.
Appendix C Warranty and Software License Póliza de Garantía Hewlett-Packard de México, S. A. de C. V. con domicilios en: Guadalajara, Jalisco Montemorelos No. 299 Fracc. Loma Bonita, 45060 Tel. 669 95 00 Monterrey, Nvo. León Calz. Del Valle O. No. 409 4° Piso, Col. Del Valle Garza Garcia, 76030 Tel. 378 42 40 México, D.F. Prolongación Reforma No. 470 Col. Lomas de Sta. Fe, 01210 Delegación Alvaro Obregón Tel.
Appendix C Warranty and Software License 4. Limitaciones: Esta garantía no es válida en los siguientes casos: A. Cuando el producto ha sido utilizado en condiciones distintas a las normales. B. Cuando el producto no ha sido operado de acuerdo con el instructivo de uso en idioma Español proporcionado. C. Cuando el producto ha sido alterado o reparado por personas no autorizadas por Hewlett-Packard de México, S.A. de C. V. Producto M arca N o .
Appendix C Warranty and Software License Software Product Limited Warranty The HP Software Product Limited Warranty will govern all Software which is provided to you (including Microsoft software) as part of the HP computer product. This HP Product Limited Warranty will supersede any non-HP software warranty terms that may be found in any documentation or other materials contained in the computer product packaging.
Appendix C Warranty and Software License the exclusion or limitation of incidental or consequential damages, so the above limitation or exclusion may not apply to you. Obtaining Warranty Service, Warranty service may be obtained fTom the nearest HP sales office or other location indicated in the owner s manual or service booklet. Consumer transactions in Australia and the United Kingdom: The disclaimers and limitations above shall not apply and shall not affect the statutory rights of a Consumer.
Appendix C Warranty and Software License ATTENTION: USE OF THE SOFTWARE IS SUBJECT TO THE HP SOFTWARE LICENSE TERMS SET FORTH BELOW. USING THE SOFTWARE INDICATES YOUR ACCEPTANCE OF THESE LICENSE TERMS. IF YOU DO NOT ACCEPT THESE LICENSE TERMS, YOU MAY RETURN THE SOFTWARE FOR A FULL REFUND. IF THE SOFTWARE IS BUNDLED WITH ANOTHER PRODUCT, YOU MAY RETURN THE ENTIRE UNUSED PRODUCT FOR A FULL REFUND.
Appendix C Warranty and Software License No Disassembly or Decryption. You may not disassemble or decompile the Software unless HP's prior written consent is obtained. In somejurisdictions, HP's consent may not be required for limited disassembly or decompilation. Upon request, you will provide HP with reasonably detailed information regarding any disassembly or decompilation. You may not decrypt the Software unless decryption is a necessary part of the operation of the Software. Transfer.
Appendix C Warranty and Software License HP NetServer Warranty Frequently-Asked Questions Q: What is the intention of the HP NetServer Warranty? A: The HP NetServer Warranty is intended to protect you from any defects in workmanship or materials of the hardware product for a period of time after your purchase.
Appendix C Warranty and Software License Q: Will adding third-party memory or disk drives void the warranty? A: Adding third-party memory or disk drives does not void the warranty. However, there are some implications when you need technical support. For example, when the memory used may relate to the problem you are experiencing, you will be asked to remove the third-party memory to confirm the problem still exists before a service provider is dispatched.
Appendix C Warranty and Software License Q: What is the response time for on-site warranty service? A: The standard response time for on-site warranty service is end of next business day. All response commitments are based on commercially reasonable efforts by HP and HP Authorized Service Providers. Q: Can I keep the defective part that is being replaced? A: No. All removed parts, in their entirety, become the property ofHP. The replacement part then becomes your property.
Appendix C Warranty and Software License Q: What are my options if I want network or server application software support? A: Network or server application software support services are available to complement the HP NetServer Warranty. Examples of these services include: 0 Per-incident bundled (5-pack or 10-pack) network support, 0 Annual network support, and 0 Annual network support and server application support.
Appendix C Warranty and Software License b. Establish and practice back-up procedures for your data and programs to minimize any disruptions to your business in case of a hardware failure; and c. Use current driver and software revision levels to optimize your server environment. Q: Is the warranty still valid ifl ship my HP NetServer to another location within my company? A: The warranty is valid as long as the HP NetServer remains in the country where you purchased it.
Appendix C Warranty and Software License * Add-on boards or hardware * Third-party hardware or software * Operating system type and revision level Most of this information can be obtained by using TopTools. Q: How can I track changes that could affect the operation of my HP NetServer? A: Many customers have found it extremely useful to keep a system log.
D Service and Support System Design, Integration, and Support The hardware, utility software, and any operating system or environment software supplied by Hewlett-Packard provide an enhanced, industry-standard base. A network operating system, utilities, and application software have been added to create your complete system. The most effective source of system and software support is the organization that designed and configured your complete system.
Appendix D • HP NetServer Information Assistant • CompuServe discussion forum and library • WorldWideWebandInternetFTP • Bulletin Board System • Automated Fax • HP Repair and Telephone Support Service and Support HP provides a complete communications program to help you keep up to date with your HP NetServer: • HP Proactive Noti^cations • HP Navigator CD-ROM Subscription This appendix also covers the following: • Ordering HP cables, drive trays, and manuals • Contacting HP’s Regional He
Appendix D Service and Support To obtain a release history or a status report, you will need one of these document numbers: • Release history: document number is 6005 • Status report: The number is different for each status report. Each version of the HP Navigator CD-ROM has a four-digit document number printed on the disk. You can obtain the release history and status report for your CD-ROM in one of these ways: • InternetWWW: http://www.hp.com/go/netserver/servsup • Internet FTP: ftp.hp.
Appendix D Service and Support The updates include the following: • Updates to your system software, such as BIOS and driver upgrades • Enhancements to server management tools Fora subscription form and subscription rates see: • InternetWWW: http://www.hp.com/go/netserver/servsup • BBS: Call(208) 344-1691 • Fax: Call HP’s fax system at (1 800) 333-1917. Outside the U.S. and Canada, call (1 208) 344-4809 ^om your fax machine.
Appendix D Service and Support complex or controversial, an electronic discussion may start among several people—^providing you with a group consensus. HP products are covered on CompuServe in forums operated by independent consultants. The NetServer section of the HPPC forum is visited regularly by HP employees and a group ofknowledgeable and friendly NetServer users. Libraries are maintained that contain newsletters, technical articles, drivers, and other so^are modules.
Appendix D Service and Support Call (208) 344-1691 to connect to the HP NetServer Support BBS. Automated Fax HP’s automated fax system contains fUll product data sheets, price guides, and a subset of the HP NetServer support information. In the U.S., call (800) 333-1917 ^om a push button tone phone to request that an index of available documents be sent to your fax machine. Call again to select the documents that you want transmitted. Outside the U.S. and Canada, call (208) 344-4809 ^om your fax machine.
Appendix D Service and Support You can sign up HP for Proactive Notification by visiting the following World Wide Web URL: http://proact.hp.com:8088/NetServer NOTE This address is case-sensitive. The 'N' and 'S' in 'NetServer' must be capitalized. Telephone Support During the warranty period, telephone technical support is available to assist you with setup, configuration, startup, and troubleshooting of your HP hardware product.
Appendix D Service and Support 4. From the Select NOS menu, select your network operating system, and the version, if necessary. 5. Select No when the Select NOS screen asks, "Would you like to use HP's automated mode ofNOS installation?" 6. Configuration Advisor displays configuration advisories. Read them to see if any relate to your problem. You can also do the following: 0 Save the configuration advisories to disk as ASCII file "advisor.txt" to print out later, as described in Step 9.
Appendix D • Applicable error messages from system or diagnostics • Applicable hardware driver revision levels • Add-on boards or hardware installed • Third-party hardware or software • Operating system type and revision level Service and Support For hardware repair or telephone support in the U.S.
Appendix D Service and Support HP Customer Support Center (Netherlands): Austria: 0660 6386 Belgium (Dutch): 02 626 8806 Belgium (French): 02 626 8807 Denmark: 3929 4099 Finland: 02 03 47 288 France: 01 43 62 3434 Germany: 0180 525 8143 Ireland: 01 662 5525 Italy: 02 2 641 0350 Netherlands: 020 6068751 Norway: 22 11 6299 Portugal: 01 441 7199 Spain: 902 321 123 Sweden: 08 619 2170 Switzerland: 084 880 1111 United Kingdom: 0171 512 5202 International (English): 44 171 512 5
Appendix D Service and Support Telephone Ordering Information u.s. • To identify a part or manual: automated fax(800) 333-1917; voice (916)783-0804. • To order with a credit card: (800) 227-8164. Canada • Call(800) 387-3154. • Also available for part or manual identi^cation: automated fax (800) 333-1917; voice (916) 783-0804. Latin America • Call your local HP of^ce or (305) 267-4220 (Miami).
Appendix D Service and Support Contacting HP Regional Headquarters Should you need to contact Hewlett-Packard, check your local telephone directory for the HP Sales and Service Office near you. If you cannot locate an HP office, contact one of the Worldwide HP Marketing Headquarters listed here: Asia/Pacific Headquarters Hewlett-Packard Asia Paci^c Ltd. 17-21/F Shell Tower, Times Sq.
Appendix D Service and Support Chile—ChilePac, Santiago France—CompuServe SARL, Rueil Hong Kong—CompuServe Hong Kong, Motorola AirCommunications Hungary—CompuServe Hungary, Middle Europe Network, Budapest Israel—CompuServe Israel, Trendline Info. Comm., Tel Aviv Japan—NIFTY Corporation, Tokyo Mexico—CompuServe Mexico, Infoacces S.A. de C.V., Mexico City South Africa—CompuServe A^ica, Lynnwood Ridge South Korea—ATEL Co., Seoul Taiwan—TTN-Serve, Taiwan Telecomm, Taipei United Kingdom—CompuServe Ltd.
Index accessories installing, 31 troubleshooting, 44 accessoryboards, 10 ISA installing, 9 non-Plug-and-Play, 32 PCI, installing, 9 acoustic emissions, 55 additional memory, installing, 31 anti-tippedestal, 1,36 automated FAX help system, 94 7 backplane, 31 battery problems, 50 BBS HP support bulletin board, 92, 93 bezel, front, 4,13 BIOS, 14, 18,21,26 card utilities, 19,21 CD-ROM drive troubleshooting, 49 clearing system configuration memory, 45 CMOS memory, clearing, 45 CompuServe, 92 configuration cust
Index H hard disk drive troubleshooting, 49 hardware accessories limited warranty, 68 hardware problems, 47 hardware product limited warranty, 67 hardware repair warranty information for, 67 help CompuServe, 92, 100 FAX systems for, 94 fromHewlett-Packard, 100 HP PC support bulletin board, 92, 93 Internet, 93 release history, 90 repairs, 96 status report, 90 system and sobare support, 89 system documentation, 92 telephone support, 95, 96 hot swap subsystem, 31 HP Management Solutions, 22 HP Navigator, 1,
Index messages, 42 mouse troubleshooting, 48 I network interface controller (NIC), 31, 40 Network Operating System Installation Instructions, 20,21, 22 no error messages, 43 NOS installation, 18, 20, 22 manual, 22 NOS installation instructions, 20,21, 22 NOS intallation, 21 O Order Assistant, 5 P password problems, 50 pcANYWHERE, 24 pedestal, anti-tip, 1,36 power supply, 54 Power-On SelfTest (POST) errors, 25 power-on system hardware test, 42 Power-On System Test errors, 42 precautions, 39 pre-failure
Index systemresources, 19, 21, 26, 32 system switches, 46 Technical Reference Label, 5, 47 technical support, 73 telephone support, 95 Tested Products List, 10 thumbscrews, 4 top cover, 4 TopTools, 15, 18, 23, 40 TopToolsAdministrator Guide, 24, 40 troubleshooting, 39 accessories, 44 basics, 40 battery, 50 error messages, 42 Ending the problem, 41 hardware problems, 47 no error messages, 43 password problems, 50 precautions, 39 tools, 39 V User Preferences, 26 106 utilities, 25 Diagnostic Assistant, 25