
HP xw4600, xw6600, and xw8600 Workstations - Setting up SATA RAID


7. ‘Disk Select’ – If available, press <enter>, use the up/down arrow keys to move over the drives in
the list. Use the space bar to select the drive for the volume. Make sure that the correct number of
drives is selected as per Table 1.
8. ‘Strip Size’ – Use up/down arrow keys to select strip block size (default is 128KB, this is a
reasonable value).
9. ‘Capacity’ is based on the drives and the RAID level selected. The default value is the maximum
capacity and should be selected.
10. ‘Create Volume’ – Press the Enter key to create the RAID volume. Note that the ‘Disk/Volume
Information’ is now updated with the RAID volume status as ‘Normal’ and lists which drives are
“Members” of the volume.
11. Exit the Intel Matrix Storage Manager Configuration Utility.
Setting the Boot Order
1. Reboot the system and enter Setup again by pressing the F10 key at the startup screen.
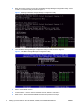
2. Enter “Storage” and then “Boot Order,” see Figure 5.
3. Make sure that the hard drive that has or will have the operating system on it is listed first under
“Hard Drive.” If this is the case then exit the BIOS without saving any of the changes and proceed
to Step 5.
4. If the drive that has or will have the operating system on it is not at the top of the list use the arrow
keys to select your drive. Press the Enter key to select and drag your drive to the top location. Press
the F10 key to accept the changes and exit the BIOS saving your changes.
Figure 5 Setting the Boot Order
ENWW Setting the Boot Order 5