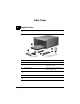
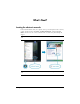
Basic Setup 1 Unpack the box ✎ Computer color, features, and options may vary. Component Component 1 AC adapter 4 Power Cord 2 Computer 5 Modem cable (select models only) (optional for setup) 3 Primary battery 6 Country-specific modem adapter (select models only) ✎ Batteries and power cords vary in appearance by region and country. ✎ Unless you use dial-up networking, the modem cable is optional for setup.
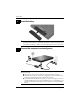
Basic Setup 2 Insert the battery To reduce potential safety issues, use only the AC adapter or battery Å WARNING: provided with the computer, a replacement AC adapter or battery provided by HP, or a compatible AC adapter or battery purchased separately as an accessory from HP. 3 Connect the computer to external power To reduce the risk of electric shock or damage to your equipment, observe Å WARNING: these practices: ■ Plug the power cord into an AC outlet that is easily accessible at all times.
Basic Setup Leave the computer connected to external power until the battery is fully charged and the battery light turns off. charged new battery can run the computer after software setup is complete, ✎ Abutpartially battery charge displays will not be accurate until the new battery has been fully charged. The battery light (in the front of the computer) remains on when it is charging.
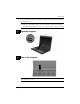
Basic Setup 6 Set up the software After the computer is turned on, the software setup process begins. The on-screen instructions guide you through setting up and registering your computer. After you respond to the setup prompt, you must complete the entire setup process without interruption. select your language carefully. On some models, the languages you do not ✎ Please choose are deleted from the system and cannot be restored during software setup.
What’s Next? Locating the electronic manuals For detailed information about your computer, such as power management, drives, memory, security, and other features, click Start, click Help and Support, and then click User Guides. You do not need to connect to the Internet to access the user guides in Help and Support. ✎ If you are running Windows® XP, your screens may look slightly different. ✎ A User Guides disc may have also been included with your computer.
What’s Next? Finding more information In Help and Support, you can find information about the operating system, drivers, troubleshooting tools, and technical support. To access Help and Support, click Start, and then click Help and Support. For country- or region-specific support, see http://www.hp.com/support, select your country or region, and follow the on-screen instructions. : To reduce the risk of serious injury, read the Safety & Comfort Guide.
Product Information and Troubleshooting Important display information All HP notebook display panels adhere to strict quality and reliability specifications. A small percentage of display panels may have minor cosmetic imperfections that appear as bright or dark dots (described below) in the viewable area: is consistent with industry standards and common to all display panel types used ✎ This by notebook PC vendors and is not specific to any HP model or product line.
Product Information and Troubleshooting Operating environment The operating environment information in the following table may be helpful if you plan to use or transport the computer in extreme environments. Factor Metric U.S.
Product Information and Troubleshooting : Avoid exposing a drive to magnetic fields. Security devices with Ä CAUTION magnetic fields include airport walk-through devices and security wands. The airport security devices that check carry-on luggage, such as conveyor belts, use X-rays instead of magnetism and will not damage a drive. ■ ■ ■ ■ ■ In-flight computer use is at the discretion of the airline. If you plan to use the computer during a flight, check with the airline in advance.
Product Information and Troubleshooting Troubleshooting resources If you experience computer problems, perform these troubleshooting steps in the order provided until the problem is resolved: 1. Refer to “Quick troubleshooting,” the next section in this chapter. 2. Access Web site links and additional information about the computer through Help and Support. Click Start, and then click Help and Support. 3.
Product Information and Troubleshooting ❏ In Windows XP Professional, select Start, click Turn Off Computer, click ■ Restart, and then click OK. (If you have been registered to a domain, the button you click will be called Shut Down instead of Turn Off Computer.) If you cannot restart the computer using this procedure, refer to the next section, “The computer is turned on but is not responding.” If you have antivirus software installed on your computer, run the virus scan.
Product Information and Troubleshooting An external device is not working Follow these suggestions if an external device does not function as expected: ■ Turn on the device according to the manufacturer’s instructions. ■ Be sure that all device connections are secure. ■ Be sure that the device is receiving electrical power. ■ Be sure that the device, especially if it is older, is compatible with the operating system. ■ Be sure that the correct drivers are installed and updated.
Backup and Recovery Backing up your information You can only recover files that you have previously backed up. HP recommends that you use HP Backup & Recovery Manager to create an entire drive backup as soon as you set up your computer.
Backup and Recovery Backing up specific files or folders You can back up specific files or folders to the recovery partition on the hard drive, to an optional external hard drive, or to optical discs (CDs or DVDs). process will take several minutes, depending on the file size and the speed of the ✎ This computer. To back up specific files or folders: 1. Click Start, click All Programs, click HP Backup & Recovery, and then click Backup & Recovery Manager. 2. Click Next. 3.
Backup and Recovery Creating recovery points When you back up modifications since your last backup, you are creating system recovery points. This allows you to save a snapshot of your hard drive at a specific point in time. You can then recover back to that point if you want to reverse subsequent changes made to your system. first system recovery point, a snapshot of the entire image, is automatically created ✎ The the first time you perform a backup.
Backup and Recovery Performing a recovery You can only recover files that you have previously backed up. HP Backup & Recovery Manager helps you with the following tasks for safeguarding your information and restoring it in case of a system failure: ■ Recovering important files—This feature helps you reinstall important files without performing a full system recovery.