
Instruction Manual


Troubleshoot installation issues
If the following topics do not help, see HP support for information about HP support.
•
Hardware installation suggestions
•
HP software installation suggestions
•
Solve network problems
Hardware installation suggestions
This section contains the following topics:
•
Hardware tips
•
Make sure the ink cartridges are correctly installed
Hardware tips
Check the printer
• Make sure that all packing tape and material have been removed from outside and
inside the printer.
• Make sure that the printer is loaded with paper.
• Make sure that no lights are on or blinking except the Ready light, which should be
on. If the Attention light is blinking, check for messages on the printer control panel.
Check the hardware connections
• Make sure that any cords and cables that you are using are in good working order.
• Make sure that the power cord is connected securely to both the printer and to a
working power outlet.
Check the printhead and ink cartridges
• Make sure that the printhead and all ink cartridges are firmly installed in their
correct, color-coded slot. Press down firmly on each one to ensure proper contact.
The printer cannot work if they are not all installed.
• Make sure that all latches and covers are closed correctly.
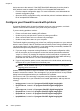
Make sure the ink cartridges are correctly installed
1. Make sure the printer is turned on.
2. Open the ink cartridge access door by lifting from the front right of the printer, until
the door locks into place.
NOTE: Wait until the print carriage stops moving before proceeding.
3. Make sure the ink cartridges are installed in the correct slots.
Match the shape of the icon and color of the ink cartridge with the slot that has the
same shaped icon and color.
4. Run your finger along the top of the ink cartridges to locate any cartridges that are
not snapped completely down.
Troubleshoot installation issues 155