
User guide


Icon Purpose
Displays a screen where you can see information about the ink cartridges,
including fill levels. This icon has a red border when an ink cartridge needs
attention.
NOTE: Ink level warnings and indicators provide estimates for planning
purposes only. When you receive a low-ink warning message, consider having
a replacement cartridge available to avoid possible printing delays. You do not
need to replace cartridges until prompted to do so.
Displays the status of the Auto Answer function. Touch Auto Answer to turn it on
or off. For more information, see Set the answer mode (Auto answer).
Change printer settings
Use the control panel to change the printer mode and settings, print reports, or get help
for the printer.
TIP: If the printer is connected to a computer, you can also change the printer
settings using HP software tools available on your computer, such as the HP printer
software, HP Utility (Mac OS X), or the EWS. For more information about these
tools, see
Printer management tools.
This section contains the following topics:
•
Select the mode
•
To select a different mode
•
To change settings for a mode
•
Change the printer settings
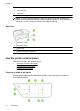
Select the mode
The main menu of the control panel display shows the available modes for the printer.
To select a mode, touch
(left arrow) or (right arrow) to see the available modes,
and then touch the icon to select the desired mode. Follow the prompts on the control
panel display to complete the job. The control panel display returns to the main menu
when the job is finished.
To select a different mode
Touch
(Back button) to return to the main menu. Touch (left arrow) or (right
arrow) to scroll through the available modes, and then touch the icon to select the
desired mode.
To change settings for a mode
1. After selecting a mode, touch the arrow buttons to scroll through the available
settings, and then touch the setting you want to change.
2. Follow the prompts on the display to change the settings, and then touch Done.
NOTE: Touch (Back button) to return to the previous menu.
Chapter 1
(continued)
14 Get started