Wall-Mounting your HP computer User Guide
The only warranties for Hewlett-Packard products and services are set forth in the express statements accompanying such products and services. Nothing herein should be construed as constituting an additional warranty. HP shall not be liable for technical or editorial errors or omissions contained herein. HP assumes no responsibility for the use or reliability of its software on equipment that is not furnished by HP. This document contains proprietary information that is protected by copyright.
Table of contents 1 Preparing your HP computer for wall-mounting .......................................................................................... 1 What you need ..................................................................................................................................... 1 Safety information ................................................................................................................................ 1 Before removing the stand ............................
iv
1 Preparing your HP computer for wallmounting This document provides instructions for computer wall-mounting preparation. The VESA assembly is at the back of the HP computer and attaches to a wall-mounting device (sold separately). The computer stand will need to be removed before wall-mounting the computer. Should you decide to switch your computer back from a wall-mounted unit to desktop unit, instructions are also included for reinstalling the stand on the computer.
Before removing the stand To avoid injury and equipment damage when opening the computer, always complete the following steps in order: 1. Remove any media and external devices (such as any CD, DVD, memory cards, USB devices, or external hard disk drives) from the computer. CAUTION: Static electricity can damage the electronic components of the computer or optional equipment. Ensure that you are discharged of static electricity by briefly touching a grounded metal object. 2.
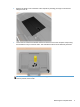
2. Remove the VESA cover at the back of the computer by inserting your finger in the slot and lifting the cover off. 3. Loosen the two screws at the bottom that secure the back cover to the computer. Keep turning the screwdriver until you hear five clicks. This indicates that the screw is sufficiently loosened. NOTE: Some models may include a third screw (1) in the center of the back cover. If this screw is present, loosen it also.
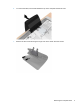
4 4. Remove the back cover by lifting from the I/O area first, and then lifting all the way around the computer. 5. Remove the four screws (1, 2, 3, and 4) that secure the stand to the back of the computer.
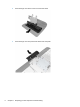
6. To remove the stand, lift it forward toward the top of the computer and then lift it off. 7. Remove the two screws securing the hinge cover to the stand. Save the screws.
6 8. Push the hinge cover down to remove it from the stand. 9. Push the hinge cover into place at the back of the computer.
10. Install the screw to secure the hinge cover to the back of the computer. 11. Replace the back cover on the computer. Press the cover so it snaps into place, and ensure that there are no gaps between the computer and the cover.
. Tighten the two screws at the bottom of the computer to secure the back cover to the computer. If present, tighten the screw (1) at the center of the back cover. NOTE: Save the VESA cover, the computer stand, the four stand screws, and one hinge screw, so that you can convert your computer back to a desktop unit in the future. Follow all the steps in Reinstalling the stand on your HP computer on page 9. 13.
2 Reinstalling the stand on your HP computer You may decide to convert your computer from a wall-mounted unit back to a desktop unit. You will need to install the computer stand back on to your computer. What you need ● A Phillips screwdriver (magnetic-tipped recommended) ● A stable flat surface covered with a soft, clean cloth (such as a large towel) to protect the computer when you place it face down.
3. After the system has completely shut down, disconnect the power adapter from the back of the computer. 4. Disconnect all other attached cables from the back and side of the computer. 5. Carefully remove the computer from the wall and place facedown on a stable flat surface covered with a clean soft cloth. CAUTION: The computer is heavy and may require two people to remove it from the wall. 6.
2. Remove the back cover by lifting from the I/O area first, and then lifting all the way around the computer. 3. Remove the screw that secures the hinge cover to the back of the computer and then remove the hinge cover.
12 4. Replace the hinge cover on the stand by sliding it up into place, aligning the screw holes on the hinge cover with the screw holes on the stand. 5. Install the two screws to secure the hinge cover to the stand.
6. Place the stand on the back of the computer, inserting the two tabs at the top of the stand into the two slots on the computer. Align the four screw holes on the stand with the screw holes on the computer. 7. Insert the four screws to secure the stand to the back of the computer.
14 8. Replace the back cover on the computer. Press the cover so it snaps into place, and ensure that there are no gaps between the computer and the cover. 9. Tighten the two screws at the bottom of the computer to secure the back cover to the back of the computer. If present, tighten the screw (1) at the center of the back cover.
10. Install the VESA cover on the back of the computer. 11. Place the computer in an upright position. 12. Connect the power cord. 13. Connect any cables that were previously disconnected.