
Advanced Host Controller Interface (AHCI) and Redundant Array of Independent Disks (RAID) on HP EliteDesk and EliteOne 705 Business PCs Using AMD Array Management Software (RAIDXpert2)


10
7. Press C to create the array.
8. Press Esc to exit. At system prompt, press Y to reboot or any other key to go back.
Select boot order
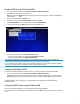
To set up your system to boot from the OS media, you may need to change the boot order in the F10 setup menu.
1. Turn on or restart the computer by clicking Start > Shut Down > Restart the Computer.
2. Press F10 as soon as the monitor light turns green.
If you do not press F10 at the appropriate time, you must restart the computer, and then press F10 again to access
the utility.
3. Use the arrow keys to select Storage.
4. Use the down arrow key to select Boot Order, and then press Enter.
5. Use the down arrow key to select ATAPI CD-ROM Drive, and then press Enter. Press the arrow key up to the desired
position in the boot order. Press Enter again and F10 to accept the change.
6. To apply and save changes, select File > Save Changes and Exit.
– If you do not want to apply your changes, select Ignore Changes and Exit.
– To reset to factory settings, select Apply Defaults and Exit. This option restores the original factory defaults.
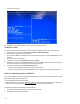
Notes for operating system installation
After creating a RAID disk volume in the option ROM and selecting the boot order, the operating system can be installed.
Before proceeding, you will need the following:
• Microsoft Windows OS media and Product Key.
• RAID driver flash drive. To create, go to www.hp.com/support. Select your country and language, select Support and
Drivers, click on Drivers and Software, enter the model number of the computer, and press Enter.
The following steps apply to Microsoft Windows OS installations.
1. Insert the Windows OS media and press any key to reboot the computer.
2. Press F9 at the prompt to begin installation.