Quick Start Guide Filename: ma3ubqs.doc Title: HP-Print2k.dot Template: HP-Print2K.
The information in this document is subject to change without notice. ® Hewlett-Packard Company makes no warranty of any kind with regard to this material, including, but not limited to, the implied warranties of merchantability and fitness for a particular purpose. HP shall not be liable for errors contained herein or for incidental or consequential damages in connection with the furnishing, performance, or use of this material.
Start Here........................................... vii Introducing the Quick Start Guide .........1 Safety Information ................................................. 1 Using the Quick Start Guide................................... 3 Finding Additional Information ............................... 4 Setting Up the PC..................................5 Turning On the PC for the First Time ........................ 6 Registering with HP ...............................................
To configure multi-channel audio output for speakers configuration .................................... 33 To configure multi-channel audio output for the DVD player............................................... 34 To use the microphone with multi-channel audio ......................................... 34 Adjusting speaker volume ................................ 35 Using a Microphone ........................................... 36 Adjusting microphone volume ..........................
Understanding Your Drives ................................... 61 Using the Diskette (Floppy) Drive........................... 62 Using the 6-In-1 Memory Card Reader .................. 62 Special note about the Safely Remove Hardware Utility ............................................. 63 To use the 6-In-1 memory card reader................ 63 Inserting a CD or DVD......................................... 66 Removing a CD or DVD ....................................... 67 Handling CDs........................
System Recovery............................................... 102 Starting System Recovery If the PC Is Responding .................................................. 103 Starting System Recovery If the PC Is Not Responding .................................................. 103 System Recovery Using Recovery discs ................ 104 Starting System Recovery using recovery discs .............................................. 104 Freeing Up Space on Your Hard Disk Drive..........
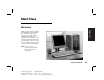
Start Here Start Here Welcome Thank you for becoming a member of the HP Pavilion home PC family. This “Start Here” section is an overview of some of the added software features and tools available on your HP Pavilion. The rest of this Quick Start Guide gives you information on how to use your computer. With this guide, you can use your computer with confidence. Note: The screens on your computer may not match the screens pictured on these pages. Quick Start Guide Filename: ma3ubqs.doc Title: HP-Print2k.
Inventory Checklist Power cord Modem cable PC Keyboard The documentation includes: Setup poster This Quick Start Guide Warranty and Support Guide, containing support, warranty, license, regulatory, and safety information Upgrading and Servicing the PC guide (select models installed on PC, or in print) Read first, addenda, or other documents if applicable Creating DVDs and CDs guide (select models) Microsoft Windows XP guide My HP Pavilion home PC brochure (select models) viii HP Pavilion home PC Filena
PC Front Your PC may look different from the ones shown here. Component, connector location, type, and number vary by model. — CD storage (select models) — CD-ROM or CD-RW drive — DVD-ROM or DVD+RW/+R drive — Diskette (floppy) drive — 6-In-1 Memory card reader (select models) ® F — FireWire (IEEE 1394) G — USB 2.
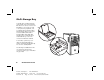
Multi-Storage Bay Some PCs have a multi-storage bay (select models only) on the top of the PC chassis. You can use it to store ten CDs/DVDs, to store memory cards, or as a place for peripherals, such as a digital camera docking station. The bay design allows you to place a device and thread the USB or FireWire (IEEE 1394) data cable and the power cord for the device underneath the top cover to the connectors at the back of the PC.
Multi-Storage Bay — Peripheral Placement 1 Open the bay cover. Hold the cover on each side near the hinges, then lift the cover and slide it toward the back of the chassis (figure C). Gently lift it off. C Start Here To use the multi-storage bay for a peripheral device, do the following: 2 Thread the cables through the cable tunnel opening at the back of the bay (figure D). Connect data and power cables to the peripheral device, and place the peripheral in the bay.
Multi-Storage Bay — Peripheral Placement (Continued) To use the chassis top to set a peripheral device, do the following: G E 1 Remove the bay cover (see step 1 on previous page). 2 Grasp the tab and pull it out toward the front of the chassis (figure E). Put the tab in its storage area in the bay near the spindle (figure F). 3 Thread the data and power cables for the device through the cable tunnel opening at the back of the bay. Place the cables in the tab opening and replace the bay cover.
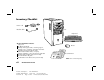
Connect your keyboard, mouse, monitor, and modem as described in the setup poster. Turn on the computer for the first time and finish the registration process. Then, add a printer or other device, or install any software programs that came on CDs or DVDs included in the computer box (select models only). SERIAL Your computer may look different from the one shown here. Component, connector location, type, and number vary by model.
PC Connector Symbols Symbols in this table identify connectors. Symbol Description Symbol Mouse (PS/2) Keyboard (PS/2) Universal Serial Bus (USB) for mouse, keyboard, digital camera, or other device with a USB connector Description Audio Line Out (powered speakers) OUT Audio Line In IN Headphones Printer (parallel) Monitor serial Serial port for digital camera or other serial device Speaker Many peripherals and external devices are Plug and Play.
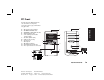
Your PC may look different from the one shown here. External components shown in the following figure are not included with the PC. Back connector location, type, and number vary by model. Note: Before using your components, you may need to install the software that came with the component. HP Products Work Better Together HP computers include pre-loaded software for select HP All-In-One, camera, scanner, and printer peripheral products.
PC Front Connections Your PC may look different from the one shown here. External components shown in the following figure are not included with the PC. Front connector location, type, and number vary by model. xvi Note: Before using your components, you may need to install the software that came with the component. HP Pavilion home PC Filename: ma3ubqs.doc Title: HP-Print2k.dot Template: HP-Print2K.
Register with HP Start Here Register your HP Pavilion home PC with Hewlett-Packard so HP can assist you with your technical support needs (select models only). Quick Start Guide Filename: ma3ubqs.doc Title: HP-Print2k.dot Template: HP-Print2K.
Internet Click Start, choose All Programs, choose Online Services, and then click Easy Internet Sign-up (available on select models) for a simple step-by-step wizard to guide you through setup for the Internet and e-mail. For information about modem setup, the Internet, and e-mail, see the related sections inside this guide. You can also find helpful information by clicking Start, Help and Support, and then My HP Pavilion PC (select models only). xviii HP Pavilion home PC Filename: ma3ubqs.
HP Desktop Help and Support Easy Internet Sign-up (select models) HP Tour Guide Start Here The HP desktop has shortcut icons that make it easy to find the things you need. Click the icon to find out more information about that program. Note: The screen on your computer may not match the screen pictured here. Start button Taskbar System tray Quick Start Guide Filename: ma3ubqs.doc Title: HP-Print2k.dot Template: HP-Print2K.
Start Menu Click the Start button to view the Start menu, the entry point to everything on your PC. Look at the following pages to learn about important software programs and tools available to you. Choose All Programs and then choose Hewlett-Packard to find HP-specific software (select models only). Help and Support All Programs Start button Note: The screen on your PC may not match the screen pictured here. xx HP Pavilion home PC Filename: ma3ubqs.doc Title: HP-Print2k.dot Template: HP-Print2K.
Help and Support Start Here Click Start and then Help and Support to learn about your PC and get your questions answered. HP Pavilion information and support (select models) Help and support news Quick Start Guide Filename: ma3ubqs.doc Title: HP-Print2k.dot Template: HP-Print2K.
My HP Pavilion PC Learn how to use your HP Pavilion home PC Click Start, Help and Support, and then My HP Pavilion PC for detailed instructions and information about your PC (select models only). xxii HP Pavilion home PC Filename: ma3ubqs.doc Title: HP-Print2k.dot Template: HP-Print2K.
Start Here HP Instant Support Send a help request Click Start, Help and Support, and then HP Instant Support. Run tests yourself, or contact an HP Support analyst for help over the Internet (select models only). Quick Start Guide Filename: ma3ubqs.doc Title: HP-Print2k.dot Template: HP-Print2K.
All Programs Click Start and then choose All Programs to find the software programs on your PC. Choose Hewlett-Packard, and then choose Hewlett-Packard HP Pavilion PC Tools to find HP drivers and the HP Tour Guide (select models only). HP Pavilion PC Tools All Programs Start button Note: The screen on your PC may not match the screen pictured here. xxiv HP Pavilion home PC Filename: ma3ubqs.doc Title: HP-Print2k.dot Template: HP-Print2K.
HP Tour Guide Start Here Click Start, choose All Programs, Hewlett-Packard, choose hp pavilion pc tools, and then click hp tour guide (select models only). Or Click the icon on the desktop (select models). Let the HP Tour Guide show you the desktop and the basics of the Internet and e-mail. Quick Start Guide Filename: ma3ubqs.doc Title: HP-Print2k.dot Template: HP-Print2K.
Your Warranty & Support Guide You can get help over the telephone from HP. See the Warranty and Support Guide included with the computer documentation for the terms of your HP Pavilion warranty coverage, for license information, and for support telephone numbers and addresses. The Warranty and Support Guide contains operating specifications for the PC along with regulatory and safety information. Note: Your document contents may vary. xxvi HP Pavilion home PC Filename: ma3ubqs.doc Title: HP-Print2k.
HP Web Sites Start Here Type these Web site addresses into the Address box of your Internet browser, and then press the Enter key on your keyboard to find helpful information from HP online. http://www.hp.com This main Web site has the latest information about your HP Pavilion home PC and all your HP products. Receive technical support, download software updates, and find out about HP’s home and business services. http://www.hp.
Microsoft Windows XP Operating System ® ® For questions about the Microsoft Windows XP operating system, refer to: Help and Support, for onscreen help and troubleshooting — click Start and then Help and Support. The Microsoft Windows XP guide, included with the computer documentation. xxviii HP Pavilion home PC Filename: ma3ubqs.doc Title: HP-Print2k.dot Template: HP-Print2K.
Recovery System and Hard Drive Space ! Selective: Ensures that the recovery data is matched to the particular PC model. You can easily recover only the application or system software you need. ! Fast: Recovers only the software you need; preserves user data and files. System recovery using recovery discs has two options: ! Standard Recovery: This option recovers factory-shipped programs, drivers, and the operating system without affecting data files.
xxx HP Pavilion home PC Filename: ma3ubqs.doc Title: HP-Print2k.dot Template: HP-Print2K.
Introducing the Quick Start Guide This product has not been evaluated for connection to an “IT” power system (an AC distribution system with no direct connection to earth, according to IEC 60950). AC Power Safety Warning Warning: Install the PC near an AC outlet. The AC power cord is your HP Pavilion PC’s main AC disconnecting device and must be easily accessible at all times. For your safety, the power cord provided with your system has a grounded plug.
Warning: Always disconnect Warning: Electrostatic discharge (ESD) the modem cord from the telephone system before installing or removing your PC cover. can damage disk drives, add-in cards, and other components. If an ESD station is not available, wear a wrist strap attached to a metal part of the PC. Place cards on a conductive foam pad or inside the card wrapper, if possible, but never on the card wrapper. Warning: Do not operate the PC with the cover removed.
Using the Quick Start Guide In this Quick Start Guide, learn how to: Turn the PC on and off. Set up an Internet account and connect to the Internet. Adjust the speaker volume. Note: Set up the PC near a telephone line so you can Insert and remove a CD disc. connect the modem for Internet access. Use the CD-ROM, DVD-ROM, CD-RW, or DVD+RW/+R drive to play music, watch movies, or record information. Use HP Pavilion PC Tools (select models only).
Finding Additional Information Look in the PC box for printed details or updates regarding your model PC. Information about the PC is in the onscreen Help and Support Center. Just click Start, and then click Help and Support. Information about the internal parts of the PC chassis is in the Upgrading and Servicing the PC guide included with your PC (installed on your system or printed). To view guides installed on your PC, refer to “Using HP Pavilion PC Tools” on page 80.
Setting Up the PC Follow the setup poster to set up the PC in your work area and then read the topics in this section to turn on the computer for the first time and to finish the registration process (select models only). After registering, install any software programs that came on CDs or DVDs included in the PC box (select models only). Note: Some programs are preinstalled on the PC. Before installing a program, check to see if it is already installed on your system.
Turning On the PC for the First Time After you’ve completed the steps on the setup poster, you’re ready to turn on the PC. First, press the Power button on the monitor. Then, press the On button on the front of the PC. Note: The power supply is pre-set for the country/region in which you purchased the PC. If you move, please check the voltage requirements before plugging your PC into an AC power outlet. Your PC may look different from the ones shown here.
Registering with HP You may be prompted to register the PC with HP (select models only). Register so you can receive changes, updates, and support. You can register any of these ways: Turn on the PC and follow the onscreen instructions to register. Double-click the registration icon on your desktop, and follow the onscreen instructions.
Getting Help See the Warranty and Support Guide included with the PC documentation for the terms of your PC warranty coverage and for support contact information. Protecting the PC HP provides a virus-scanning software program to help protect your PC (select models only). The virus-scanning program manufacturer provides free virus scan updates through your Internet connection for an initial period after your PC purchase.
Working in Comfort 0–15˚ Before you begin using the PC, set up the PC and your work area to maintain your comfort and productivity. Refer to “Safety & Comfort Guide” installed on your PC for important ergonomic information. Just click Start, All Programs, Hewlett-Packard, HP Pavilion PC Tools, and then click Safety & Comfort Guide. 50–70 cm (20–28 inches) 0–15˚ Find important safety and ergonomic information on the Internet; type http://www.hp.
10 HP Pavilion home PC Filename: ma3ubqs.doc Title: HP-Print2k.dot Template: HP-Print2K.
Introducing the Basics Windows operating system The operating system for your PC is Microsoft Windows XP. Windows displays the desktop on the monitor. The taskbar with the Start button appears at the edge of the desktop display. Basics Using the PC Start menu Click the Start button and: Select programs or documents. Open the Help and Support Center. Start a search. Run a program. Open the Control Panel to view or change settings.
Organize your All Program list You see folders organized according to task when you: 1 Click Start. 2 Choose All Programs. A folder contains a list of items. Each item is actually a shortcut or link to a program, document, or another folder. The Music folder, for example, contains shortcuts to the program you use to play music CDs. To change the name of an item: 1 Right-click the item. 2 Select Rename. 3 Type the new name, click OK, and then click Yes. 12 HP Pavilion home PC Filename: ma3ubqs.
HP Instant Support Caution: If you use Add or Remove Note: HP Instant Support is not available in all models. Programs in the Control Panel to delete a software program, the shortcut in All Programs may not be removed. When you need assistance to solve a PC-related problem, use HP Instant Support: 1 Click Start. 2 Choose All Programs. 3 Select the folder. 4 Right-click the shortcut, and then select Delete.
Using the Mouse Your PC includes a plain or a scrolling mouse. The mouse uses a roller ball or optics (a light) to sense movement and causes the cursor (pointer) on the screen to move. Scroll wheel button (scrolling mouse only) Right button Left button Note: Use the mouse on a flat surface. The optical mouse cannot work on a glass, translucent, or reflective surface.
Scroll through a document without having to click the scroll bar on the screen. Use the autoscroll feature to have the document scroll automatically. Skim through a document. The scroll feature Click the left mouse button to place the cursor in the document. To scroll toward the beginning of a document, roll the mouse wheel button up (away from you). To scroll toward the end of a document, roll the wheel button down (toward you). Quick Start Guide Filename: ma3ubqs.doc Title: HP-Print2k.
To use the autoscroll feature Switching mouse button functions 1 Place the cursor next to the text, and press the wheel button once. An autoscroll icon appears. To switch the functions of the right and left mouse buttons: 2 Move the mouse in the direction you want to scroll. The farther you move the pointer from the starting point, the faster the document scrolls. 3 To stop autoscroll, press the wheel button again. To use the panning feature 1 Press and hold down the wheel button.
Using the Keyboard To adjust the speed of the cursor on the screen in relation to the motion of the mouse: Introduction 1 Click the Start button. 2 Click Control Panel. 3 Click Printers and Other Hardware, if it is present. 4 Double-click Mouse. 5 Click the Pointer Options tab. 6 Use the slider to adjust the Pointer Speed. 7 Click Apply, and then click OK. The keyboard has an arrangement of standard keys, indicators, and special buttons. The illustrations show the location of the keys and buttons.
Keyboard features The keyboard for your PC may look like one of the following four layouts. Note: Your keyboard may not have all the features listed. This keyboard enables you to: Adjust speaker volume. Place the PC into standby to save power. 18 HP Pavilion home PC Filename: ma3ubqs.doc Title: HP-Print2k.dot Template: HP-Print2K.
Basics This keyboard enables you to: Adjust speaker volume. Place the PC into standby to save power. Customize the buttons to open programs and connect to Internet Web sites. Connect to the Internet (if you have an established Internet account). Search for information on the Internet. Mute speaker sound. Find a file or program on the hard drive. Get support information.
This keyboard enables you to: Mute speaker sound. Place the PC into standby to save power. Search for information on the Internet. Get support information. Customize the buttons to open programs and connect to Internet Web sites. Connect to the Internet (if you have an established Internet account). Find a file or program on the hard drive. 20 HP Pavilion home PC Filename: ma3ubqs.doc Title: HP-Print2k.dot Template: HP-Print2K.
Basics l l This keyboard enables you to: Adjust speaker volume. Mute speaker sound. Connect to the Internet (if you have an established Internet account). Customize the buttons to open programs and connect to Internet Web sites. Search for information on the Internet. Get support information. Place the PC into standby to save power. Find a file or program on the hard drive.
Alphanumeric keys Function keys l l The alphanumeric keys are the main keys found on a standard typewriter. 22 HP Pavilion home PC Filename: ma3ubqs.doc Title: HP-Print2k.dot Template: HP-Print2K.dot Author: JimL Last Saved By: kimt Revision #: 36 Page: 22 of 148 Printed: 04/03/03 02:04 PM l l The function keys are the F1 through F12 keys located above the main keys. Pressing F1 displays a Help window for the software program being used. Pressing F3 displays a search window.
Arrow keys l l The edit keys include the following: Insert, Home, Page Up, Delete, End, and Page Down. l l The arrow keys are controls for up, down, right, and left. You can use these keys instead of the mouse to move the cursor for navigation in a Web site, in a document, or in a game. Quick Start Guide Filename: ma3ubqs.doc Title: HP-Print2k.dot Template: HP-Print2K.
Numeric keys Keyboard indicators l l Each keyboard indicator is an LED labeled with the name or icon for its status: Icon When the Num Lock LED (light-emitting diode) on the keyboard is on, the numeric keys are the number keys and arithmetic functions found on a basic calculator. When the Num Lock LED on the keyboard is off, the numeric keys are directional keys used during games or to move the cursor. Press the Num Lock key to lock and unlock the numeric key functions.
l Basics Special buttons l The special buttons (select models only) are at the top of the keyboard. (Some models have some of these special buttons on the left side of the main keys.) These buttons operate a CD or DVD player, connect you to the Internet, or provide quick access to specific functions. See “Buttons” on page 26. Quick Start Guide Filename: ma3ubqs.doc Title: HP-Print2k.dot Template: HP-Print2K.
Buttons The top of the keyboard has a number of special buttons (select models only). hp A B C D E F G H K M N P l Note: The number, location, and labeling of buttons vary by keyboard model. 26 HP Pavilion home PC Filename: ma3ubqs.doc Title: HP-Print2k.dot Template: HP-Print2K.
Icon Feature Description Standby Puts PC into power-saving mode (screen is blank but PC is still on). To make screen reappear, press any key on keyboard, or press standby again. May take 10–30 seconds before screen reappears. User Switches between the PC users. HP Links to HP Web site. D Help Opens the Help and Support Center. E HP Picture Toolkit Opens an imaging software program. Can be reconfigured. Music Starts MusicMatch Jukebox or Windows Media Player. Can be reconfigured.
Figure Key H K M N P R S 28 Icon Feature Description Shopping Sports Finance Connect Goes to popular Web sites. Can be reconfigured to open any site or software program. Search Chat E-Mail HP Pavilion home PC Filename: ma3ubqs.doc Title: HP-Print2k.dot Template: HP-Print2K.
Figure Key Feature Description See figure after table Media Controls (CD/DVD/MP3) Operates CD or DVD player: a — open and close disc tray(s) b — record c — play or pause d — stop e — skip to the previous track f — skip to the next track V Volume control (Volume knob or Volume Up and Volume Down buttons) Volume knob: Increases speaker volume when turned clockwise and decreases volume when turned counterclockwise. It can be turned indefinitely, even after maximum sound has been reached.
Media controls Button configuration d b a c You can reconfigure the special buttons on the keyboard to open different programs or files, or to connect to favorite Web sites. 1 Click Start on the taskbar. 2 Choose Control Panel. 3 Click Printers and Other Hardware, if it is present. a e f Media control keys: a — open and close disc trays b — record c — play or pause d — stop e — skip to the previous track f — skip to the next track 30 HP Pavilion home PC Filename: ma3ubqs.doc Title: HP-Print2k.
9 On the Buttons tab, click Apply. Modifying monitor display properties 10 Repeat steps 6 through 9 for each button you want to reconfigure. 1 Click the Start button. 11 Click OK when you are finished reconfiguring the keyboard. 3 Click Appearance and Themes, if it is present. Using the Monitor Some PC models can connect more than one display device (CRT monitor, flat panel monitor, TV, etc.) to the PC. You can quickly change where the PC desktop appears by pressing Alt+F5.
Using Speakers For information on adjusting the sound level, refer to “Adjusting speaker volume” on page 35. Note: The stereo speakers set is a left-right, 2-channel speaker system, and may be passive (no power button and no power cord) or active (power button or power cord). A multi-channel audio speakers system is an active system with more than 2 channels and may include a subwoofer. For example, 5.
To configure multi-channel audio output for speakers configuration 1 Turn off the PC. 1 Click Start on the taskbar. 2 Connect the three audio cable plugs from the speaker system to the connectors on the back of the PC (see the following table). 2 Choose All Programs. Connect speaker plugs for 6/5.1 speaker mode To PC back connector Front speakers Audio (Line) Out (lime-green) Rear speakers Audio (Line) In (blue) Center/subwoofer speakers Mic-1 (pink) 3 Turn on the PC.
To configure multi-channel audio output for the DVD player Note: WinDVD is set up for two (stereo) speaker output. To hear all speakers on multi-channel DVD movies, change the audio properties for WinDVD so that they match your speaker configuration (set in the previous procedure) and the recorded DVD capability. 1 Insert a DVD or start InterVideo WinDVD Player. (See ”Playing a DVD” on page 75.) 2 Right-click anywhere in the WinDVD video window, and then click Setup. 3 Click the Audio tab.
The two ways to use the Volume icon are: You can adjust speaker volume by: 1 Click the Volume icon on the taskbar. Using the volume knob or buttons on the keyboard. Basics Adjusting speaker volume 2 Adjust the volume. Using the volume knob on the speakers (select models only). 3 When you are satisfied with the sound level, click outside the Volume window to close this window. Using the Volume icon on the taskbar.
Using a Microphone Your PC comes with one microphone connector in the back of the PC. Some models have another microphone connector in the front of the PC. Only one microphone connector works at a time, and the back connector is ready to use. For PCs with the multi-channel audio speakers option, the microphone connector in the front of the PC, if present, is ready to use; see “To use the microphone with multi-channel audio” on page 34.
5 Click OK. 8 Click Close. 6 Adjust the volume of Microphone Balance. 9 Click X (Close) on the upper-right corner of the Recording Control window. Note: If the volume is now acceptable, proceed directly Adjusting microphone volume If you need to adjust the volume of the microphone, whether it is connected to the front of the PC or to the back, follow the procedure below: 1 Double-click the Volume icon on the taskbar. The Volume Control window opens.
Using a Television Connecting to a TV set Your PC may have TV-out capability (select models only), which means you can connect it to a television to view the computer image on a TV. With the TV-out feature, you can view the computer image, watch DVD movies (if you have a DVD player), or play games on your TV. To connect a TV to the PC: Cables you may need To connect a TV to the PC, you may need a video cable and an audio cable. The type of video cable depends on your TV.
If your TV has a composite video jack and your PC has a composite video jack, connect a composite video cable to the Video In jack on the TV to the composite video jack on the back of the PC. Back of PC If your TV has a composite video jack and your PC has only an S-Video jack, connect a composite video cable to the Video In jack on the TV and to an S-Video adapter cable. Connect the S-Video adapter cable to the S-Video jack on the back of the PC.
Viewing the PC image on TV 6 Click the Settings tab. Important: The type of video card on your PC 7 Click the Advanced button. determines how the PC selects the TV-out option. Some options and menus in this procedure may be different for your PC. To view your PC image on the TV: 1 Make sure the video and audio cables are connected before you turn on the TV and the PC. 2 Turn on the TV. Press the Video/TV button on your remote control to select the Video setting, not the TV setting.
When you want to disconnect the TV from the computer, you may need to disable the TV option to return your computer display to its original resolution. To disable the TV option: 1 Right-click an empty area of the screen. 2 Click Properties. 3 Click the Settings tab. 4 Click the Advanced button. 5 Click the nView tab, click the nView Display Mode in the list on the left, and then select the Standard [Dualview] option.
Disconnecting the TV Turning Off the PC 1 Disable the TV option. See the previous procedure. You can turn off the PC without pressing any buttons on the PC chassis. 2 Turn off the TV and the PC. 3 Remove the video cable at the TV and the PC. 4 Remove the audio cable at the TV and the PC. 5 Reconnect your computer speaker cable to the Line Out jack (lime green connector) on the back of the computer. 1 Close any open software programs. To close programs, click X in the upper-right corner of each window.
As an alternative to shutting down the PC, you can put the PC in standby mode. To conserve power, you can automatically put the PC into standby and then hibernation by setting the power management timers. Standby mode When the PC is in standby mode, it goes into a low-power state and the monitor is blank as if it’s turned off. The next time you use the PC, any programs, folders, and documents that were open before you put the PC in standby will be available.
If the PC does not work properly when you wake it from standby, reset the PC: Press and hold the On button on the front of the PC for approximately 5 seconds until the system turns off. Then turn the PC back on. Note: Using the On button to reset the system is not recommended and should be used only as a last resort. Hibernation mode When the PC is in hibernation mode, it saves everything that is in PC memory to the hard disk, turns off the monitor and the hard disk, and then turns itself off.
6 If you changed the Enable hibernation check box, click Apply. To automatically put the PC into standby or hibernation mode, modify the power management settings: 7 Click the Power Schemes tab to set the timers for standby and/or hibernation. In the Power Schemes box, select a power scheme from the drop-down list. Choose the timers: 1 Click Start on the taskbar. 2 Click Control Panel. 3 Click Performance and Maintenance, if it is present. 4 Double-click Power Options.
46 HP Pavilion home PC Filename: ma3ubqs.doc Title: HP-Print2k.dot Template: HP-Print2K.
Setting Up and Using the Internet Access to the ISPs in your area (available on select models). Some ISPs offer a traditional dial-up service, and others offer faster technologies such as Digital Subscriber Line (DSL) and cable. (DSL, ADSL, and cable ISPs are not available in all countries/regions.) Internet Explorer Web browser. Outlook Express e-mail software program. V.92-ready modem and modem software (not available in all models). LAN (local area network) card (select models only).
What is an ISP? What is the World Wide Web? Internet Service Providers (ISPs) are businesses that give you access to the Internet, and most of them provide an electronic mail service (e-mail). There is usually a monthly fee for this service. The World Wide Web (WWW), also called the Web, is a public part of the Internet used by individuals, companies, governments, and organizations. These individuals and groups have created millions of Web site pages in support of their activities.
What is a URL? What is an e-mail address? The URL (Uniform Resource Locator) identifies a file location, typically in the form Your e-mail address identifies the electronic post office box where people can send you electronic mail. E-mail addresses have the form The URL contains the protocol and the pathway to a site and may include the path to a specific file within that site. Each period, or dot, in the URL separates elements within the address. For example, you will see the URL extension .
How do I search the Internet? The browser program you use includes a Search feature. You may need to click a button or select the feature from a menu to display it, depending on the type of browser program it is. Type a question or a word that describes the information you want to find into the search box, and then press Enter. The Windows Search feature includes direct access to the Internet Explorer Search.
Or The setup poster shows you how to plug in a modem/telephone cable to the PC modem connector and to your telephone service line wall jack connector. To identify the modem connector, look at the back panel of the PC. The modem looks similar to one of the following illustrations. Note: Your PC may have only one modem/telephone connection. Your PC may also have a network interface that uses an RJ-45 port and network cable to connect to a LAN (local area network).
Back of PC To connect the cable between the modem and the telephone service line: 1 Plug one end of a modem cable into the modem connector on the back of the PC. This connector may be labeled with either Line or a modem connector symbol. 2 Plug the other end of the cable into the telephone service line jack on the wall.
Your modem driver can be upgraded to enable certain V.92 features. For information, go to the Support Web site listed in the Warranty and Support Guide, click the support link, type Pavilion V.92 into the search box, and then click the arrow to the right of the box. Follow the instructions provided. Important: Your ISP must support the V.92 standard in order to use any of the V.92 features.
To connect the network interface to the network: 1 Plug the network cable into the RJ-45 port on the back of the PC. Warning: DO NOT plug the telephone line or modem cable into the network interface connector. Although the plug on the telephone cable looks similar to the plug on the network interface cable, they are not the same. 2 Plug the other end of the network cable into a 10BaseT or a 100BaseT port on the network hub. Note: The hub is a device to which all PCs on the network are connected.
Note: If you decide to use a DSL (Digital Subscriber Line) or a cable Internet connection, contact your ISP for any specific software and hardware you may need. 2 Open Easy Internet Sign-up: Double-click the Easy Internet Sign-up icon on the desktop. Or Click Start on the taskbar. Choose All Programs. Choose Online Services. Click Easy Internet Sign-up. 3 Follow the onscreen instructions. Connecting to the Internet A Web browser program searches for, finds, and displays Web site information.
Using any browser If you signed up for Internet access with an ISP that allows any browser, use Internet Explorer or another Web browser to explore the Internet. To connect to the Internet, use either of the following methods: Click Start on the taskbar, choose All Programs, choose Online Services, and click Internet Explorer. Or The Hewlett-Packard Web site is dedicated to HP Pavilion home PC owners and to the entire HP product line.
Note: These links may not be available in all countries/regions. Products & Services: Find detailed information about all HP products and the various business and personal computing services HP offers. Drivers: Download software and driver updates. Support: Receive technical support and detailed product information such as hardware warranties, specifications, and instruction manuals.
3 If necessary, select your country/region, and then click the arrow to the right of the list. 4 If necessary, click the Support link, and then select your model. To go directly to the English language support Web page for your HP Pavilion model and find online manuals for it, use the following steps: 1 Establish a connection to the Internet. 2 Type http://www.hp.com/cposupport into your Web browser Address box, and press the Enter key on your keyboard.
An account with an Internet Service Provider (ISP). Microsoft Internet Explorer (included with your HP Pavilion) or other browser program (usually provided by an ISP). A telephone dial-up modem connection, or a LAN, cable modem, or DSL connection from your PC to the ISP. Note: If you decide to use a DSL or a cable Internet connection, contact your ISP for any specific software and hardware you may need.
To send e-mail messages Open the Outlook Express program: 1 Click Start on the taskbar, and select the Outlook Express icon. Note: You can also press the E-Mail button on the keyboard to open Outlook Express (select models only). 2 Click the Create Mail button on the toolbar. 3 Type in, or select from an address book, the address of each recipient. 4 Type the message title in the Subject box. 5 Type your message in the New Message window. 6 Click the Send button on the toolbar when you’re finished.
Doing Common Tasks The PC has a diskette (floppy) drive (select models only), and one or more compact disc (CD) drives. For information about the optional 6-In-1 memory card reader (select models only), refer to “Using the 6-In-1 Memory Card Reader” on page 62. There are different types of optical disc drives that may be included with the PC, depending on your PC model: CD-ROM drive, which can read audio and data CD discs. CD-RW drive, which can read and record (burn) audio and data CD discs.
Using the Diskette (Floppy) Drive Insert the diskette into the drive (select models only) until it locks in place. Insert the diskette with the round metal disk face-down and the arrow on the top pointing into the drive. You can copy files from or to the diskette. When you are done, check that the light on the drive is off, indicating that the PC is not writing to the diskette, and then press the Eject button on the PC and remove the diskette.
Special note about the Safely Remove Hardware Utility Warning: Do not click Stop in the Safely Remove Hardware window with the USB Mass Storage Device selected. Doing so removes the operating system recognition of the 6-In-1 memory card reader from your PC; you must restart the PC to see your reader again. If you open the Safely Remove Hardware window by mistake, click Close. To use the 6-In-1 memory card reader Important: CompactFlash and Microdrive are keyed and cannot be inserted incorrectly.
Warning: Do not try to remove media when the in-use light is blinking. Doing so may cause loss of data.
CompactFlash I/II F A Card Insert Into 2-slot reader CompactFlash type I media Receptacle edge (holes) F (upper) CompactFlash type II media Receptacle edge (holes) F (upper) IBM Microdrive disk drive Receptacle edge (holes) F (upper) Secure Digital (SD) Memory Card Upside down (gold connector fingers up) G (lower) MultiMediaCard (MMC) Upside down (gold connector fingers up) G (lower) Memory Stick (MS) Memory Card Upside down (gold connector fingers up) G (lower) SmartMedia (SM) Memory
Inserting a CD or DVD Eject button The PC must be turned on to eject the disc tray. Your PC may look different from the ones shown here. Eject button Drive door (pull for optional drives) 1 Press the Eject button near the drive to eject the disc tray. Door (lower for 6-In-1 and diskette drive) 66 HP Pavilion home PC Filename: ma3ubqs.doc Title: HP-Print2k.dot Template: HP-Print2K.
3 Gently place the disc in the tray with the label facing up. Note: You can close the top drive tray or top two drive trays by pressing the media control open/close button or Eject buttons on the keyboard if your keyboard has them. Removing a CD or DVD Note: You cannot remove a CD or DVD when the PC is off. 2 Holding on to the disc edges only, lift the CD or DVD out of the tray. 3 Place the disc in its case. 4 Close the disc tray by gently pushing the tray into the PC.
Handling CDs Playing Music CDs To avoid damaging a CD, follow these guidelines: The PC includes MusicMatch Jukebox (select models) or Windows Media Player. This software lets you play music CDs. Return the CD to the case when you are finished using it. Handle the disc by its outside edges or center hole only. Do not touch the unlabeled side of a CD or place the unlabeled side down on your desk. Doing so could scratch the surface of the CD. Store CDs at room temperature.
To play a music CD: 1 Insert the music CD into the drive. The MusicMatch Jukebox window opens. Or If the MusicMatch window does not automatically open, click Start on the taskbar, choose All Programs, choose Music (if it is present), MUSICMATCH, and then select MUSICMATCH Jukebox. 3 To control the CD in the drive, click the buttons in the MusicMatch Jukebox window. To play a particular song, double-click its song title (or track number) in the Playlist.
To play a music CD: 1 Insert the music CD into the drive. The Windows Media Player window opens. Or If the Windows Media Player window does not automatically open, click Start on the taskbar, choose All Programs, choose Video (if it is present), and then select Windows Media Player. 2 To control the CD in the drive, click the buttons in the Windows Media Player window. To play a particular song, double-click its song title (or track number) in the Playlist.
Creating a CD by Using the CD-RW Drive Creating a CD by Using RecordNow Note: The CD-RW drive is available on select To open the RecordNow program: Your PC has recording (or burning) software (select models only) for creating CDs. You can make To An audio CD Create personal music CDs with your favorite music tracks and WAV, MP3, and WMA files. A data CD A copy of a CD Store data from files or folders on your hard disk drive. You can also write files directly to a CD-R or CD-RW disc.
Creating a music CD 1 Open RecordNow. Important: HP supports lawful use of technology and 2 Click Make a Music Disc. does not endorse or encourage the use of our products for purposes other than those permitted by national copyright law. RecordNow creates closed session music CDs, which means you must record all music files in one recording session. Music files can be recorded repeatedly on a rewriteable CD-RW disc, but all previously recorded files must be erased first.
4 To copy tracks from a music CD: a Insert the music CD, and then click Next. 5 To copy audio or MP3 files from your hard drive: a Insert a blank CD-R or CD-RW disc, and then click Next. c Click the Finish button when you have added all the audio files to your music CD project. Your audio files are prepared for recording. b Select files from the Music on System window, or click the Browse button to locate the files you want to copy, select them, and then click the Add button.
Creating a data CD 4 Click the Add Files and Folders button to locate the files you want to record. Select a file, and then click the Add button. Repeat this step until all files are selected. Use RecordNow to create a copy of a disc or of your personal data files from your hard drive. If the disc is not blank when you insert it, you must either erase it or insert another disc that is blank or appendable. 5 Click the Next button when you have finished adding files. 1 Open RecordNow.
Playing a DVD Note: DVD movies are often localized to geographical countries/regions. For information about this, see “Using country/region codes” on page 77. 1 Insert the disc into the DVD-ROM drive. Note: On a double-sided DVD, read the text 2 Close the disc tray by gently pushing the tray into the PC. The movie plays in its own resizable window, and the WinDVD control panel appears.
To start WinDVD without a disc in the drive: Understanding DVD terminology 1 Click Start on the taskbar. To understand the DVD controls, you should be familiar with DVD terminology. Each DVD can hold one or more titles. Most full-length movies have only one title on the DVD, but some DVDs include several short movies, with each movie being a separate title. 2 Choose All Programs. Choose Video, if it is present. 3 Choose InterVideo WinDVD Player. 4 Click InterVideo WinDVD 4.
Using the WinDVD control panel If you are playing a movie full screen and the panel is hidden, you can redisplay it as follows: 1 Right-click anywhere in the video window. 2 Click Player. The control panel appears. To resize the video window when it is not full screen, place the mouse pointer on a window corner and drag the border. Or Click the Full Screen button in the upper-right corner of the WinDVD control panel.
When the country/region code locks, if you need help, contact HP Support. The country/region number is usually placed over a world globe printed on the DVD packaging and disc. DVDs without country/region codes will play on any player or drive in any country/region.
The DVD+RW/+R drive is available on select models only. The DVD+RW/+R drive plays movie DVDs and music CDs, reads data CDs and DVDs, and records (burns) files to DVD+RW, DVD+R, CD-R, and CD-RW discs. Note: There are two types of DVD discs: DVD+RW/R and DVD-R/RW. DVD-R and DVD-RW discs do not work in the DVD+RW/+R drive. Using the Combo Drive The combination drive is available on select models only.
If you insert a blank DVD, a program opens for you to use to record to the disc. See “Creating a DVD by Using the DVD+RW/+R Drive” on page 79. Using HP Pavilion PC Tools The HP Pavilion PC Tools folder (select models only) in the All Programs/Hewlett-Packard menu contains special utilities for HP Pavilion owners. For example, you’ll find a utility for displaying system information. This folder also contains the HP Tour Guide and any onscreen guides included with your PC.
Getting Updates from HP for the PC HP provides an Internet-based service that includes informing you when updates are available for your PC (select models only). The Updates from HP support messages are also available to you through the Support Web site under the information for your model PC. To go to the Web site, refer to your Warranty and Support Guide.
To start Updates from HP After you view or close a message, it will not automatically display again. To turn off the Updates from HP Service 1 Click Start on the taskbar. You cannot receive messages, including important support messages that may be critical to the operation of your PC, while the service is off. 2 Choose All Programs. To turn off the service: To read a previously received message: 3 Choose Updates from HP. 4 Click Updates from HP again.
Re-enabling the Updates from HP Service When you re-enable the Updates from HP service, the service runs whenever you are connected to the Internet, and you receive messages as they become available. Double-click the Re-enable Updates from HP icon on the desktop. Or 1 Click Start on the taskbar. 2 Choose All Programs. 3 Choose Updates from HP. 4 Click Re-enable Updates from HP. HP Updates If you disable the service, you can use the Re-enable Updates from HP icon on the desktop to turn on the service.
84 HP Pavilion home PC Filename: ma3ubqs.doc Title: HP-Print2k.dot Template: HP-Print2K.
Help Resolving Problems Troubleshooting For help on general and miscellaneous problems you may be experiencing with the PC, refer to the following pages for possible solutions. Look up the description of the problem, and try the solution listed. For more detailed information, press the Help button on your keyboard, or click Start on the taskbar and select Help and Support. Problem Solution My PC won’t turn on at all.
Problem Solution My PC won’t turn on at all. (continued) If the PC doesn’t go through the above procedure, check the following: The power cord and all cables are securely plugged into the PC. The power cord is plugged into a grounded outlet. Check to see whether the outlet works by plugging another item into it. The monitor is connected to the PC, plugged in, and turned on. I installed a new printer or other device, and it won’t work.
Solution The PC (or part of it) doesn’t seem to be working. Try restarting the PC as follows: 1 Click Start on the taskbar. 2 Click Turn Off Computer. 3 Click Restart. If the PC shows no response to mouse or keyboard actions, reset the PC: 1 Press and hold the On button until the system turns off. 2 Wait a few seconds, and turn the PC back on. Help Problem Note: Using the On button to reset the system is not recommended and should be used only as a last resort.
Problem Solution The monitor doesn’t work, even though the PC appears to. Check the connection of the power cord into the monitor. Make sure the monitor is turned on — it has its own power button. Make sure the monitor power cord is plugged into a grounded outlet. Check to see whether the outlet works by plugging another item into it. (If the light on the front of the monitor is lit, the monitor is getting power.) Check the cable connection between the monitor and the PC.
Solution When I push one of the special or multimedia buttons on the keyboard, nothing happens. My keyboard doesn’t work, even though the PC and monitor seem to work. Check the button configuration. To reconfigure the button: 1 Click Start on the taskbar. 2 Click Control Panel. 3 Click Printers and Other Hardware, if present. 4 Double-click Keyboard. 5 In the Keyboard Properties window that appears, click the Buttons tab. 6 Double-click the button you want to change.
Problem Solution The AOL program comes up even though I’m not using it. If AOL opens when you are using another Internet Service Provider (ISP), the PC is still trying to use AOL for Internet access and you may want to remove the AOL program. To uninstall AOL: 1 2 3 4 Click Start on the taskbar. Click Control Panel. Double-click Add or Remove Programs. Select America Online, click Change/Remove, and then click Yes when the confirmation window opens.
Solution The mouse doesn’t work, even though everything else does. If nothing happens when you move the mouse, it’s possible that the mouse is connected improperly. PS/2 mouse only: Check that the cable connector pins are straight. Make sure the mouse is connected to the mouse port, not to the keyboard port. To reconnect these two cables, turn the PC off, reconnect the cables, and then turn the PC back on. If the pointer doesn’t move on the screen when you move the mouse, clean the mouse.
Problem Solution I cannot remove the cables for my external device from the multistorage bay cable tunnel (select models only). Remove the rear top cover: 1 Remove the multi-storage bay cover. See “Multi-Storage Bay — Peripheral Placement” in the “Start Here” section of this document. 2 Press tab (A) inside the bay and slide the top back cover toward the back of the chassis; then lift off the cover. A 92 HP Pavilion home PC Filename: ma3ubqs.doc Title: HP-Print2k.dot Template: HP-Print2K.
The PC uses the operating system and installed software programs during normal operation. If your PC works improperly or stops because of the software, you may be able to repair it. You need recovery discs (CDs or DVDs) for some repairs that use the HP Application Recovery program or the HP PC System Recovery program. The PC does not include recovery discs in the accessory box, but you can make your own recovery CDs or DVDs; see “Using HP PC Recovery CD-DVD Creator” on page 98.
Turn Off Computer When you turn off the computer and then turn it on again, you force the PC to copy the operating system into its memory and to clear some tracking information. This may eliminate some problems that can remain after performing a Restart. Refer to “Turning Off the PC” on page 42. Driver Rollback This Microsoft Windows XP feature is part of the Windows Installer program used with the Add or Remove Programs utility in the Control Panel.
Application and Driver Recovery If the problem with the PC seems to be with only one program or one driver, it may be that the application program or the driver program is damaged. You can reinstall individual factoryinstalled application programs and driver programs using the HP Application Recovery program (select models only); see “Application Recovery“ on page 101. System Recovery Use the HP System Recovery program as a last resort to reinstall the software.
Creating Recovery CDs/DVDs 1 You can recover (bring back) the operating system and programs that were included on your hard drive just as they were when you bought the computer. Note: A hard drive is a disk inside the computer that stores the operating system, programs, and data. 2 You recover the operating system and programs directly from your hard drive, where a copy was placed for your convenience. We call this part of your hard drive the “recovery partition.
3 2 4 Recovery 1 5 Quick Start Guide Filename: ma3ubqs.doc Title: HP-Print2k.dot Template: HP-Print2K.
The recovery discs can be used only with the specified PC model. The discs are licensed for use only with your HP Pavilion home PC. The recovery CDs/DVD can install the operating system and software on your PC hard disk drive if the software becomes corrupted or is accidentally erased. You can use this program to make only one set of recovery CDs or DVD for your PC. The recovery discs you create can be used only on your PC.
Using HP Recovery Tools CD 1 Close any open programs. To close programs, click X in the upper-right corner of each window. Your PC allows you to create (burn) a Recovery Tools CD. After you make the HP Recovery Tools CD, you can use it to: 2 Click Start on the taskbar. Read instructions to use each utility on the Recovery Tools CD. Start the System Recovery program from the recovery partition. Remove the System Recovery partition from your PC hard disk drive to increase space for data.
Warning: Before using the HP PC Recovery Tools CD to change your hard disk drive, make System Recovery discs for your PC by using the HP PC Recovery CD-DVD Creator program (see page 98). You cannot make System Recovery CDs after you remove the System Recovery partition. You must create (burn) the Recovery Tools CD before you can use it. To create or to start the HP PC Recovery Tools CD: 1 Click Start on the taskbar. 2 Choose All Programs. 3 Choose Hewlett-Packard. 4 Choose HP Pavilion PC Tools.
Note: Not all models include the Application Recovery program. Perform steps 3 through 7 of the following procedure. If HP Application Recovery appears in the folder, your PC includes the program. If an individual factory-installed application or driver accidentally gets erased or damaged, you can reinstall the software using the HP Application Recovery program. Note: Do not use the Application Recovery program to reinstall software programs that came on CDs or DVDs included in the PC box.
System Recovery When other methods of repairing your system software (like System Restore or Application Recovery) fail, you may want to use the HP System Recovery program as a last resort to reinstall the software. When necessary, you can reinstall the operating system and the application software that was originally installed on the PC at the factory by using the System Recovery program. Warning: The HP System Recovery program will delete any data or programs that you installed after purchase.
1 Turn off the PC. Disconnect all peripheral devices from the PC except the monitor, the keyboard, and the mouse. Turn on the PC. 2 Click Start on the taskbar, choose All Programs, choose Hewlett-Packard, choose HP Pavilion PC Tools, and click HP PC System Recovery. 3 Wait until the System Recovery window appears, asking Do you really want to start System Recovery? 4 Click Yes to continue with the recovery process.
4 During the startup, do the following to enter the System Recovery program: When the blue screen with the HP Invent logo appears, press the F10 key on the keyboard. (You have only a few seconds to press the F10 key before the normal startup process continues.) System Recovery Using Recovery discs Make your own recovery CDs/DVDs before you need them; recovery discs are not included with your PC. See “Creating Recovery CDs/DVDs” on page 96.
Full System Recovery: This recovery function completely erases and reformats the hard disk drive. The program performs a full System Recovery to reinstall the operating system, programs, and drivers from the recovery discs. However, you must reinstall any software that was not installed on the PC at the factory. This includes software that came on CDs included in the PC accessory box, and software programs you installed since your purchase.
4 Disconnect all peripheral devices from the PC except the monitor, the keyboard, and the mouse. 5 Press the On button to turn on the PC. 6 The PC starts the recovery; wait for the onscreen instructions to display, and then follow those instructions. For standard recovery, press R. Click Next to proceed with the System Recovery. Click Yes to start the recovery. Insert the remaining recovery discs when directed. Or For full System Recovery, press F. Click Yes to perform a full System Recovery.
The partition: Houses a backup version of the operating system and the programs included with the PC. Takes up about 5 GB of hard disk space, reducing the total amount of space available for your use. Can be removed using the Recovery Tools CD. The PC comes with a hard disk drive. Depending on your model, the hard disk drive has 20 gigabytes (GB) to more than 250 GB of total disk space.
To display hard disk space To view the amount of space on the hard disk: 1 Click Start on the taskbar. 2 Click Control Panel. 3 Click Performance and Maintenance, if it is present. 4 Double-click Administrative Tools. 5 Double-click Computer Management. The Computer Management window opens. 6 Double-click Storage. 7 Double-click Disk Management (Local). Information is displayed for each drive on your PC. You may need to scroll the window to the right to see the capacity and the free space sizes.
You can remove most desktop icons from your display by either deleting them or moving them to an unused icons folder. To delete a desktop icon, right-click the icon, and then select Delete. Important: You should not delete any unfamiliar desktop icons. If in doubt, do not delete it. Instead, use the steps to move the desktop icons to the Unused Desktop Shortcuts folder. To move desktop icons to the Unused Desktop Shortcuts folder: 1 Click Start. 2 Choose Control Panel.
Reinstalling programs You can reinstall most programs that came with your PC. For programs that came on CDs or DVDs, just reinsert the disc and follow the onscreen instructions. For preinstalled programs, follow the steps in “Application Recovery” on page 101. 110 HP Pavilion home PC Filename: ma3ubqs.doc Title: HP-Print2k.dot Template: HP-Print2K.
Index A adjusting microphone volume, 37 adjusting speaker volume, 35, 86 All Programs, xxiv, 12 All Programs list changing, 12 America Online, troubleshooting, 90 Application Recovery, 93, 95, 101 Application Recovery warning, 101 autoscrolling, mouse, 16 available hard disk space checking, 107 increasing, 108 Start, 11 User, 27 B box contents, viii browsing the Internet, 50 burning DVD, 79 buttons Eject, 66 E-Mail, 28 Help, 27 HP, 27 mouse, 14 mouse scroll wheel, 14 Mute, 29 Off.
CD-RW drive burning, 71 playing, 71 recording, 71 types of discs, 71 CD-RW, writing to, 71 chassis, symbols, xiv closed session music CDs, 72 Combo drive, 79 components, ix, 6 Connect button, 55 connecting Ethernet, 53 multi-channel speakers, 33 telephone line, 55 to a Web site, 56 to the Internet, 55 connectors cable tunnel, xi PC back, xiii, xv PC front, ix, xvi symbols on chassis, xiv Control Panel, opening, 11 corrupted software, 101 country/region code warning, 78 112 country/region codes for DVD, 77
F faxes, standby mode, 43 floppy disk.
K M keyboard features, 18 indicators, 24 media controls, 30 reconfiguring buttons, 30 troubleshooting, 89 types of buttons, 26 keyboard buttons for CD or DVD, 30 keyboard keys alphanumeric, 22 arrow, 23 edit, 23 function, 22 numeric, 24 manuals, online, 4, 57 memory card reader, card types, 62 messages from HP reading, 82 turning off, 82 turning on, 83 microphone, 36 adjusting volume, 37 using with multi-channel speakers, 34 Microsoft Recovery Console utility, 99 Microsoft XP Help, xxviii, 4 modem modem
Net. See Internet, about network cable warning, 54 network interface about, 53 connecting, 53 network interface card, 53 NIC, 53 no sound, 86 O Off button.
problem resolution HP Instant Support, 13 troubleshooting, xxii, 85 product notices, 81 programs, uninstalling, 108 R receiving e-mails, 58 reconfiguring keyboard buttons, 30 RecordNow program, 71 recovering system overview, 96 recovery CDs/DVDs, xxix System Restore, 95 using CDs/DVD, 104 using System Restore, 93 recovery CDs/DVDs, 96 Recovery CD-DVD Creator, 98 recovery CDs/DVDs, xxix Recovery Tools CD making or starting, 99 region code, 77 registering with HP, xvii, 7 116 reinstalling software, 101, 10
T taskbar, Windows, 11 technical specifications, 56 technical support, 56 television, viewing PC image on a TV, 38 terminology for DVD, 76 tips, 81 tour desktop, xxv e-mail, xxv Internet, xxv software, xxv Tour Guide, xxv, 80 tours in Help and Support, 13 troubleshooting, xxii, 85 turning off messages from HP, 82 PC, 42, 94 turning on PC first time, 6 troubleshooting, 85 TV, disconnecting, 42 TV-out, 38 cables, 38 connecting a TV set, 38 disabling, 41 viewing PC image on TV, 40 U uninstalling software, 10
User button, 27 using 6-In-1 memory card reader, 62 using a microphone, 36 using the diskette (floppy) drive, 62 using the PC, 11 V V.92 modem, 53 viewing onscreen guides, 80 virus protection, 8 voltage requirements, 1 voltage warning, 85 volume adjusting, 35, 86 adjusting microphone, 37 controls, 29 show Volume icon on taskbar, 35 Volume Control settings window, 35, 36 118 W warranty, xxvi, 8 warranty warning, 85 Web.