User’s Guide HP f2304 High Definition 23” LCD Monitor
The information in this document is subject to change without notice. Hewlett-Packard® Company makes no warranty of any kind with regard to this material, including, but not limited to, the implied warranties of merchantability and fitness for a particular purpose. HP shall not be liable for errors contained herein or for incidental or consequential damages in connection with the furnishing, performance, or use of this material.
Contents 1 Product Features 2 Safety and Maintenance Guidelines Important Safety Information . . Maintenance Guidelines . . . . . Cleaning the Monitor . . . . . . . Shipping the Monitor . . . . . . . . . . . . . . . . . . . . . . . . . . . . . . . . . . . . . . . . . . . . . . . . . . . . . . . . . . . . . . . 2–1 2–2 2–4 2–4 Selecting the Signal Connectors and Cable . . . . . . . . . . . . . . . . Removing the Monitor Base . . . . Mounting the Monitor . . . . . . . .
Contents Using Video Connectors . . . . . . . . . . . . . . . . . . 4–12 Composite to S-video Adapter . . . . . . . . . . . 4–12 5 Troubleshooting Solving Common Problems . . . . . . . . . . . . . . . . . 5–1 Getting Help Using the Worldwide Web . . . . . 5–3 Preparing to call Technical Support . . . . . . . . . 5–3 A Specifications f2304 Flat Panel Monitor . . . . . . . . . . . . Recognizing Preset Display Resolutions LCD Monitor Quality and Pixel Policy for f2304 Monitor . . . . . . . . . . . . . . .
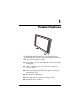
1 Product Features The HP f2304 High Definition 23” LCD Monitor (liquid crystal display) has an active matrix and a thin-film transistor (TFT). The monitor features include: ■ Large wide screen 23-inch diagonal (58.4 cm) viewable area display. ■ 1920 × 1200 resolution, plus full-screen support for lower resolutions. ■ Wide viewing angle to allow viewing from a sitting or a standing position. ■ Tilt adjustment capabilities. ■ Removable base for flexible mounting solutions.
Product Features ■ 1–2 Multiple video inputs supported: ❏ VGA analog ❏ DVI-I supports either analog or digital signal input ❏ S-video with composite video adapter included ❏ Component video for high definition video support ■ Video input includes PiP (Picture in Picture) option for windowed video display over data display. ■ The high definition component video input supports 480i, 480p, 720p, and 1080i video format.
2 Safety and Maintenance Guidelines Important Safety Information A power cord is included with your monitor. If another cord is used, use only a power source and connection appropriate for this monitor. For information on the correct power cord set to use with your monitor, refer to the “Power Cord Set Requirements” section in Appendix B. Å WARNING: To reduce the risk of electric shock or damage to your equipment, do not disable the power cord grounding feature.
Safety and Maintenance Guidelines Å WARNING: For the protection of your monitor, as well as your computer, connect all power cords for your computer and its peripheral devices (such as a monitor, printer, scanner) to some form of surge protection device such as a power strip or Uninterruptible Power Supply (UPS). Not all power strips provide surge protection; the power strips must be specifically labeled as having this ability.
Safety and Maintenance Guidelines Ä ■ Turn your monitor off when not in use. You can substantially increase the life expectancy of your monitor by using a screen saver program and turning off the monitor when not in use. ■ Unplug your monitor from the wall outlet before cleaning. Do not use liquid cleaners or aerosol cleaners. Use a damp cloth for cleaning. If the screen requires additional cleaning, use an antistatic screen cleaner.
Safety and Maintenance Guidelines Cleaning the Monitor To clean the monitor, follow these steps: 1. Turn off the monitor and the computer. 2. Unplug the monitor. 3. Dust the monitor by wiping the screen and the cabinet with a soft, clean cloth. Ä CAUTION: Do not use benzene, thinner, ammonia, or any volatile substance to clean the monitor screen or cabinet. These chemicals may damage the monitor. Never use water to clean an LCD screen.
3 Setting Up the Monitor The f2304 monitor connects to your computer through an analog connector (VGA) or a digital (DVI) connector. Some video cards support a higher resolution through an analog (VGA) connection than through a digital (DVI) connection. The f2304 monitor supports resolutions up to 1920 x 1200 for both analog and digital connections. Please see the documentation that came with your PC or video card for details regarding the video resolution settings supported by your equipment.
Setting Up the Monitor 2. Connect one end of the VGA monitor signal cable to the VGA video connector on the rear panel of the computer, and the other end to the back of the monitor. Or Connect one end of the DVI-D monitor signal cable to the DVI video connector on the rear panel of the computer, and the other end to the back of the monitor.
Setting Up the Monitor Å WARNING: To reduce the risk of electric shock or damage to your equipment: Do not disable the power cord grounding plug. The grounding plug is an important safety feature. Plug the power cord into a grounded (earthed) electrical outlet that is easily accessible at all times. Disconnect power from the monitor by unplugging the power cord from the electrical outlet. Do not place anything on power cords or cables.
Setting Up the Monitor 4. Remove side panel. See “Removing the Side Panel” on page 3-7. Connect the speakers cable to the PC Audio In connector on the monitor and then connect the other end to the Audio Out connector on the back of the PC. 5. Adjust the monitor as needed for your comfort using the monitor’s tilt adjustment capabilities.
Setting Up the Monitor Å WARNING: Burn-in image damage may occur on monitors that display the same static image on screen for a prolonged period of time. To avoid burn-in image damage on your monitor screen, you should always activate a screen saver application or turn off the monitor when it is not in use for a prolonged period of time.
Setting Up the Monitor Ä CAUTION: Ensure that the front bezel of the monitor is positioned over a flat table or desktop to prevent it from getting scratched, defaced, or broken when removing the base from the monitor. To remove the monitor base: 1. Disconnect and remove the signal and power cables from the back of the monitor. 2. Lay the monitor face down on a flat area. 3. Remove the back panel by gently pulling on the handle and then slowly easing the tabs around the panel out of the tab slots. 4.
Setting Up the Monitor Mounting the Monitor 1. Remove the monitor base. Refer to “Removing the Monitor Base” steps in the previous section. 2. With the base is removed, use the four threaded screw holes on the monitor panel to mount the monitor. The mounting holes are spaced 4 inches (10.2 cm) apart. the monitor to a swing arm or other mounting fixture ✎ Mount by following the instructions included with the mounting fixture to be used.
Setting Up the Monitor Side Panel Connectors A B C D E F G Label Connector Color A Y Green B Pb Blue C Pr Red D S-VIDEO IN Black Function High-Definition Component Video Input Connects to the video component output of a DVD player or set-top box. The f2304 monitor is capable of displaying video from 480i, 480p, 720p, and 1080i sources. S-video Input connects to an S-video output device, such as console game, set-top box, VCR, or DVD player.
Setting Up the Monitor Label Connector Color E R Red F L White G User’s Guide Lime Green Function Right/Left RCA audio line-in connects to an audio source, such as a console game, set-top box, VCR, or DVD player. When component or S-video input is selected from the onscreen display, audio will be used from this source. PC Audio In connects to audio from a PC source. When VGA or DVI input is selected, audio will be used from this source.
Setting Up the Monitor Cable Management The f2304 monitor is designed to help you organize your monitor cables in one area. The power cord, the VGA, and DVI cables can be threaded through the hole in the back of the monitor stand and positioned over the two hooks on the inside of the monitor stand, located through the back opening.
4 Operating the Monitor Installing the Information Files The User Guide CD included with this monitor contains two information files to be installed onto your computer; an .INF file and an .ICM file. ■ The .INF file defines monitor resources and provides specifications used by most operating systems to install support software for certain hardware devices. The .INF file ensures monitor compatibility and optimization with your computer’s graphics adapter. You can download .
Operating the Monitor Using Monitor Buttons The monitor buttons are located under the front panel of the monitor. The monitor buttons are used to: 4–2 ■ Turn on the monitor. ■ Open the Main Menu onscreen display (OSD) window where you can change the monitor settings. ■ Control the brightness and contrast of the display. ■ Open the Picture in Picture (PiP) window when analog or digital video is displayed. ■ Select signal input. ■ Adjust volume.
Operating the Monitor A B C D E FGH I J Monitor Buttons Icon/ Label Control Function A Power button and Power LED Turns the monitor on and off. Full power = Blue Sleep = Amber B Headphone connector Use a headphone device. Note: When the headphone connector is being used, the monitor speakers are muted. C _ Volume Down Turns volume lower. D + Volume Up Turns volume higher. E PiP PiP button • Opens the Picture in Picture (PiP) window when analog or digital video is displayed.
Operating the Monitor Monitor Buttons Icon/ Label Control Function F Input Signal Input button Signal input selection — scrolls through VGA-Analog, DVI-Analog, DVI-Digital, S-video, and component video input. G Auto Auto button Automatically adjusts the display to the ideal setting. OSD Down Adjustment • Select and adjust the on-screen display (OSD) Menu settings. H • Brightness control hot key. When OSD is not active, pressing the OSD Down control displays the OSD Brightness adjust function.
Operating the Monitor Adjusting Monitor Settings Press the Menu button to view the On Screen Display (OSD) Menu. The Main Menu window pops up and you can make adjustments to your monitor’s various features. Use the arrow keys in the Main Menu window to make your adjustments. Using the On-Screen Display The adjustments for screen settings are located in the on-screen display (OSD). Press the Menu button on the monitor’s front panel to view the OSD menu.
Operating the Monitor OSD Menu Levels Menu Level 1 Menu Level 2 Image Zoom (Displayed when video device is selected) Menu Level 3 Menu Level 4 Zoom Off Zoom On 1 Zoom On 2 Color Sharpness Sharpness Selection Clock Adjustment Scale Clock Phase Adjustment Scale 9300K 6500K - sRGB Language Custom Color Red, Green, Blue Video Color Hue, Saturation Deutsch English Español Français Italiano Nederlands Management 4–6 Power Saver On/Off Selection Power On Recall On/Off Selection Mode Disp
Operating the Monitor OSD Menu Levels Menu Level 1 Menu Level 2 Menu Level 3 Serial Number Display serial number Sleep Timer Set current & sleep time Menu Level 4 Basic Menu OSD Control Video Input Controls Horizontal Position Adjustment Scale Vertical Position Adjustment Scale OSD Timeout Adjustment Scale OSD Transparency Adjustment Scale Video Input Select Analog (D-SUB) Analog (DVI) Digital (DVI) S-video Component Video Auto Detect PiP Control PiP Source S-video Component Video Pi
Operating the Monitor OSD Menu Levels Menu Level 1 Factory Reset Menu Level 2 Menu Level 3 Menu Level 4 Horizontal Position Adj Scale Vertical Position Adj Scale Yes No Exit Image Control Clock and Clock Phase selections are ✎ The not available when the monitor is operating in the DVI (digital) mode.
Operating the Monitor Identifying Special OSD Messages Special OSD messages appear on the monitor screen for the following monitor conditions: ■ Input Signal Out of Range — Indicates the monitor is unable to access or fully support the provided input signal. The monitor’s preferred video mode is 1920 x 1200 @ 60Hz. ■ Going to Sleep — Indicates the monitor is entering a reduced power state or “sleep” mode.
Operating the Monitor Enhancing the Video Function The monitor includes a zoom feature that allows you to adjust the viewable image to full screen display. It enhances video performance by changing the screen’s aspect ratio, the ratio of the picture’s width to its height, to get 4 to 3 (standard broadcast) and 16 to 9 (widescreen) formats. The zoom feature is available when the signal input selection is set to super video or component video. To use the zoom feature: 1.
Operating the Monitor DVD wide screen modes may provide formats other ✎ Some than 16:9. When this occurs, black video borders may remain visible above and below the displayed image when Zoom On 2 is active. 5. When the desired zoom setting is highlighted, press the Menu button to confirm the selection. The OSD returns to the Image Control menu. Select the option to Cancel or Save the new zoom setting. 6. Press the Menu button and select Exit to close the Main Menu.
Operating the Monitor adjusting the Clock and Clock Phase values, if the ✎ When monitor images become distorted, continue adjusting the values until the distortion disappears. To restore the factory settings, select Yes from the Factory Reset menu in the OSD.
Operating the Monitor 4. Press the Input button to select S-video input. 5. If the display becomes distorted, press and hold the PIP button for at least 5 seconds until the display is corrected. step 5 whenever the Input button is pressed, or the ✎ Repeat Factory Reset Function is activated.
Operating the Monitor 4–14 User’s Guide
5 Troubleshooting Solving Common Problems The following table lists possible problems, the possible cause of each problem, and the recommended solutions. Problem Possible Cause Solution Screen is blank or the No Input Signal message is displayed. Power cord is disconnected. Connect the power cord. Monitor power switch is turned off. Press the power button. Video cable is improperly connected. Connect the video cable properly. Refer to Chapter 3 ”Setting Up the Monitor” for more information.
Troubleshooting Problem Possible Cause Solution Image appears blurred, indistinct, or too dark. Brightness and contrast are too low. Press the Menu button to open the OSD Menu, and adjust the brightness and contrast as needed. Image is not centered. Image position may need adjustment. Press the Menu button to access the OSD menu. Select Image Control to adjust the horizontal or vertical position of the image. “Check Video Cable” is displayed on screen. Monitor video cable is disconnected.
Troubleshooting Getting Help Using the Worldwide Web Before contacting customer services, refer to the support Web site at: http://www.hp.com/support Preparing to call Technical Support If you cannot solve a problem using the troubleshooting tips in this section, you may need to call technical support.
Troubleshooting 5–4 User’s Guide
A Specifications f2304 Flat Panel Monitor Display Type 23 inches Wide screen TFT LCD 58.4 cm Viewable Image Size 23-inch diagonal 58.4 cm 20o Tilt –5 to Face Treatment Anti-glare polarizer with hard coating Maximum Weight (unpacked) 20.9 lbs. Dimensions (includes pedestal Height (maximum) Depth Width 16.9 inches 7.8 inches 25.3 inches 9.
Specifications f2304 Flat Panel Monitor Relative Humidity Operating Non-Operating 20 to 80% 5 to 95% Power Source 100 – 240 V 50 – 60 Hz Power Consumption <100 watts Input Terminals VGA 15-pin D-type connector with cable included. DVI-I connector with DVI-D cable included S-video connector with composite video adapter included Component Video Color Display Values CIE* Chromaticity Coordinates x (+/–0.030) y (+/– 0.030) Red 0.640 0.332 Blue 0.146 0.065 Green 0.288 0.
Specifications Recognizing Preset Display Resolutions The HP f2304 High Definition 23” LCD Monitor supports the display resolution modes listed in the table below. Some of these modes may not be available from the video graphics system used in the computer. Preset modes 20, 22 and 24 supports the f2304 monitor using only the VGA signal input.
Specifications Preset Pixel Format Horz Freq (kHz) Vert Freq (Hz) Pixel Clk (MHz) Standard 7 1024 x 768 48.36 60.00 65.000 VESA 8 1024 x 768 60.02 75.03 78.750 VESA 9 1024 x 768 68.68 85.00 94.500 VESA 10 1152 x 720 44.86 60.00 66.750 CVT 083MA DVT 16:10 11 1152 x 870 68.68 75.06 100.000 MAC 12 1152 x 900 61.80 65.96 92.978 SUN 13 1280 x 768 47.396 60.0 68.25 CVT 0.98M9-R 14 1280 x 960 60.00 60.00 108.000 VESA 15 1280 x 1024 63.98 60.02 108.
Specifications LCD Monitor Quality and Pixel Policy for f2304 Monitor The HP f2304 monitor uses high-precision technology manufactured according to HP standards, to guarantee trouble-free performance. Nevertheless, the display may have cosmetic imperfections that appear as small bright or dark spots. This is common to all LCD displays used in products supplied by all vendors and is not specific to the HP f2304 displays. These imperfections are caused by one or more defective pixels or sub-pixels.
Specifications To locate defective pixels, the monitor should be viewed under normal operating conditions and in normal operating mode at a supported resolution and refresh rate, from a distance of approximately 16 inches (50 cm). HP expects that, over time, the industry will continue to improve its ability to produce displays with fewer cosmetic imperfections and HP will adjust guidelines as improvements are made.
Specifications Using the Energy Saver Feature When the monitor is in its normal operating mode, the monitor uses less than 100 watts of power and the Power light is green. The monitor also supports a reduced power state. The reduced power state will be entered into if the monitor detects the absence of either the horizontal sync signal and/or the vertical sync signal.
Specifications A–8 User’s Guide
B Agency Regulatory Notices Federal Communications Commission Notice This equipment has been tested and found to comply with the limits for a Class B digital device, pursuant to Part 15 of the FCC Rules. These limits are designed to provide reasonable protection against harmful interference in a residential installation.
Agency Regulatory Notices Modifications The FCC requires the user to be notified that any changes or modifications made to this device that are not expressly approved by Hewlett-Packard may void the user’s authority to operate the equipment. Cables Connections to this device must be made with shielded cables with metallic RFI/EMI connector hoods to maintain compliance with FCC Rules and Regulations.
Agency Regulatory Notices To identify this product, refer to the Part, Series, or Model number found on the product. Canadian Notice This Class B digital apparatus meets all requirements of the Canadian Interference-Causing Equipment Regulations. Avis Canadien Cet appareil numérique de la classe B respecte toutes les exigences du Règlement sur le matériel brouilleur du Canada.
Agency Regulatory Notices Japanese Notice Korean Notice EPA Energy Star Compliance Monitors that are marked with the Energy Star® Logo meet the requirements of the EPA Energy Star program. As an Energy Star Partner, Hewlett-Packard has determined that this product meets the Energy Star guidelines for energy efficiency. Specific details on using the Energy Saving features can be found in the energy saver or power management section of the computer manual.
Agency Regulatory Notices Power Cord Set Requirements The monitor power supply is provided with Automatic Line Switching (ALS). This feature allows the monitor to operate on input voltages between 100-120V or 200-240V . The power cord set (flexible cord or wall plug) received with the monitor meets the requirements for use in the country where you purchased the equipment. If you need to obtain a power cord for a different country, you should purchase a power cord that is approved for use in that country.
Agency Regulatory Notices HP Recycling Program HP offers product end-of-life return programs for HP and other manufacturers’ hardware in several geographic areas. The terms and availability of these programs vary by geography because of differences in regulatory requirements and local customer demand. For information on the HP recycling program, refer to the HP Web site at: http://www.hp.com/hpinfo/globalcitizenship/ environment/recycle/hardware.
C TCO ‘99 Requirements You have just purchased a TCO ‘99 approved and labeled product! Your choice has provided you with a product developed for professional use. Your purchase has also contributed to reducing the burden on the environment and to the further development of environmentally adapted electronics products.
TCO ‘99 Requirements What does the environmental labeling involve? This product meets the requirements for the TCO ‘99 scheme which provides for an international and environmental labeling of personal computers. The labeling scheme was developed as a joint effort by the TCO (The Swedish Confederation of Professional Employees), Svenska Naturskyddsforeningen (The Swedish Society for Nature Conservation), Statens Energimyndighet (The Swedish National Energy Administration), and SEMKO AB.
TCO ‘99 Requirements Environmental requirements Flame retardants: Flame retardants are present in printed circuit boards, cables, wires, casings and housings. Their purpose is to prevent, or at least to delay, the spread of fire. Up to 30% of the plastic in a computer casing can consist of flame retardant substances. Most flame retardants contain bromine or chloride, and those flame retardants are chemically related to another group of environmental toxins, PCBs.
TCO ‘99 Requirements Mercury:* Mercury is sometimes found in batteries, relays and switches. It damages the nervous system and is toxic in high doses. The relevant TCO ‘99 requirement states that batteries may not contain any mercury. It also demands that mercury is not present in any of the electrical or electronics components associated with the labeled unit. There is however one exception.