HP PCIe Workload Accelerator HHHL SSD Installation Guide HP PCIe Workload Accelerator Half-Height, Half-Length NAND Flash SSD Abstract his document describes how to install an HP PCIe Workload Accelerator half-height, half-length (HHHL) PCIe NAND Flash SSD into a host system HP Part Number: 727351-001 Published: February 2013 Edition: 1
© Copyright 1999, 2013 Hewlett Packard Inc. Confidential computer software. Valid license from HP required for possession, use or copying. Consistent with FAR 12.211 and 12.212, Commercial Computer Software, Computer Software Documentation, and Technical Data for Commercial Items are licensed to the U.S. Government under vendor's standard commercial license. The information contained herein is subject to change without notice.
Contents 1 Introduction...............................................................................................4 HP PCIe Workload Accelerator Overview....................................................................................4 System Recommendations.....................................................................................................6 Hardware Recommendations.................................................................................................
1 Introduction This document describes how to install an HP PCIe Workload Accelerator half-height, half-length (HHHL) PCIe NAND Flash SSD into a host system and complete the required steps to get the drive into a functional state. Additional documentation is referenced as needed.
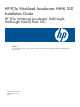
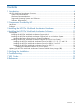
Figure 1 HP PCIe Workload Accelerator HHHL card (Component side) Figure 2 HP PCIe Workload Accelerator HHHL card (Solder Side) HP PCIe Workload Accelerator Overview 5
A total of 64 NAND placements are on the drive. The 350GB drive has four NAND die per package and the 700GB drive has eight NAND die per package. NAND are placed on both the component and solder sides of the drive along with the component and solder sides of two daughter boards as shown in Figure 1 (page 5) and Figure 2 (page 5). Figure 1 (page 5) shows the drive’s LEDs. The state of these LEDs, such as color and blinking pattern, convey important information about the drive’s status and behavior.
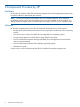
• Microsoft Windows Server 2012 (x86-64) SP128 • Microsoft Windows Server 2012 Hyper-V (x64) • Microsoft Windows 7 (x64) • Microsoft Windows 8 (x64) • Red Hat® Enterprise Linux (RHEL) version 5.5, 5.6, 5.7, 5.8 (SP 128), 6.1, or 6.2 (x86-64) • SUSE™ Linux Enterprise (SLES) version 11 SP1 or SP2 (x86-64) Software Requirements • The HP PCIe Workload Accelerator drive is compatible with both Windows and Linux 64-bit-compatible operating systems only.
2 Components Provided by HP Hardware HP provides the number of HP PCIe Workload Accelerator drives of the appropriate capacity that have been ordered or specified by the customer. NOTE: The HP PCIe Workload Accelerator drive is not usable until the HP PCIe Workload Accelerator support pack is downloaded from micron.com and installed on the host system. For specific OEMs, the support pack is provided either separately on micron.com or directly from HP.
3 Installing the HP PCIe Workload Accelerator Hardware To install the HP PCIe Workload Accelerator hardware in a system: 1. Power down the host system. 2. Ensure that you are ESD grounded before touching the HP PCIe Workload Accelerator drive or the host system. 3. Remove the HP PCIe Workload Accelerator drive from the ESD packaging and verify that it is not damaged. If you suspect that the board is damaged, contact your local HP representative or the HP PCIe Workload Accelerator Applications Team. 4.
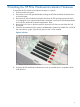
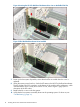
Figure 4 Inserting the HP PCIe Workload Accelerator Drive into an Available PCIe Slot Figure 5 PCIe Workload Accelerator Drive Installed 7. Power up the host system. If possible, ensure that the LEDs are visible when the cover is replaced. 8. When the system powers back on, check the LED state on the HP PCIe Workload Accelerator. The LED closest to the PCIe connector on the bottom of the card should be solid green, which indicates that the drive is ready to be used.
4 Installing the HP PCIe Workload Accelerator Software Prerequisites Review the following requirements before installing the HP PCIe Workload Accelerator support pack software: • The HP PCIe Workload Accelerator hardware must first be installed before installing the support pack software in the host system. • The system (both the operating system and all processors) must be 64-bit compatible. • If using the HPWAM GUI, the 64-bit version of JRE version 1.
a. b. c. Before installing HPWAM, install JRE 1.6 or later (64-bit version). For JRE installationinstructions and downloads, go to www.java.com If you have already installed HPWAM, the latest version can be installed over an existing installation. Run the installer located at: \Workload Accelerator Manager\Windows\Workload Accelerator Manager-x86_64–Setup.exe Updating the Device Driver (New or Existing Installation) 1. 2. 3. 4. 5. 6.
a. b. c. As a root user, run rpm -Uvh where is mtip32xx-.x86_64_rhel5ux.rpm. As a root user, run depmod. Reboot the system. NOTE: In both steps, is replaced by the Linux driver located in the /Linux Driver folder of the support pack. Installing the HP PCIe Workload Accelerator Driver for RHEL 6.1 and 6.2 For RHEL versions 6.1 and 6.2, the package name of our RHEL driver is kmod-mtip32xx-.el6.x86_64_rhel6ux.rpm. 1.
a. b. c. As a root user, run rpm -Uvh where is mtip32xx-kmp-default-..x86_64.rpm. As a root user, run depmod. Reboot the system. NOTE: In both steps, is replaced by the Linux driver located in the /Linux Driver folder of the support pack. Installing the HPWAM Software on a Linux System Once you have installed the Linux driver, install HPWAM using the following instructions. HPWAM will be installed under /opt/HP/WkldAccelManager.
5 Verifying the Installation To verify that the installation was successful: 1. In the operating system, verify that the drive appears as a recognized device and that the driver has been loaded. Refer to the sections in“Installing the HP PCIe Workload Accelerator Software” (page 11) for a description of the specific steps used to verify this. 2. Verify that the drive is online and ready to be used. a.
6 Troubleshooting Review the following troubleshooting steps if problems are encountered when following the installation instructions in this document. Problem: The drive is not appearing online or times out in the Windows Disk Manager with an I/O error. Solution: Confirm the HP PCIe Workload Accelerator drive and driver have been successfully installed. Check whether the LED status on the adapter board is blinking with an alternating flashing pattern.
a. b. c. Run rssdm -S. Check SMART attribute 194 (enclosure temperature) and compare value to the temp throttle threshold in C. If the enclosure temperature is greater than or equal to the threshold temperature, performance decreases. Problem: How can the Power Limiting setting be enabled on the HP PCIe Workload Accelerator? Solution: If your system is running a support pack release later than B126.01, the power limiting setting is disabled by default.
5. 6. Power the system on. Run the rssdm –L command to verify the SSD temperature. If the temperature remains below the thermal threshold limit, the SSD is ready for use at full performance. If the temperature exceeds the thermal threshold limit, the SSD can still be used but performance will be reduced because of the thermal limiting effect. Problem: The Flash Translation Layer (FTL) rebuild status in the Windows Event Log and Real SSDManager does not steadily increase.
7 LED Codes Table 2 LED Codes HHHL Green LED Amber LED Red LED Description Off Off Off Indicates that power is off. Green/amber flashing alternately (200ms) Off Indicates that power is on and the drive is busy with an internal operation. Wait until the operation completes. The drive state should change to a solid green LED state. On Off Off Indicates that either an ATA command is being processed or power is on, firmware is initialized, and there is no host activity.
8 References 20 • HP PCIe Workload Accelerator Manager User Guide • PCIe Express CEM Specification Version 2.0 • Java Runtime Environment version 1.
*727351-001* Printed in the US