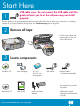
Start Here USB cable users: Do not connect the USB cable until this guide instructs you to or the software may not install properly. 1 Use this guide to set up the hardware and connect the HP All-in-One to either your computer or a working network. If you have problems during setup, see Troubleshooting later in the guide. 2 Remove all tape Lift the access door and remove tape on the left side of the device.
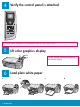
4 Verify the control panel is attached The control panel faceplate must be attached for the HP All-in-One to work! 5 Lift color graphics display For best viewing, remove the protective film from the display.
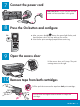
7 Connect the power cord USB Cable Users: Do not connect the USB cable until instructed later in this guide. 8 On 9 Press the On button and configure a After you press the On button, the green light flashes, and then becomes solid. This may take up to a minute. b Wait for the print cartridge prompt before continuing. Open the access door Lift the access door until it stops. The print carriage moves to the right.
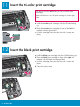
11 Insert the tri-color print cartridge The device must be On before you can insert the print cartridges. When the device is on, the print carriage is on the right side. a Hold the tri-color print cartridge with the HP label facing up. b Place the tri-color print cartridge in front of the left slot marked with the green label. c Push the cartridge firmly into the slot until it snaps into place. 12 Insert the black print cartridge a Hold the black print cartridge with the HP label facing up.
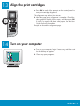
13 Align the print cartridges a Press OK at each of the prompts on the control panel to start print cartridge alignment. The alignment may take a few minutes. b After the page prints, alignment is complete. Check the color graphics display for the status, and then press OK. If it fails, try again with plain white paper. See the User Guide for more information. Recycle or discard the alignment page.
15 Choose ONE connection type (A or B) A: USB Connection - Do not connect yet. Use this connection type if you want to connect the device directly to one computer. (Do not connect until the software instructs you to.) Equipment needed: USB cable. For a USB connection, go to Section A (page 7) for instructions. B: Ethernet (Wired) Network Use this connection type if you want an Ethernet cable connection between the device and your network. Equipment needed: hub/router/switch and Ethernet cable.
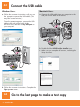
Section A: USB Connection A1 Choose the correct CD Windows Users: Macintosh Users: Note: If the startup screen does not appear, double-click My Computer, doubleclick the CD-ROM icon, and then double-click setup.exe. a Insert the HP All-in-One Windows CD. b Follow the onscreen instructions to install the software. c On the Connection Type screen, make sure to select directly to this computer. Continue to the next page. a Locate the HP All-in-One Macintosh CD. b Continue to the next page.
A2 Connect the USB cable Windows Users: a Follow the onscreen instructions until you see the prompt to connect the USB cable. (This may take several minutes.) Once the prompt appears, connect the USB cable to the port on the back of the HP All-in-One, and then to any USB port on your computer. Macintosh Users: a Connect the USB cable from your computer to the USB port on the back of the device. b Double-click the HP All-in-One installer icon.
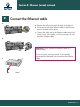
Section B: Ethernet (wired) network B1 a Connect the Ethernet cable a Remove the yellow plug from the back of the device. b Connect one end of the Ethernet cable to the Ethernet port on the back of the device. c Connect the other end of the Ethernet cable to the hub/ router/switch. If the cable is not long enough, you can purchase a longer cable. b Important: Do not connect the Ethernet cable to a cable modem. c You must have a working network.
B2 Insert the correct CD Windows Users: Macintosh Users: Note: If the startup screen does not appear, doubleclick My Computer, doubleclick the CD-ROM icon, and then double-click setup.exe. a Insert the HP All-in-One Windows CD. b Follow the onscreen instructions to install the software. c On the Connection Type screen, make sure to select through the network. Follow the onscreen instructions. a Insert the HP All-in-One Macintosh CD. b Double-click the HP All-in-One installer icon.
B3 Install software on additional computers If you have additional computers on your network, install the HP All-in-One software on each computer. Choose the correct HP All-in-One CD for each installation. Follow the onscreen instructions. Make sure that you choose the connection type between the network and your HP All-in-One (not between your computer and the network). B4 Go to the last page to make a test copy Troubleshooting Problem: A Carriage Jam message appears. Action: Open the access door.
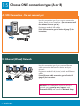
*Q7211-90257* *Q7211-90257* Make a test copy Q7211-90257 Now that you have finished setup, it is time to use your HP All-in-One. Make a copy of a favorite photo. a a Remove the plain white paper and load the 4 x 6 in (10x15 cm) photo paper. Place the paper glossy side down. Move the paper adjusters next to the stack of paper. b b Find a 4x6 in (10x15 cm) photo. c c Place the photo (face down) on the right front corner of the glass.