hp photosmart 240 series guida di consultazione
sommario 1 benvenuto . . . . . . . . . . . . . . . . . . . . . . . . . . . . . . . . . . . . 1 per maggiori informazioni . . . . . . . . . . . . . . . . . . . . . . . . contenuto della scatola . . . . . . . . . . . . . . . . . . . . . . . . . . descrizione della stampante . . . . . . . . . . . . . . . . . . . . . . . parte anteriore della stampante . . . . . . . . . . . . . . . . . . lato posteriore della stampante . . . . . . . . . . . . . . . . . . spie luminose. . . . . . . . . . . . . . . . . . . . .
risoluzione dei problemi di stampa . . . . . . . . . . . . . . . . . . . . 24 manutenzione della stampante . . . . . . . . . . . . . . . . . . . . 24 pulizia della cartuccia di stampa . . . . . . . . . . . . . . . . . . . 24 3 problemi di installazione . . . . . . . . . . . . . . . . . . . . . . . . 25 4 assistenza e specifiche . . . . . . . . . . . . . . . . . . . . . . . . . . 27 assistenza . . . . . . . . . . . . . . . . . . . . . . . . . . . . . . . . . . . . . assistenza telefonica hp . . . . . . .
1 benvenuto Complimenti per aver acquistato una stampante HP Photosmart 240 Series! Questa stampante fotografica compatta permette di stampare bellissime foto rapidamente e facilmente con o senza computer. Per la sua portatitilità e leggerezza può accompagnarvi in vacanza e negli eventi familiari o sociali per stampare all’istante le foto destinate ad amici e familiari.
capitolo 1 contenuto della scatola 1 2 5 7 6 4 3 La scatola d’imballaggio contiene: 1 La stampante stampante HP Photosmart 240 Series 2 Il poster stampante HP Photosmart 240 Series Guida di installazione 3 L’opuscolo stampante HP Photosmart 240 Series Guida di consultazione 4 Il CD del software della stampante stampante HP Photosmart 240 Series (in alcuni paesi i CD possono essere più d’uno) 5 Campioni di carta fotografica e di schede indice 6 La cartuccia di stampa in tricromia HP #57 7 Un
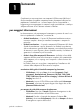
benvenuto descrizione della stampante parte anteriore della stampante Pannello di controllo Per maggiori informazioni, vedere pannello di controllo a pagina 5 Sportello del vassoio della carta Aprire questo sportello per caricare la carta o inserire una scheda di memoria Slot delle schede di memoria Per maggiori informazioni, vedere inserimento della scheda di memoria a pagina 12 Guida-carta in larghezza Per posizionare il bordo stretto del foglio nel vassoio di alimentazione guida di consultazione Spor
capitolo 1 lato posteriore della stampante Porta USB Da usare per collegare alla stampante un computer o una fotocamera digitale HP a stampa diretta Alloggiamento posteriore della carta In fase di stampa, la stampante spinge parzialmente la carta in questo alloggiamento, quindi Connettore del cavo di alimentazione Usare questa porta per collegare il cavo di Nota: Appoggiare la stampante su una superficie piana e stabile, con il lato posteriore e posto ad almeno 10 pollici (25 cm) da qualsiasi ostruzione,
benvenuto pannello di controllo ON Per accendere la stampante o metterla in modalità di risparmio energetico Schermo LCD Usare lo schermo per visualizzare le foto e le opzioni di menu STAMPA (PRINT) Per stampare foto selezionate da una scheda di memoria SALVA (SAVE) Per salvare le foto dalla scheda di memoria al computer ANNULLA (CANCEL) Per deselezionare le foto, per uscire da un menu o per interrompere un’azione precedentemente avviata MENU Le frecce consentono di visualizzare il menu della stampant
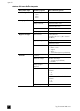
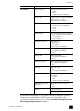
capitolo 1 struttura del menu della stampante Menu livello super.
benvenuto Menu livello super. Sottomenu/opzioni Altri sottomenu/opzioni Personalizza Dopo la stampa Deselezionare tutte le foto: • Sempre • Mai • Chiedi (opzione predefinita) N.
capitolo 1 informazioni sulla carta Le foto possono essere stampate su carta fotografica, comune o schede di indice.
benvenuto informazioni sulla cartuccia di stampa La stampante HP Photosmart 240 Series stampa foto a colori e in bianco e nero. HP offre due tipi di cartucce di stampa tra cui scegliere la più adatta al proprio progetto. Per ottenere foto di ottima qualità: Per stampare... Usare...
capitolo 1 4 Posizionare la cartuccia nell’alloggiamento con i contatti di rame rivolti verso l’interno della stampante e gli ugelli dell’inchiostro verso il basso. 5 Spingere la cartuccia dentro l’alloggiamento fino a che si assesta con uno scatto. 6 Chiudere lo sportello della cartuccia. Contatti di rame Dopo aver installato la nuova cartuccia, sull’LCD la stampante chiede di caricare carta comune. Inserire una scheda indice nel vassoio della carta e premere il pulsante OK.
2 stampa di foto da scheda di memoria Stampare foto di alta qualità per sé, per la famiglia e gli amici è molto facile. Se la fotocamera digitale conserva le foto su una scheda di memoria, per stampare o salvare le foto desiderate basta inserire la scheda nella stampante. I messaggi sull’LCD della stampante aiutano a procedere senza che sia necessario accendere il computer o avere la stampante collegata al computer. Nota: Le foto possono essere stampate anche usando il computer.
capitolo 2 formati di file di immagini supportati E’ possibile stampare foto da file di immagini JPEG e TIFF non compressi direttamente dalla scheda di memoria. Se la fotocamera utilizzata supporta altri formati di file, salvare i file sul computer e stamparli utilizzando un’applicazione adatta. Per maggiori informazioni, vedere la Guida in linea della stampante HP Photosmart.
stampa di foto da scheda di memoria Nota: Se la scheda di memoria SmartMedia viene inserita al contrario, la spia On/Attenzione (On/Attention) inizierà a lampeggiare. Rimuovere la scheda e reinserirla correttamente. Se la scheda è inserita correttamente, la stampante la legge e visualizza brevemente il numero di foto e video clip salvati sulla scheda.
capitolo 2 selezione delle foto da stampare Con il pannello di controllo è possibile selezionare una o più foto da stampare. selezione di una foto 1 Inserire la scheda di memoria nell'apposito slot della stampante. Per maggiori informazioni, vedere inserimento della scheda di memoria a pagina 12. 2 Premere il pulsante SCEGLI FOTO (SELECT PHOTOS) o per evidenziare il layout desiderato (1, 2 o 4 foto per pagina), poi premere il pulsante OK.
stampa di foto da scheda di memoria deselezione di una foto • Premere il pulsante SCEGLI FOTO (SELECT PHOTOS) o per visualizzare la foto da deselezionare, poi premere il pulsante ANNULLA (CANCEL). • Nella modalità a 9, usare le frecce sul pulsante SCEGLI FOTO (SELECT PHOTOS) per evidenziare la foto da deselezionare e premere il pulsante ANNULLA (CANCEL).
capitolo 2 stampa di più copie della foto 1 Inserire la scheda di memoria nell'apposito slot della stampante. Per maggiori informazioni, vedere inserimento della scheda di memoria a pagina 12. 2 Premere il pulsante SCEGLI FOTO (SELECT PHOTOS) o per evidenziare il layout desiderato (1, 2 o 4 foto per pagina) e poi il pulsante OK. Sull’LCD della stampante appare la prima foto della scheda di memoria. 3 Premere il pulsante SCEGLI FOTO (SELECT PHOTOS) foto da stampare.
stampa di foto da scheda di memoria stampa di una serie continua di foto Delle foto conservate sulla scheda di memoria è possibile decidere di stamparne una serie particolare. 1 Inserire la scheda di memoria nell'apposito slot della stampante. Per maggiori informazioni, vedere inserimento della scheda di memoria a pagina 12. 2 o per evidenziare Premere il pulsante SCEGLI FOTO (SELECT PHOTOS) il layout desiderato (1, 2 o 4 foto per pagina), poi premere il pulsante OK.
capitolo 2 stampa delle nuove foto Si può scegliere di stampare tutte le foto “nuove” della scheda di memoria. Le foto “nuove” sono le foto che non sono mai state stampate dal pannello di controllo della stampante. Ogni volta che si inserisce una scheda di memoria nello slot della stampante e vengono stampate le foto usando il pannello di controllo, la stampante marca le foto in modo che quando viene inserita di nuovo la stessa scheda la stampante “ricordi” le foto già stampate.
stampa di foto da scheda di memoria stampa di video clip La stampante visualizza e stampa i fotogrammi dei video clip registrati sulla scheda di memoria e riconosce i seguenti formati di file video: Motion JPEG AVI, Motion JPEG Quicktime e MPEG-1. I video clip registrati in altri formati sono ignorati. Nota: Non tutte le fotocamere permettono di registrare video clip.
capitolo 2 3 Per stampare tutte le foto scelte sulla fotocamera, premere il pulsante per evidenziare Sì e poi il pulsante OK. SCEGLI FOTO (SELECT PHOTOS) Per ignorare le selezioni della fotocamera, premere il pulsante SCEGLI FOTO (SELECT PHOTOS) per evidenziare No e poi il pulsante OK. 4 Dopo la stampa delle foto selezionate sulla fotocamera, la stampante chiede se si desidera deselezionarle e cancellare il file DPOF.
stampa di foto da scheda di memoria Nota: Verificare di aver premuto prima il pulsante ZOOM +. Premendo il pulsante ZOOM – per primo, la stampante esce dallo Zoom ed entra in modalità a 9 (nella modalità a 9, le foto appaiono sull’LCD della stampante 9 alla volta). Per tornare alla modalità Zoom per la foto selezionata, premere due volte il pulsante ZOOM +. 5 Premere il pulsante ZOOM + per aumentare il livello di ingrandimento di 0,25x. Il livello massimo di ingrandimento è 5,0x.
capitolo 2 foto incorniciate Usando il pannello di controllo della stampante è possibile selezionare bordi decorativi, di vari modelli e colori, da aggiungere come cornici alle foto. 1 Inserire la scheda di memoria nell'apposito slot della stampante. Per maggiori informazioni, vedere inserimento della scheda di memoria a pagina 12. 2 o per evidenziare Premere il pulsante SCEGLI FOTO (SELECT PHOTOS) il layout desiderato (1, 2 o 4 foto per pagina) e poi il pulsante OK.
stampa di foto da scheda di memoria 6 Premere il pulsante SCEGLI FOTO (SELECT PHOTOS) fino a quando sullo schermo LCD è evidenziato Effetto colore. Premere il pulsante OK. 7 fino a quando sullo Premere il pulsante SCEGLI FOTO (SELECT PHOTOS) schermo LCD è evidenziato l’effetto colore desiderato, poi premere il pulsante OK per selezionarlo.
capitolo 2 risoluzione dei problemi di stampa La stampante HP Photosmart è stata progettata per essere semplice e affidabile. Per maggiori informazioni sulla risoluzione dei problemi, vedere la Guida in linea della stampante HP Photosmart. Per informazioni sulla visualizzazione della Guida in linea, vedere consultazione della guida in linea della stampante hp photosmart a pagina 1. manutenzione della stampante La stampante HP Photosmart richiede la minima manutenzione.
3 problemi di installazione Questo capitolo offre una risposta alle domande più frequenti sull’installazione del software della stampante HP Photosmart sui PC Windows. Per informazioni complete sulla risoluzione dei problemi della stampante, inclusi i messaggi di errore e i problemi in Macintosh, consultare la Guida in linea della stampante HP Photosmart. Per informazioni sulla visualizzazione della Guida in linea, vedere consultazione della guida in linea della stampante hp photosmart a pagina 1.
capitolo 3 Problema Il software non è installato correttamente sul computer. OPPURE È necessario reinstallare il software della stampante. Causa possibile Soluzione Si è creata una condizione di conflitto con l'antivirus. OPPURE Si è creata una condizione di conflitto con un altro programma. 1 Disinstallare il software della stampante. Inserire il CD HP Photosmart nel computer, fare clic su Disinstalla e seguire le istruzioni a video. 2 Alla fine della disinstallazione, riavviare il computer.
4 assistenza e specifiche Questo capitolo contiene le seguenti informazioni relative alla stampanteHP Photosmart: • assistenza a pagina 27 • specifiche a pagina 30 • servizi hardware a pagina 32 • servizi software a pagina 32 • certificato di garanzia limitata a pagina 32 • informazioni sulla sicurezza a pagina 34 • conformità alle norme sulla salvaguardia ambientale a pagina 34 • conformità alle norme a pagina 36 • copyright e marchi di fabbrica a pagina 36 assistenza In caso di problem
capitolo 4 assistenza telefonica hp La stampante beneficia di un periodo di assistenza gratuita limitato. Per informazioni, vedere certificato di garanzia limitata a pagina 32 o visitare il sito www.hp.com/support per controllare la durata del periodo di assistenza gratuita. Allo scadere di tale periodo, l’assistenza HP è soggetta a un costo addizionale.
assistenza e specifiche per chiamare Chiamare l’assistenza HP con il computer e la stampante vicini. Tenere pronte le seguenti informazioni: • Numero di modello della stampante (sul lato anteriore della stampante) • Numero di serie della stampante (sulla base della stampante) • Sistema operativo del computer.
capitolo 4 specifiche Questo paragrafo elenca i requisiti minimi per l’installazione del software della stampante HP Photosmart e alcune specifiche tecniche della stampante. Nota: Per un elenco completo delle specifiche della stampante, vedere la Guida in linea della stampante HP Photosmart. Per informazioni sulla visualizzazione della Guida in linea, vedere consultazione della guida in linea della stampante hp photosmart a pagina 1.
assistenza e specifiche Formati del supporto Carta fotografica (4 x 6 pollici, 10 x 15 cm) Carta fotografica con linguetta (4 x 6 pollici con linguetta da 0,5 pollici, 10 x 15 cm con linguetta da 1,25 cm) Schede di indice (4 x 6 pollici, 10 x 15 cm) Schede Hagaki 3,9 x 5, 8 pollici (100 x 148 mm) Schede A6 4,1 x 5,8 pollici (105 x 148 mm) Schede formato L 3,5 x 5 pollici ( 90 x 127 mm) Schede formato L 3,5 x 5 pollici con linguetta da 0,5 pollici ( 90 x 127 mm con linguetta da 12,5 mm) Formati dei file di
capitolo 4 servizi hardware In caso di problemi hardware, contattare il negozio in cui la stampante è stata acquistata. O visitare il sito www.hp.com/cpso-support/guide/psd/ repairhelp.html per avere il nome del centro di vendita e assistenza più vicino. L’assistenza è gratuita per l’intero periodo della garanzia limitata. Oltre il periodo di garanzia, l’assistenza è soggetta alle tariffe. Per informazioni sulla garanzia limitata HP, vedere certificato di garanzia limitata a pagina 32.
assistenza e specifiche B. 9 I prodotti HP possono contenere parti, componenti o materiali ricostruiti equivalenti per prestazioni a quelli nuovi. 10 La garanzia limitata HP è valida in tutti i paesi e aree geografiche in cui sono distribuiti i prodotti HP coperti.
capitolo 4 informazioni sulla sicurezza Per ridurre il rischio di danni alle persone, provocate da fuoco o scosse elettriche, attenersi alle norme di sicurezza. Attenzione! Per evitare incendi o scosse elettriche, non esporre il prodotto alla pioggia o all’umidità. Attenzione! Rischio di scosse elettriche: • Leggere tutte le istruzioni della Guida di installazione HP Photosmart. • Collegare il prodotto esclusivamente a prese con messa a terra.
assistenza e specifiche consumi Quando il prodotto è in modalità ENERGY STAR®, i suoi consumi scendono in modo apprezzabile permettendo un risparmio delle risorse naturali e di denaro senza influire sulle sue elevate prestazioni. Il prodotto è qualificato ENERGY STAR, cioè è conforme ai requisiti fissati da un programma voluto per incoraggiare lo sviluppo di prodotti per ufficio a basso consumo di energia. ENERGY STAR è un marchio depositato dell’U.S. EPA.
capitolo 4 conformità alle norme For regulatory identification purposes, your product is assigned a Regulatory Model Number. The Regulatory Model Number for your product is SDGOA-0324. This regulatory number should not be confused with the marketing name (stampante hp photosmart 240 series) or product number (Q3046A). Australia EMC statement This equipment complies with Australian EMC requirements.
Stampato su carta riciclata Stampato in Germania, 5/03 ENERGY STAR® è un marchio depositato negli Stati Uniti. In qualità di partner ENERGY STAR®, Hewlett-Packard Company ha stabilito che questo prodotto soddisfa i requisiti ENERGY STAR® per un uso ottimizzato dell’energia. www.hp.com © 2003 Hewlett-Packard Company v1.1.