hp photosmart 240 series referansehåndbok
innholdsfortegnelse 1 velkommen . . . . . . . . . . . . . . . . . . . . . . . . . . . . . . . . . . . 1 mer informasjon . . . . . . . . . . . . . . . . . . . . . . . . . . . . . . . . . . 1 innholdet i pakken . . . . . . . . . . . . . . . . . . . . . . . . . . . . . . . . 2 skriveroversikt . . . . . . . . . . . . . . . . . . . . . . . . . . . . . . . . . . . . 3 skriverens forside . . . . . . . . . . . . . . . . . . . . . . . . . . . . . . . 3 skriverens bakside . . . . . . . . . . . . . . . . . . . . . .
forbedre fotografiene . . . . . . . . . . . . . . . . . . . . . . . . . . . . . beskjære et fotografi . . . . . . . . . . . . . . . . . . . . . . . . . . . justere fotolysstyrken . . . . . . . . . . . . . . . . . . . . . . . . . . . . legge til rammer på fotografiene . . . . . . . . . . . . . . . . . . . endre fargeeffekt på fotografier . . . . . . . . . . . . . . . . . . . . endre skriverinnstillinger . . . . . . . . . . . . . . . . . . . . . . . . . . . løse utskriftsproblemer . . . . . . . . . . . . . .
1 velkommen Takk for at du har kjøpt en HP Photosmart 240 Series-skriver! Med din nye, kompakte fotoskriver kan du skrive ut flotte fotografier raskt og enkelt, med eller uten en datamaskin. Skriveren er lett og bærbar, og du kan ta den med deg på ferie, til familiesammenkomster og sosiale begivenheter for å skrive ut bilder umiddelbart og dele dem med familie og venner.
kapittel 1 innholdet i pakken 1 2 5 7 6 4 3 Pakken med skriveren inneholder følgende: 1 HP Photosmart 240 Series-skriveren 2 Konfigurasjonsveiledning for HP Photosmart 240 Series 3 Referansehåndbok for HP Photosmart 240 Series 4 Programvare-CD for HP Photosmart 240 Series (i noen land og regioner leveres skriveren med flere CDer) 5 Eksempler på fotopapir og indekskort 6 HP #57 trefarget blekkpatron 7 Strømforsyning (kan variere i utseende eller ha en ekstra strømledning) Merk: Innholdet kan
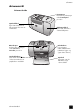
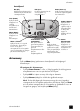
velkommen skriveroversikt skriverens forside Kontrollpanel Du finner mer informasjon under kontrollpanel på side 5 Papirskuffdeksel Åpne dette dekselet for å fylle på papir eller sette inn et minnekort Minnekortspor Du finner mer informasjon under sette inn et minnekort på side 12 Papirbreddeskinne Juster denne skinnen slik at den står inntil siden av papirbunken i innskuffen referansehåndbok Blekkpatrondeksel Åpne dette dekselet for å skifte blekkpatron Utskriftsskinne Legg inn papir under utskriftss
kapittel 1 skriverens bakside USB-port Bruk denne porten for å koble skriveren til datamaskinen eller et HP-digitalkamera med direkteutskrift Bakre papiråpning Under utskrift blir papiret skjøvet delvis ut av denne åpningen og deretter trukket gjennom til forsiden av skriveren Strømtilkobling Bruk denne porten for å koble til strømledningen som fulgte med skriveren Merk: Plasser skriveren på en plan, stabil overflate med baksiden minst 2,5 cm fra alle hindringer, slik at papiret har plass til å bevege se
velkommen kontrollpanel ON (PÅ) Trykk på denne knappen for å slå skriveren på eller sette den i strømsparemodus LCD-skjerm På denne skjermen kan du vise fotografier og menyalternativer PRINT (SKRIV UT) Trykk på denne knappen for å skrive ut valgte fotografier fra et minnekort SAVE (LAGRE) Trykk på denne knappen for å overføre fotografier fra et minnekort til datamaskinen CANCEL (AVBRYT) Trykk på denne knappen for å oppheve valg av fotografier, lukke en meny eller stoppe en handling du har bedt om MENU
kapittel 1 skrivermenystruktur Toppmeny Undermenyer/ alternativer Change layout (Endre layout) Select Layout (Velg layout) • 1 photo (1 fotografi) • 2 photos (2 fotografier) • 4 photos (4 fotografier) Print special (Spesialutskrift) Print all (Skriv ut alle) Print range (Skriv ut serie) Ekstra undermenyer/alternativer Select beginning of range (Velg første bilde i serien) Select end of range (Velg siste bilde i serien) Print new (Skriv ut nye) Print index (Skriv ut indeks) Enhance image (Forbedre b
velkommen Toppmeny Undermenyer/ alternativer Ekstra undermenyer/alternativer Preferences (Innstillinger) After printing (Etter utskrift) After printing, deselect all photos (Opphev valg av alle fotografier etter utskrift) • Always (Alltid) • Never (Aldri) • Ask (default) (Spør [standard]) # of copies (Antall eksemplarer) Set default number of copies (Angi standard antall eksemplarer) (select 1 to 99; default is 1) (velg 1 til 99; standard er 1) Photo layout (Fotolayout) Set default photo layout (A
kapittel 1 papirinformasjon Du kan skrive ut fotografier på fotopapir, vanlig papir eller indekskort.
velkommen informasjon om blekkpatroner HP Photosmart 240 Series-skriveren kan skrive ut fargefotografier og fotografier i svart/hvitt. HP tilbyr to typer blekkpatroner slik at du kan velge den beste blekkpatronen for ditt prosjekt.
kapittel 1 4 Plasser blekkpatronen i blekkpatronholderen med kobberkontaktene inn og blekkdysene ned. 5 Skyv blekkpatronen inn i blekkpatronholderen til du kjenner at den smetter på plass. 6 Lukk blekkpatrondekselet. Kobberkontakter Når du har installert en ny blekkpatron, vises det en melding på skriverens LCD-skjerm om at du må legge inn vanlig papir. Legg et indekskort i papirskuffen og trykk på OK. Den nye blekkpatronen kalibreres automatisk, og det skrives ut en kalibreringsside.
2 skrive ut fotografier fra et minnekort Det er enkelt å skrive ut fotografier med høy kvalitet til deg selv, familie og venner. Hvis digitalkameraet bruker minnekort til å lagre fotografier, kan du sette inn minnekortet i skriveren for å skrive ut fotografiene. Meldinger på skriverens LCD-skjerm leder deg gjennom prosessen. Du trenger ikke å slå på datamaskinen, og du trenger ikke en gang å ha skriveren koblet til datamaskinen. Merk: Du kan også skrive ut fotografier ved hjelp av datamaskinen.
kapittel 2 bildefilformater som støttes Du kan skrive ut fotografier fra JPEG-filer og ikke-komprimerte TIFF-filer direkte fra minnekortet. Hvis digitalkameraet støtter andre filtyper, lagrer du fotografiene på datamaskinen og skriver dem ut ved hjelp av et program. Du finner mer informasjon i hjelpen til HP Photosmart-skriveren. Du finner informasjon om hvordan du viser hjelpen til skriveren, under vise hjelpen til hp photosmartskriveren på side 1.
skrive ut fotografier fra et minnekort Når minnekortet er satt riktig inn og leser skriveren kortet og viser hvor mange fotografier og videoklipp som ble funnet. Merk: Hvis du brukte digitalkameraet til å velge fotografier på minnekortet som skal skrives ut, vises det en melding på LCD-skjermen som spør om du vil skrive ut de kameravalgte fotografiene. Du finner mer informasjon under skrive ut kameravalgte fotografier på side 19.
kapittel 2 velge fotografier som skal skrives ut Du kan velge ett eller flere fotografier for utskrift ved hjelp av kontrollpanelet på skriveren. velge et fotografi 1 Sett et minnekort inn i minnekortsporet på skriveren. Du finner mer informasjon under sette inn et minnekort på side 12. 2 Trykk på SELECT PHOTOS eller (Velg fotografier) for å merke av fotolayouten du vil skrive ut (1, 2 eller 4 fotografier per side), og trykk på OK. Det første fotografiet på minnekortet vises på skriverens LCD-skjerm.
skrive ut fotografier fra et minnekort oppheve valg av et fotografi • Trykk på SELECT PHOTOS eller (Velg fotografier) til fotografiet du vil oppheve valget av, vises, og trykk på CANCEL (Avbryt). • I visningsmodus for 9 fotografier bruker du pilene på knappen SELECT PHOTOS (Velg fotografier) til å utheve fotografiet du vil oppheve valget av. Deretter trykker du på CANCEL (Avbryt).
kapittel 2 skrive ut flere eksemplarer av et fotografi 1 Sett et minnekort inn i minnekortsporet på skriveren. Du finner mer informasjon under sette inn et minnekort på side 12. 2 Trykk på SELECT PHOTOS eller (Velg fotografier) for å merke av fotolayouten du vil skrive ut (1, 2 eller 4 fotografier per side), og trykk på OK. Det første fotografiet på minnekortet vises på skriverens LCD-skjerm. 3 Trykk på SELECT PHOTOS fotografiet du vil skrive ut.
skrive ut fotografier fra et minnekort skrive ut en sammenhengende serie med fotografier Du kan skrive ut en sammenhengende serie av fotografier på et minnekort. 1 Sett et minnekort inn i minnekortsporet på skriveren. Du finner mer informasjon under sette inn et minnekort på side 12. 2 Trykk på SELECT PHOTOS eller (Velg fotografier) for å merke av fotolayouten du vil skrive ut (1, 2 eller 4 fotografier per side), og trykk på OK.
kapittel 2 skrive ut nye fotografier Du kan velge å skrive ut alle "nye" fotografier på minnekortet på én gang. "Nye" fotografier er fotografier som ikke tidligere er skrevet ut fra skriverens kontrollpanel. Hver gang du setter inn et minnekort i skriverens minnekortspor og skriver ut fotografier ved hjelp av skriverens kontrollpanel, koder skriveren fotografiene, og neste gang du setter inn samme minnekort, husker den at fotografiene allerede er skrevet ut.
skrive ut fotografier fra et minnekort skrive ut videoklipp Skriveren kan vise og skrive ut bilder fra videoklipp som er spilt inn på et minnekort. Skriveren gjenkjenner disse videofilformatene: Motion JPEG AVI, Motion JPEG Quicktime og MPEG-1. Videoklipp som er spilt inn i andre formater, blir ignorert. Merk: Ikke alle digitalkameraer gjør det mulig å spille inn videoklipp.
kapittel 2 3 Hvis du vil skrive ut alle de kameravalgte fotografiene, trykker du på SELECT (Velg fotografier) for å merke av Yes (Ja), og så trykker du på PHOTOS OK. Hvis du vil ignorere valgene som er gjort på kameraet, trykker du på (Velg fotografier) for å merke av No (Nei), og så SELECT PHOTOS trykker du på OK. 4 Når de kameravalgte fotografiene er skrevet ut, blir du spurt om du vil oppheve valget av fotografiene og slette DPOF-filen.
skrive ut fotografier fra et minnekort Merk: Husk å trykke på ZOOM + først. Hvis du trykker på ZOOM – først, går skriveren ut av zoomingsmodus og til visningsmodus for 9 fotografier. (I visningsmodus for 9 fotografier vises det 9 fotografier om gangen på skriverens LCD-skjerm.) Du går tilbake til Zoom-modus for det valgte fotografiet ved å trykke på ZOOM + to ganger. 5 Trykk på ZOOM + for å øke forstørrelsesnivået med 0,25x. Maksimalt forstørrelsesnivå er 5,0x.
kapittel 2 legge til rammer på fotografiene Du kan bruke skriverens kontrollpanel til å velge dekorative kantlinjer i ulike mønstre og farger og legge dem til som rammer som skrives ut rundt fotografiene. 1 Sett et minnekort inn i minnekortsporet på skriveren. Du finner mer informasjon under sette inn et minnekort på side 12. 2 eller (Velg fotografier) for å merke av Trykk på SELECT PHOTOS fotolayouten du vil skrive ut (1, 2 eller 4 fotografier per side), og trykk på OK.
skrive ut fotografier fra et minnekort 5 Trykk på SELECT PHOTOS (Velg fotografier) helt til Enhance image (Forbedre bilde) er merket av på skriverens LCD-skjerm. Trykk på OK. 6 (Velg fotografier) til Add color effect (Legg Trykk på SELECT PHOTOS til fargeeffekt) er merket av på skriverens LCD-skjerm. Trykk på OK. 7 Trykk på SELECT PHOTOS (Velg fotografier) til fotofargeeffekten du ønsker å bruke, er merket av på LCD-skjermen, og trykk på OK for å velge den.
kapittel 2 løse utskriftsproblemer HP Photosmart-skriveren er utviklet for å være pålitelig og enkel å bruke. Du finner mer informasjon om problemløsing i hjelpen til HP Photosmart-skriveren. Du finner informasjon om hvordan du viser hjelpen til skriveren, under vise hjelpen til hp photosmart-skriveren på side 1. vedlikeholde skriveren HP Photosmart-skriveren trenger svært lite vedlikehold.
3 problemløsing ved installering I dette kapittelet finner du svar på vanlige spørsmål om installering av programvaren for HP Photosmart på en Windows-PC. Du finner mer detaljert informasjon om problemløsing i hjelpen til HP Photosmart-skriveren. Du finner informasjon om hvordan du viser hjelpen til skriveren, under vise hjelpen til hp photosmart-skriveren på side 1. Før du kontakter HPs kundestøtte, bør du lese denne delen om problemløsingstips eller gå til brukerstøtten på Internett på www.hp.
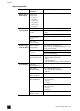
kapittel 3 Problem Mulig årsak Programvaren ble ikke riktig installert på datamaskinen. ELLER Jeg må installere skriverprogramvaren på nytt. Det kan være en konflikt med 1 Avinstaller skriverprogramvaren. Det gjør du ved å sette inn HP Photosmart-CDen i antivirusprogrammet du bruker. CD-ROM-stasjonen, klikke på Avinstaller ELLER og følge instruksjonene på dataskjermen. Det kan være en konflikt med et 2 Start datamaskinen på nytt når annet program. avinstalleringen er ferdig.
4 brukerstøtte og spesifikasjoner I dette kapittelet finner du følgende informasjon om HP Photosmart-skriveren: • brukerstøtte på side 27 • spesifikasjoner på side 30 • maskinvareservice på side 32 • programvareservice på side 32 • begrenset garanti på side 32 • sikkerhetsinformasjon på side 34 • miljøerklæring på side 34 • regulatory statements på side 36 • opphavsrettigheter og varemerker på side 36 brukerstøtte Hvis det oppstår problemer, følger du fremgangsmåten nedenfor: 1 Les hjel
kapittel 4 brukerstøtte fra hp på telefon Du kan få gratis brukerstøtte per telefon i en begrenset periode. Du finner flere opplysninger under begrenset garanti på side 32, eller gå til www.hp.com/ support for å finne ut hvor lenge du har krav på gratis brukerstøtte. Når denne perioden er gått ut, må du betale for brukerstøtten når du ringer til HP. Kontakt HP-forhandleren eller ring telefonnummeret til brukerstøtte for ditt land / din region hvis du vil vite mer om dette.
brukerstøtte og spesifikasjoner ringe brukerstøtte Sitt ved datamaskinen og skriveren når du ringer HPs brukerstøtte. Du må være forberedt på å oppgi følgende opplysninger: referansehåndbok • Skrivermodellnummer (finnes foran på skriveren). • Serienummer (finnes på undersiden av skriveren). • Operativsystem på maskinen. • Versjon av skriverdriveren: – Windows-PC: Du finner ut hvilken versjon av skriverdriveren som brukes, ved å høyreklikke på ikonet for minnekortet på oppgavelinjen i Windows.
kapittel 4 spesifikasjoner I denne delen finner du informasjon om systemkrav for installering av programvaren til HP Photosmart samt enkelte skriverspesifikasjoner. Merk: Du finner en komplett liste over skriverspesifikasjonene i hjelpen til HP Photosmart-skriveren. Du finner informasjon om hvordan du viser hjelpen til skriveren, under vise hjelpen til hp photosmart-skriveren på side 1.
brukerstøtte og spesifikasjoner Driftstemperatur 0–45 °C [Optimalt 15–35 °C] Filformater som støttes Utskrift: Støttede bilde- og videoformater av minnekort Lagring: Alle filformater referansehåndbok Marger Utskrift uten kantlinjer: Topp 0,0 mm Bunn 12,5 mm Venstre/høyre 0,0 mm Utskrift med kantlinjer: Topp 4 mm Bunn 12,5 til 16,8 mm Venstre/høyre 4 mm Mediestørrelser Fotopapir (10 x 15 cm) Fotopapir med flik (10 x 15 cm med 1,25 cm flik) Indekskort (10 x 15 cm) Hagaki-kort (100 x 148 mm) A6-kort (10
kapittel 4 maskinvareservice Hvis det oppstår problemer med skrivermaskinvaren, må du kontakte forretninger der du kjøpte skriveren. Du kan også gå til www.hp.com/cpso-support/guide/ psd/repairhelp.html for å finne informasjon om nærmeste salgs- og servicekontor. Service er gratis i en begrenset garantitid. Etter garantitiden må service betales. Du finner mer informasjon om HPs begrensede garanti under begrenset garanti på side 32.
brukerstøtte og spesifikasjoner 10 B. HPs begrensede garanti er gyldig i alle land/regioner der det dekkede HP-produktet distribueres av HP. Avtaler om utvidet garanti-service, som for eksempel på stedet-service, fås hos alle autoriserte HP service-steder i land eller regioner der produktet distribueres av HP eller av en autorisert importør. Når det gjelder telefon-support i Europa, kan du finne detaljer og betingelser for denne i ditt land eller din region på følgende websted: http://www.hp.com/support.
kapittel 4 sikkerhetsinformasjon Du må alltid følge grunnleggende forhåndsregler for sikkerhet når du bruker dette produktet, slik at du reduserer faren for skader som følge av brann eller elektrisk sjokk. Advarsel! For å forhindre brann- og sjokkfare, må du ikke utsette dette produktet for regn eller annen fukt. Advarsel! Mulig sjokkfare. • Les og forstå alle instruksjonene i konfigurasjonsveiledningen for HP Photosmart. • Bruk bare jordede stikkontakter når du kobler enheten til en strømkilde.
brukerstøtte og spesifikasjoner energiforbruk Energiforbruket reduseres kraftig når enheten er i ENERGY STAR®-modus, noe som også sparer naturressurser og penger, uten at den gode ytelsen til produktet påvirkes. Dette produktet er kvalifisert for ENERGY STAR, som er et frivillig program som ble opprettet for å oppmuntre til utviklingen av energibesparende kontorprodukter. ENERGY STAR er et amerikansk varemerke som er registrert i USA. EPA.
kapittel 4 regulatory statements For regulatory identification purposes, your product is assigned a Regulatory Model Number. The Regulatory Model Number for your product is SDGOA-0324. This regulatory number should not be confused with the marketing name (hp photosmart 240 series-skriver) or product number (Q3046A). Australia EMC statement This equipment complies with Australian EMC requirements.
Trykt på resirkulert papir Trykt i Tyskland 05.03 ENERGY STAR® er et registrert varemerke i USA. Som ENERGY STAR®-partner har Hewlett-Packard Company fastslått at dette produktet oppfyller ENERGY STAR®-retningslinjene for strømsparing. www.hp.com © 2003 Hewlett-Packard Company v1.1.