hp photosmart 240 series guia de referência
conteúdo guia de referência 1 bem-vindo . . . . . . . . . . . . . . . . . . . . . . . . . . . . . . . . . . . . 1 2 imprimir fotos a partir de um cartão de memória. . . . . . . 11 encontrar mais informações . . . . . . . . . . . . . . . . . . . . o que há na caixa . . . . . . . . . . . . . . . . . . . . . . . . . . visão geral da impressora . . . . . . . . . . . . . . . . . . . . . parte frontal da impressora . . . . . . . . . . . . . . . . . . parte traseira da impressora . . . . . . . . . . . . . .
solucionar problemas de impressão . . . . . . . . . . . . . . . . . . . 24 manutenção da impressora . . . . . . . . . . . . . . . . . . . . . . . 24 limpar o cartucho da impressora . . . . . . . . . . . . . . . . . . . 24 ii 3 solução de problemas da instalação . . . . . . . . . . . . . . . . 25 4 suporte e especificações . . . . . . . . . . . . . . . . . . . . . . . . . 27 suporte . . . . . . . . . . . . . . . . . . . . . . . . . . . . . . . . . . . . . . . suporte hp por telefone . . . . . . . . . .
1 bem-vindo Obrigado por adquirir a HP Photosmart 240 Series printer! Com a sua nova impressora de fotos compacta é possível imprimir rápida e facilmente belas fotos sem ter que usar um computador. Por ser portátil e leve, é possível levar a impressora nas férias e reuniões familiares e eventos sociais para imprimir instantaneamente e compartilhar fotos com a família e os amigos.
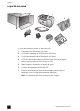
capítulo 1 o que há na caixa 1 2 5 7 6 4 3 A caixa da impressora contém os seguintes itens: 1 A impressora HP Photosmart 240 Series 2 O Guia de instalação da HP Photosmart 240 Series 3 O Guia de referência da HP Photosmart 240 Series 4 O CD do software da impressora HP Photosmart 240 Series (alguns países/regiões podem ter mais do que um CD) 5 Papel fotográfico de amostra e cartões de índice 6 Cartucho de impressão colorido HP #57 7 Fonte de alimentação (as fontes de alimentação podem varia
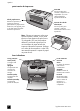
bem-vindo visão geral da impressora parte frontal da impressora Painel de controle Para mais informações, consulte painel de controle na página 5 Porta da bandeja do papel Abra essa porta para carregar papel ou inserir um cartão de memória Slots de cartão de memória Para mais informações, consulte inserir um cartão de memória na página 12 Guia de largura do papel Ajuste esta guia, colocando-a junto à extremidade do papel na bandeja guia de referência Porta do cartucho de impressão Abra essa porta para
capítulo 1 parte traseira da impressora Slot de papel traseiro Durante a impressão, a impressora empurra parcialmente o papel através deste slot e, em seguida, puxao de volta através da parte frontal da impressora Porta USB Use essa porta para conectar a impressora ao computador ou a uma câmera digital de impressão direta HP Conexão do cabo de alimentação Use essa porta para conectar o cabo de alimentação incluído com a impressora Nota: Coloque a impressora sobre uma superfície plana e estável, com a pa
bem-vindo painel de controle LIG.
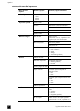
capítulo 1 estrutura do menu da impressora Menu de nível superior Submenus/opções Alterar layout Selecionar layout: • 1 foto • 2 fotos • 4 fotos Impressão especial Imprimir todas Intervalo submenus/opções adicionais Selecionar o início do intervalo: Selecionar o final do intervalo: Imprimir novas Imprimir índice Melhorar imagem Brilho da foto Brilho da foto: (selecionar -3 a +3; o padrão é 0 e significa que não há alteração Adicionar quadro Selecionar padrão: Selecionar cor: Adic efeito de cor
bem-vindo Menu de nível superior Submenus/opções submenus/opções adicionais Preferências (continuação da página anterior) Layout de foto Definir layout de foto padrão: • Perguntar (padrão) • 1 foto • 2 fotos • 4 fotos Imprimir vídeo Definir os quadros de impressão de vídeo: • 9 por página (padrão) • 16 por página • 25 por página Adic data/hora Registro de data/hora: • Data e hora • Apenas data • Desativar (padrão) Sem bordas Impressão sem borda: • Ativar (padrão) • Desativar Impressão Exif Imp
capítulo 1 informações sobre papel É possível imprimir em papel fotográfico, papel comum ou cartões de índice.
bem-vindo informações sobre cartuchos de impressão A impressora HP Photosmart 240 Series pode imprimir fotos coloridas e em preto e branco. A HP fornece dois tipos de cartucho de impressão, assim é possível escolher o melhor cartucho para o seu projeto.
capítulo 1 4 Insira o cartucho de impressão no suporte do cartucho de impressão, com os contatos de cobre voltados para o interior da impressora e com os bocais de tinta voltados para baixo. 5 Empurre o cartucho de impressão para dentro do suporte do cartucho de impressão, até sentir que ele se encaixa no lugar. 6 Contatos de cobre Feche a porta do cartucho de impressão. Após instalar um cartucho de impressão novo, aparece uma mensagem na tela LCD da impressora solicitando que carregue papel comum.
2 imprimir fotos a partir de um cartão de memória É fácil imprimir fotos de alta qualidade para você, seus parentes e amigos. Se a câmera digital usar um cartão de memória para armazenar fotos, é possível inserir o cartão de memória na impressora para imprimir ou salvar as fotos. As mensagens apresentadas na tela LCD da impressora orientam o processo—não é preciso ligar o computador, nem conectar a impressora ao computador! Nota: Também é possível imprimir fotos usando o computador.
capítulo 2 formatos suportados de arquivos de imagem É possível imprimir fotos a partir de arquivos de imagem JPEG e TIFF não comprimidos diretamente do cartão de memória. Se a câmera digital suportar outros formatos, salve os arquivos para o computador e imprima-os usando um aplicativo de software. Para mais informações, veja a Ajuda da impressora HP Photosmart. Para informações sobre como visualizar a Ajuda da impressora, consulte para exibir a ajuda da impressora hp photosmart na página 1.
imprimir fotos a partir de um cartão de memória Nota: Se um cartão de memória SmartMedia for inserido ao contrário, a luz vermelha Lig./Atenção começará a piscar. Remova o cartão de memória e reinstale-o corretamente. Assim que o cartão de memória é inserido corretamente, a impressora lê o cartão e exibe por instantes quantas fotos e clipes de vídeo foram encontrados.
capítulo 2 consulte a Ajuda da impressora HP Photosmart. para obter informações sobre como visualizar a Ajuda da impressora, consulte para exibir a ajuda da impressora hp photosmart na página 1. selecionar fotos para imprimir É possível selecionar uma ou mais fotos para imprimir usando o painel de controle da impressora. selecionar uma foto 1 Insira um cartão de memória no respectivo slot da impressora. Para obter mais informações, consulte inserir um cartão de memória na página 12.
imprimir fotos a partir de um cartão de memória Nota: Não é possível acessar o menu da impressora enquanto estiver vendo as fotos no modo de visualização 9 em 1. desmarcar uma foto • Pressione o botão SELEC. FOTOS (Select Photos) ou para exibir a foto que deseja desmarcar e, em seguida, pressione o botão CANCELAR (Cancel). • No modo de visualização 9 em 1, use as setas no botão SELEC. FOTOS (Select Photos) para realçar a foto que deseja desmarcar e, em seguida, pressione o botão CANCELAR (Cancel).
capítulo 2 Nota: Ao pressionar o botão CANCELAR (Cancel) durante a impressão, a impressora pára de imprimir mas mantém as seleções da foto e as configurações de impressão. imprimir mais de uma cópia de uma foto 1 Insira um cartão de memória no respectivo slot da impressora. Para obter mais informações, consulte inserir um cartão de memória na página 12. 2 Pressione o botão SELEC.
imprimir fotos a partir de um cartão de memória O layout alterado da foto será aplicado a todas as fotos que imprimir até você escolher um layout de foto diferente do menu da impressora ou remova o cartão de memória da impressora. Quando o cartão de memória for removido, o layout da foto retorna para o layout da foto padrão da impressora. A configuração de fábrica da impressora para o layout da foto padrão pede para você selecionar um layout todas vez que inserir um cartão de memória.
capítulo 2 4 Pressione o botão SELEC. FOTOS (Select Photos) até Impressão especial ser realçado na tela LCD da impressora. Pressione o botão OK. 5 Pressione o botão SELEC. FOTOS (Select Photos) até Imprimir todas ser realçado na tela LCD da impressora. Pressione o botão OK. A primeira e a última foto armazenadas no cartão de memória aparecem na tela LCD da impressora.
imprimir fotos a partir de um cartão de memória removida. Para fotos realmente sem bordas, use papel fotográfico com uma lingüeta para destacar de 0,5 polegada (12,5 mm), tal como papel fotográfico HP premium plus. É possivel configurar a impressora para imprimir as fotos com bordas brancas nos quatro lados desligando a opção de impressão sem borda nas preferências da impressora. Para obter mais informações, consulte alterar as preferências da impressora na página 23.
capítulo 2 Para imprimir fotos selecionadas na câmera a partir de um cartão de memória. 1 Use a câmera digital para selecionar as fotos que deseja imprimir. Para mais informações, consulte a documentação que acompanha sua câmera. 2 Remova o cartão de memória da câmera digital e insira-o no slot do cartão de memória da impressora. Para mais informações, consulte inserir um cartão de memória na página 12.
imprimir fotos a partir de um cartão de memória 3 Quando a primeira foto no cartão de memória aparecer na tela LCD da ou para impressora, pressione o botão SELEC. FOTOS (Select Photos) navegar para a foto que deseja cortar. Quando a foto desejada aparecer na tela LCD da impressora, pressione o botão OK para selecioná-la. 4 Pressione o botão ZOOM + no painel de controle da impressora. Quatro setas na tela LCD da impressora piscam brevemente para indicar que você está entrando no modo Zoom.
capítulo 2 6 Pressione o botão SELEC. FOTOS (Select Photos) até Brilho da foto aparecer realçado na tela LCD da impressora. Pressione o botão OK. 7 Use as setas no botão SELEC. FOTOS (Select Photos) para ajustar o brilho: – Pressione o botão SELEC. FOTOS (Select Photos) aumentar o brilho. – Pressione SELEC. FOTOS (Select Photos) ou ou para para diminuir o brilho. 8 Pressione o botão OK quando estiver satisfeito com o brilho. 9 Pressione o botão IMPRIMIR (Print) para começar a impressão.
imprimir fotos a partir de um cartão de memória 1 Insira um cartão de memória no respectivo slot da impressora. Para obter mais informações, consulte inserir um cartão de memória na página 12. 2 Pressione o botão SELEC. FOTOS (Select Photos) ou para realçar o layout da foto que deseja imprimir—1, 2, ou 4 fotos por página—e, em seguida, pressione o botão OK. 3 Quando a primeira foto no cartão de memória aparecer na tela LCD da impressora, pressione o botão SELEC.
capítulo 2 4 Pressione o botão SELEC. FOTOS (Select Photos) até que a configuração desejada seja realçada na tela LCD da impressora. Pressione o botão OK. Para mais informações sobre as preferências da impressora, consulte a Ajuda da impressora HP Photosmart. Sobre como visualizar a Ajuda da impressora, consulte para exibir a ajuda da impressora hp photosmart na página 1. solucionar problemas de impressão A impressora HP Photosmart foi projetada para ser confiável e fácil de usar.
3 solução de problemas da instalação Este capítulo responde às perguntas mais freqüentes sobre como instalar o software da impressora HP Photosmart em um PC com Windows. Para ajuda completa para solução de problemas sobre todos os aspectos da impressora, incluindo mensagens de erro e solução de problemas do Macintosh, consulte a Ajuda da impressora HP Photosmart. Como visualizar a Ajuda da impressora, consulte para exibir a ajuda da impressora hp photosmart na página 1.
capítulo 3 Problema Possível causa Solução O software não instalou corretamente no computador. OU Preciso reinstalar o software da impressora. Pode haver um conflito com seu programa de antivírus. OU Pode haver um conflito com outro programa de software. 1 Desinstale o software da impressora. Para isso, insira o CD HP Photosmart no computador, clique em Desinstalar e siga as instruções apresentadas na tela do computador. 2 Quando a desinstalação for concluída, reinicie seu computador.
4 suporte e especificações Ese capítulo contém as seguintes informações sobre a impressora HP Photosmart: • suporte na página 27 • especificações na página 30 • serviços de hardware na página 32 • serviços de software na página 32 • declaração da garantia limitada na página 32 • informações de segurança na página 34 • declarações ambientais na página 34 • informações de segurança na página 34 • copyrights e marcas registradas na página 36 suporte Se tiver um problema, siga essas etapas:
capítulo 4 suporte hp por telefone A impressora vem com um período de tempo limitado de suporte gratuito por telefone. Informações, consulte declaração da garantia limitada na página 32, ou vá para www.hp.com/support para verificar a duração do suporte gratuito. Após o período de suporte gratuito por telefone a ajuda está disponível a partir da HP com custos adicionais. Entre em contato com o revendedor HP ou ligue para o número de telefone de suporte para o seu país ou região para obter opções de suporte.
suporte e especificações fazer uma chamada Telefone para o suporte HP enquanto estiver perto do computador e da impressora. Esteja preparado para fornecer as seguintes informações: guia de referência • Número do modelo de impressora (localizado na parte da frente da impressora). • Número de série da impressora (localizado na parte inferior da impressora). • Sistema operacional do computador.
capítulo 4 especificações Esta seção relaciona os requisitos mínimos do sistema para instalação do software da impressora HP Photosmart e fornece as especificações da impressora selecionada. Nota: Para obter uma lista completa das especificações da impressora, consulte a Ajuda da impressora HP Photosmart. Para obter informações sobre como visualizar a Ajuda da impressora, consulte para exibir a ajuda da impressora hp photosmart na página 1.
suporte e especificações Conectividade USB: Microsoft Windows 98, 2000 Professional, ME, XP Home, e XP Professional; Mac OS 9 v9.1 ou posterior, OS X v10.1 até v10.
capítulo 4 serviços de hardware Se surgir falha no hardware da impressora, entre em contato com a loja na qual comprou sua impressora, ou vá para www.hp.com/cpso-support/guide/psd/ repairhelp.html para encontrar o escritório de serviço e vendas mais próximo. O serviço é gratuito durante o período de garantia limitada. Depois disso, o serviço será cobrado. Para mais informações sobre a garantia limitada da HP, consulte declaração da garantia limitada na página 32.
suporte e especificações B. 8 Qualquer produto de reposição pode ser novo ou em estado de novo, desde que a sua funcionalidade seja ao menos igual àquela do produto que está sendo substituído. 9 Os produtos da HP podem conter peças manufaturadas, componentes, ou materiais equivalentes a novos no desempenho. 10 A garantia limitada da HP é válida em qualquer país ou região onde o produto coberto da HP for distribuído pela HP.
capítulo 4 informações de segurança Siga sempre as precauções básicas de segurança quando usar este produto para reduzir o risco de danos de fogo ou choque elétrico. Cuidado! Para evitar fogo ou perigo de choque, não exponha este produto à chuva ou qualquer tipo de umidade. Cuidado! Perigo em potencial de choque. • Leia e entenda todas as instruções no Guia de Instalação da HP Photosmart. • Use apenas uma tomada elétrica aterrada quando conectar a unidade a uma fonte de alimentação.
suporte e especificações consumo de energia A utilização de energia cai significativamente enquanto estiver no modo ENERGY STAR®, o qual economiza recursos naturais e economiza dinheiro sem afetar o alto desempenho deste produto. Este produto atende os requisitos do ENERGY STAR, que é um programa voluntário estabelecido para favorecer o desenvolvimento dos produtos de escritório com eficiência de energia. ENERGY STAR é uma marca registrada americana do U.S. EPA.
capítulo 4 declarações de regulamentação For regulatory identification purposes, your product is assigned a Regulatory Model Number. The Regulatory Model Number for your product is SDGOA-0324. This regulatory number should not be confused with the marketing name (hp photosmart 240 series printer) or product number (Q3046A). Australia EMC statement This equipment complies with Australian EMC requirements.
Impresso em papel reciclado Impresso na Alemanha, 5/03 ENERGY STAR® é marca registrada nos EUA. Como parceira da ENERGY STAR®, a Hewlett-Packard Company determinou que este produto segue as diretrizes da ENERGY STAR® quanto à eficácia da alimentação. www.hp.com © 2003 Hewlett-Packard Company v1.1.