CPQ-311245-001.book Page 1 Thursday, March 27, 2003 10:17 PM 4 Power Contents Understanding Standby, Hibernation and Shutdown . . . . 4–2 Standby . . . . . . . . . . . . . . . . . . . . . . . . . . . . . . . . . . . 4–2 Hibernation . . . . . . . . . . . . . . . . . . . . . . . . . . . . . . . . 4–2 Shutdown . . . . . . . . . . . . . . . . . . . . . . . . . . . . . . . . . . 4–3 Choosing Standby, Hibernation or Shutdown . . . . . . . . . 4–4 Using Standby, Hibernation and Shutdown Procedures . . . . . . . .
CPQ-311245-001.book Page 2 Thursday, March 27, 2003 10:17 PM Power Recycling or Disposing of a Used Battery Pack . . . . . . 4–19 Understanding Standby, Hibernation and Shutdown This section describes Standby, Hibernation, and shutdown and explains when to implement them. Standby, Hibernation, and shutdown procedures are provided later in the chapter. Standby and Hibernation are energy-saving features that can be initiated by you or by the system.
CPQ-311245-001.book Page 3 Thursday, March 27, 2003 10:17 PM Power ■ ■ To determine whether the notebook is in Hibernation or turned off, press the power button: ❏ If the notebook is in Hibernation, your work returns to the screen. ❏ If the notebook is off, Windows loads. Hibernation is enabled by default, but can be disabled. To prevent loss of work during a critical low-battery condition, disable Hibernation only during a battery pack calibration.
CPQ-311245-001.book Page 4 Thursday, March 27, 2003 10:17 PM Power Choosing Standby, Hibernation or Shutdown If you plan to resume shortly: Initiate Standby for shorter times and Hibernation for longer times or power conservation. The amount of time a battery pack can support Standby or Hibernation or hold a charge varies by notebook configuration and the condition of the battery pack.
CPQ-311245-001.book Page 5 Thursday, March 27, 2003 10:17 PM Power Using Standby, Hibernation and Shutdown Procedures This section explains the default Standby, Hibernation, and shutdown procedures and includes information about turning the display on or off.
CPQ-311245-001.book Page 6 Thursday, March 27, 2003 10:17 PM Power Turning the Notebook or Display On or Off Task Procedure Results Turn on the notebook. Press the power button. ■ ✎ Power/standby light turns on. ■ Operating system loads. ■ Power/standby light turns off. ■ Operating system shuts down. ■ Notebook turns off. Shut down the notebook.* Turn off the display when the notebook is closed. Pressing the power button turns on the notebook from Standby, Hibernation, or shutdown.
CPQ-311245-001.book Page 7 Thursday, March 27, 2003 10:17 PM Power Initiating or Resuming from Standby Task Procedure Result User-initiated Standby With the notebook on, use either of the following procedures: ■ Power/standby light flashes. ■ Screen clears. If the notebook is running on battery power, the system initiates Standby after 10 minutes of notebook inactivity. ■ Power/standby light flashes. ■ Screen clears. ■ ■ Power/standby light turns on. ■ Your work returns to the screen.
CPQ-311245-001.book Page 8 Thursday, March 27, 2003 10:17 PM Power Initiating or Restoring from Hibernation Task Procedure Result User-initiated Hibernation With the notebook on, use either of the following procedures: ■ Power/standby light turns off. ■ Briefly press the power button. ■ Screen clears. ■ Select Start > Shut Down > Hibernate. (If the Hibernate option is not displayed, press and hold shift.) ■ Power/standby light turns off. ■ Screen clears. Press the power button.
CPQ-311245-001.book Page 9 Thursday, March 27, 2003 10:17 PM Power Setting Power Control Preferences By default, when the notebook is on: ■ Briefly pressing the power button initiates Hibernation. ■ Pressing the Fn+F5 hotkeys, called the “sleep button” in the operating system, initiates Standby. ■ The display switch turns off the display. The display switch is activated by closing the display.
CPQ-311245-001.
CPQ-311245-001.book Page 11 Thursday, March 27, 2003 10:17 PM Power Switching Between Battery and External Power The notebook switches between external power and battery power according to the availability of external power. To conserve the charge in an inserted battery pack, the notebook runs on external power whenever external power is available. External power can be supplied from an electrical outlet through an AC adapter or an optional DC cable.
CPQ-311245-001.book Page 12 Thursday, March 27, 2003 10:17 PM Power Monitoring the Charge in a Battery Pack Obtaining Accurate Charge Information To increase the accuracy of all battery charge displays: ■ Allow the battery pack to discharge to less than 10 percent of a full charge through normal use before charging it. ■ Charge the battery pack fully. Even a new battery pack can display charge information inaccurately if it has not been fully charged.
CPQ-311245-001.book Page 13 Thursday, March 27, 2003 10:17 PM Power Managing Low-Battery Conditions The information in this section describes default alerts and system responses. Identifying Low-Battery Conditions When the battery pack is the only power source for the notebook and drops to 10 percent of a full charge, the notebook has reached a low-battery condition. A text warning message appears on the screen.
CPQ-311245-001.book Page 14 Thursday, March 27, 2003 10:17 PM Power Calibrating a Battery Pack When to Calibrate Even if a battery pack is heavily used, it should not be necessary to calibrate it more than once a month. It is not necessary to calibrate a new battery pack before first use. Calibrate the battery pack under the following conditions: ■ When battery charge displays seem inaccurate. ■ When you observe a significant change in battery run time.
CPQ-311245-001.book Page 15 Thursday, March 27, 2003 10:17 PM Power If you use the notebook occasionally during the discharge procedure and have set energy-saving timeouts, expect the following performance from your system during the discharge process: Ä ■ The monitor will not turn off automatically. ■ Hard drive speed will not decrease automatically while the notebook is idle. ■ System-initiated Standby will not occur.
CPQ-311245-001.book Page 16 Thursday, March 27, 2003 10:17 PM Power Recharging the Battery Pack 1. Connect the notebook to external power and keep the notebook connected until the battery pack is fully recharged and the battery light turns green. You can use the notebook while the battery pack is recharging, but the battery pack will charge faster if the notebook is turned off. 2.
CPQ-311245-001.book Page 17 Thursday, March 27, 2003 10:17 PM Power Battery Conservation Settings and Procedures Using the following battery conservation settings and procedures extends the run time of a battery pack. ■ Turn off wireless and local area network (LAN) connections and exit modem applications when you are not using them. ■ Disconnect from the notebook any external devices that use power from the notebook.
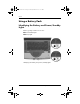
CPQ-311245-001.book Page 18 Thursday, March 27, 2003 10:17 PM Power Replacing a Battery Pack Ä CAUTION: To prevent loss of work when removing a battery pack that is the only power source, initiate Hibernation or turn off the notebook before removing the battery pack. To replace the battery pack: 1. Turn the notebook underside up. ❏ To remove a battery pack, slide the battery release latch 1. (The battery pack tilts upward.) Then pull the battery pack out of the battery bay 2.
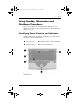
CPQ-311245-001.book Page 19 Thursday, March 27, 2003 10:17 PM Power ❏ To insert a battery pack, insert the alignment tab on the battery pack into the alignment slot on the notebook 1, then tilt the battery pack downward until it snaps into place 2. Inserting a battery pack 2. To restore from Hibernation or to turn on the notebook, press the power button.
CPQ-311245-001.
CPQ-311245-001.book Page 1 Thursday, March 27, 2003 10:17 PM 5 Drives and Drive Media Contents Understanding Drive and Drive Media Terms. . . . . . . . . 5–2 Caring for Drives and Drive Media . . . . . . . . . . . . . . . . . 5–3 Adding a Drive to the System . . . . . . . . . . . . . . . . . . . . . 5–4 Using the IDE Drive Light. . . . . . . . . . . . . . . . . . . . . . . . 5–4 Inserting or Removing a Disc . . . . . . . . . . . . . . . . . . . . . 5–5 Inserting a Disc . . . . . . . . . . . . . . . . . . .
CPQ-311245-001.book Page 2 Thursday, March 27, 2003 10:17 PM Drives and Drive Media Understanding Drive and Drive Media Terms Hard drives are for the permanent storage of data files and of software such as system files, applications, and drivers. A hard drive is sometimes called a hard disk drive or HDD. Diskette drives support diskettes, which are used to store or transport data. The notebook can read or write to any diskette. A diskette drive is sometimes called a floppy disk drive, or FDD.
CPQ-311245-001.book Page 3 Thursday, March 27, 2003 10:17 PM Drives and Drive Media Caring for Drives and Drive Media Ä CAUTION: To prevent damage to the notebook or a drive and loss of work: ■ ■ ■ ■ ■ ■ ■ ■ Ä■ Do not remove the internal hard drive except for repair or replacement. For instructions, see the“Replacing the Internal Hard Drive” section later in this chapter. Electrostatic discharge can damage electronic components.
CPQ-311245-001.book Page 4 Thursday, March 27, 2003 10:17 PM Drives and Drive Media Adding a Drive to the System The internal hard drive and optical drive are standard features of the notebook. The type of optical drive varies by notebook model. An optional drive can be added to the system by connecting it, as instructed in the drive documentation, to one of the USB (Universal Serial Bus) connectors or to the 1394 connector. Hard drive capacity can also be added with a microdrive PC Card.
CPQ-311245-001.book Page 5 Thursday, March 27, 2003 10:17 PM Drives and Drive Media Inserting or Removing a Disc Inserting a Disc 1. Turn on the notebook. 2. Press the release button 1 on the drive bezel to release the media tray, then pull the tray outward until it is fully extended 2. 3. Position a CD or one-sided DVD over the tray, label side up. 4. Gently press the center of the disc onto the tray spindle 3 until the disc snaps into place. Handle the disc by the edges, not the flat surfaces.
CPQ-311245-001.book Page 6 Thursday, March 27, 2003 10:17 PM Drives and Drive Media Removing a Disc (With Power) 1. Turn on the notebook. 2. Press the release button 1 on the drive bezel to release the media tray, then pull the tray outward until it is fully extended 2. 3. Remove the disc from the tray by gently pushing down on the spindle while pulling up on the outer edges of the disc 3. Handle the disc by the edges, not the flat surfaces.
CPQ-311245-001.book Page 7 Thursday, March 27, 2003 10:17 PM Drives and Drive Media Removing a Disc (Without Power) If the notebook is turned off or if no power is available, the release button on the optical drive will not work. To remove a disc from an optical drive without using the release button: 1. Insert the end of a small object like a paper clip into the release access 1 in the front bezel of the drive. 2.
CPQ-311245-001.book Page 8 Thursday, March 27, 2003 10:17 PM Drives and Drive Media Playing a Disc You can play a CD in a CD drive or a DVD drive. You can play a DVD only in a DVD drive. The information in this section applies to most optical drives and most disc software. For information about specific disc software, including Windows Media Player, WinDVD, and Easy CD Creator, see the “Using Multimedia Software” section in Chapter 6.
CPQ-311245-001.book Page 9 Thursday, March 27, 2003 10:17 PM Drives and Drive Media Protecting Playback Ä CAUTION: Inserting or removing any device while running any multimedia application may pause or stop the play. Ä CAUTION: Initiating Standby or Hibernation while playing a drive medium may stop the play or diminish the quality of the play.
CPQ-311245-001.book Page 10 Thursday, March 27, 2003 10:17 PM Drives and Drive Media Setting the Boot Order By default, the notebook starts up from the internal hard drive. You can set the notebook to start up from any bootable CD or DVD in the optical drive. A bootable CD or DVD contains files needed by the notebook to start up and operate properly. On some models, you can also start up from a drive connected to the notebook by USB. Startup preferences are set in the Setup utility.
CPQ-311245-001.book Page 11 Thursday, March 27, 2003 10:17 PM Drives and Drive Media 5. Turn the notebook underside up. 6. Remove the 2 hard drive retaining screws.
CPQ-311245-001.book Page 12 Thursday, March 27, 2003 10:17 PM Drives and Drive Media 7. To remove a hard drive, grasp the hard drive assembly (the hard drive, the hard drive cover, and the hard drive bracket) using the hard drive recess 1. Tilt the hard drive assembly upward 2, then pull the assembly from the hard drive bay 3.
CPQ-311245-001.book Page 13 Thursday, March 27, 2003 10:17 PM Drives and Drive Media 8. To insert a hard drive, insert the 2 alignment tabs on the hard drive cover into the 2 alignment slots on the hard drive bay 1, then tilt the hard drive assembly downward into the hard drive bay until it is seated 2.
CPQ-311245-001.book Page 14 Thursday, March 27, 2003 10:17 PM Drives and Drive Media 9. If you have inserted a hard drive, reinsert the 2 hard drive retaining screws. (If you removed but did not replace a hard drive, put the retaining screws in a safe place.) Replacing the hard drive retaining screw.