CPQ-311245-001.book Page 1 Thursday, March 27, 2003 10:17 PM 8 Hardware Options and Upgrades Contents Connecting a Powered Device . . . . . . . . . . . . . . . . . . . . . 8–2 Connecting a USB Device . . . . . . . . . . . . . . . . . . . . . . . . 8–3 Using a PC Card. . . . . . . . . . . . . . . . . . . . . . . . . . . . . . . . 8–4 Selecting a PC Card. . . . . . . . . . . . . . . . . . . . . . . . . . 8–4 Configuring a PC Card . . . . . . . . . . . . . . . . . . . . . . . 8–4 Inserting a PC Card . . . . .
CPQ-311245-001.book Page 2 Thursday, March 27, 2003 10:17 PM Hardware Options and Upgrades Connecting a Powered Device To connect the notebook to an optional external device that has a power cord: 1. Be sure the device is turned off. 2. Connect the device to the jack or connector on the notebook specified by the device manufacturer. 3. Plug the device power cord into a grounded electrical outlet. 4. Turn on the device.
CPQ-311245-001.book Page 3 Thursday, March 27, 2003 10:17 PM Hardware Options and Upgrades Connecting a USB Device USB (Universal Serial Bus) is a hardware interface that can be used to connect external devices such as a USB keyboard, mouse, drive, printer, scanner, or hub to the notebook. A hub is a connecting device that can be either powered or unpowered. USB hubs can be connected to a USB connector on the notebook or to other USB devices.
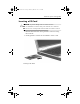
CPQ-311245-001.book Page 4 Thursday, March 27, 2003 10:17 PM Hardware Options and Upgrades Using a PC Card A PC Card is a credit card–sized accessory designed to conform to the standard specifications of the Personal Computer Memory Card International Association (PCMCIA). The notebook PC Card slot supports both 32-bit CardBus and 16-bit PC Cards. PC Cards can be used to add modem, sound, storage, wireless communication, or digital camera functions to the notebook.
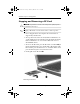
CPQ-311245-001.book Page 5 Thursday, March 27, 2003 10:17 PM Hardware Options and Upgrades Inserting a PC Card Ä■ CAUTION: To prevent damage to the PC Card connectors: ■ Use minimal force when inserting a PC Card into a PC Card slot. Do not move or transport the notebook while a PC Card is inserted. 1. Hold the PC Card label-side up with the connectors facing the notebook. 2. Gently push the card into the slot until the card is seated.
CPQ-311245-001.book Page 6 Thursday, March 27, 2003 10:17 PM Hardware Options and Upgrades Stopping and Removing a PC Card Ä CAUTION: To prevent loss of work or an unresponsive system, stop the PC Card before removing it. ✎ Stopping a PC Card, even if it is not in use, conserves power. 1. Close all applications and complete all activities that are supported by the PC Card. 2. To stop a PC Card, select the Safely Remove Hardware icon on the taskbar, then select the PC Card.
CPQ-311245-001.book Page 7 Thursday, March 27, 2003 10:17 PM Hardware Options and Upgrades Using an SD Card or MMC Ä■ CAUTION: To prevent damage to the SD Card connectors: ■ Use minimal force when inserting an SD Card or MMC into an SD Card slot. Do not move or transport the notebook while an SD Card or MMC is inserted. SD (Secure Digital) Cards and MMCs (multimedia cards) are flash memory cards that provide secure data storage and convenient data sharing.
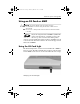
CPQ-311245-001.book Page 8 Thursday, March 27, 2003 10:17 PM Hardware Options and Upgrades Inserting an SD Card or MMC To insert an SD Card or MMC: 1. Hold the card label-side up with the connectors facing the notebook. 2. Gently push the card into the SD Card slot until the card is seated. (The card will extend outward slightly beyond the notebook.) Inserting an SD Card or MMC Removing an SD Card or MMC To remove an SD Card or MMC: 1.
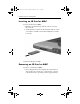
CPQ-311245-001.book Page 9 Thursday, March 27, 2003 10:17 PM Hardware Options and Upgrades 2. Push the card inward until it is released 1. 3. Pull the card out of the slot 2. Releasing and removing an SD Card or MMC Disabling or Restarting an SD Card or MMC An inserted SD Card or MMC uses power even when the card is not in use. Disabling the card conserves power.
CPQ-311245-001.book Page 10 Thursday, March 27, 2003 10:17 PM Hardware Options and Upgrades Increasing Memory You can increase the amount of RAM (random access memory) in the notebook with an optional Compaq-approved memory module. The notebook memory slot supports one 128-MB, 256-MB, 512-MB, or 1024-MB memory module. Some notebook models ship with a vacant memory slot. On other models the memory slot contains a preinstalled memory module that can be replaced at any time.
CPQ-311245-001.book Page 11 Thursday, March 27, 2003 10:17 PM Hardware Options and Upgrades Removing or Inserting a Memory Module Å WARNING: To prevent exposure to electrical shock, access only the memory compartment during this procedure. The memory compartment and the battery and hard drive bays are the only user-accessible internal compartments on the notebook. All other areas that require a tool to access should be opened only by a Compaq authorized service provider.
CPQ-311245-001.book Page 12 Thursday, March 27, 2003 10:17 PM Hardware Options and Upgrades 6. Remove the memory compartment screw 1, then lift up and remove the memory compartment cover 2.
CPQ-311245-001.book Page 13 Thursday, March 27, 2003 10:17 PM Hardware Options and Upgrades 7. Remove or insert the memory module. To remove a memory module: a. Pull away the retention clips on each side of the module 1. (The module tilts upward.) b. Grasp the edges of the module and gently pull the module out of the memory slot 2. c. To protect a memory module after removal, place it in an electrostatic-safe container.
CPQ-311245-001.book Page 14 Thursday, March 27, 2003 10:17 PM Hardware Options and Upgrades To insert a memory module: a. Align the keyed (notched) edge of the module with the keyed area in the memory slot 1. b. With the module at a 45-degree angle from the surface of the memory compartment, press the module into the memory slot until it is seated 2. c. Push the module downward until the retention clips snap into place 3.
CPQ-311245-001.book Page 15 Thursday, March 27, 2003 10:17 PM Hardware Options and Upgrades 8. Align the tabs on the memory compartment cover with the cover slots on the notebook, then tilt the cover downward until it is seated 1. 9. Reinsert and tighten the memory compartment screw 2. 10. Replace the battery pack (if you removed a battery pack at the beginning of this procedure), reconnect the notebook to external power, then restart the notebook.
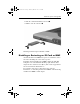
CPQ-311245-001.book Page 16 Thursday, March 27, 2003 10:17 PM Hardware Options and Upgrades Connecting an Optional Cable Lock An optional cable lock is a security device that prevents unauthorized removal of the notebook. Loop the cable around a secure object, then insert the cable lock 1 into the security cable slot 2 and lock it with the cable lock key 3.
CPQ-311245-001.book Page 1 Thursday, March 27, 2003 10:17 PM 9 Software Updates, Restorations and Utilities Contents Updating Software . . . . . . . . . . . . . . . . . . . . . . . . . . . . . . 9–2 Preparing for a Software Update . . . . . . . . . . . . . . . . 9–2 Downloading and Installing an Update . . . . . . . . . . . 9–4 Backing Up and Restoring Data. . . . . . . . . . . . . . . . . . . . 9–7 Setting a System Restore Point . . . . . . . . . . . . . . . . . 9–7 Restoring to a System Restore Point . .
CPQ-311245-001.book Page 2 Thursday, March 27, 2003 10:17 PM Software Updates, Restorations and Utilities Updating Software For optimal notebook performance and to make sure your notebook remains compatible with changing technologies, install the latest versions of the software provided with your notebook as they become available. To update notebook software: 1. Prepare for any update by identifying your notebook type, series or family, and model.
CPQ-311245-001.book Page 3 Thursday, March 27, 2003 10:17 PM Software Updates, Restorations and Utilities The product name, notebook model, and notebook serial number are also displayed in the same section of the Setup utility that displays ROM information, as described in the next section.
CPQ-311245-001.book Page 4 Thursday, March 27, 2003 10:17 PM Software Updates, Restorations and Utilities Downloading and Installing an Update Most software at the Compaq Web site is packaged in a compressed file called a SoftPaq. Some ROM updates may be packaged in a compressed file called a RomPaq. Other ROM updates may be provided as a CPQFlash SoftPaq. Most download packages contain a file named Readme.txt. A Readme.
CPQ-311245-001.book Page 5 Thursday, March 27, 2003 10:17 PM Software Updates, Restorations and Utilities 2. Follow the instructions on the screen to identify your notebook and access the ROM update you want to download. 3. At the download area: a. Record the date, name, or other identifier of any ROM update that is later than the ROM currently installed on your notebook. (You may need to identify the update later, after it has been downloaded to the hard drive.) b.
CPQ-311245-001.book Page 6 Thursday, March 27, 2003 10:17 PM Software Updates, Restorations and Utilities Downloading and Installing a Non-ROM SoftPaq To update software other than a ROM update: 1. Access the page at the Compaq Web site that provides software for your notebook: Select Start > Help and Support, then select a software update link. Or, visit the Compaq Web site at: http://www.compaq.com/athome/support/ 2.
CPQ-311245-001.book Page 7 Thursday, March 27, 2003 10:17 PM Software Updates, Restorations and Utilities Backing Up and Restoring Data System problems can cause the files in your My Documents folder to become corrupt or unavailable. System problems may occur whenever new software or hardware is added to the system. The System Restore utility enables you to safeguard your data files and functional configurations by using System Restore points.
CPQ-311245-001.book Page 8 Thursday, March 27, 2003 10:17 PM Software Updates, Restorations and Utilities Repairing or Reinstalling the Operating System The OS CD included with your notebook can be used to repair or reinstall the operating system. Both operations may take 1 to 2 hours to complete. ■ Repairing the operating system preserves your data and settings. ■ Reinstalling the operating system deletes all files on the notebook.
CPQ-311245-001.book Page 9 Thursday, March 27, 2003 10:17 PM Software Updates, Restorations and Utilities 6. Press enter to continue. (A Licensing Agreement screen is displayed.) 7. Press F8 to accept the agreement and continue. (The Setup window is displayed.) 8. Press R to repair the selected Windows installation. (The repair process begins.) After the repair process is complete, which may take up to 2 hours, the notebook restarts in Windows.
CPQ-311245-001.book Page 10 Thursday, March 27, 2003 10:17 PM Software Updates, Restorations and Utilities 6. Press enter to continue. (A Licensing Agreement screen is displayed.) 7. Press F8 to accept the agreement and continue. (The Setup window is displayed.) 8. Press esc to continue installing a fresh copy of the operating system. 9. Press enter to set up the operating system. 10. Press C to continue setup using this partition. 11.
CPQ-311245-001.book Page 11 Thursday, March 27, 2003 10:17 PM Software Updates, Restorations and Utilities Installing a Retail Version of an Operating System The Windows operating system provided on the notebook or on a restoration CD is enhanced by Compaq. The Compaq enhancements add power and security features and provide supplementary support for external devices such as drives and PC Cards.
CPQ-311245-001.book Page 12 Thursday, March 27, 2003 10:17 PM Software Updates, Restorations and Utilities Navigating and Selecting in the Setup Utility Because the Setup utility is not Windows-based, it does not support the TouchPad. Navigation and selection are by keystroke. ■ To navigate, use the up and down arrow keys or tab. ■ To select an item, use the arrow keys to select the item, then press enter. ■ To close a display but remain in the Setup utility, press esc.
CPQ-311245-001.book Page 13 Thursday, March 27, 2003 10:17 PM Software Updates, Restorations and Utilities Using the Support Utilities If you cannot solve a notebook problem by using this guide or the supplementary information, including the Troubleshooting guide, on the Documentation Library CD, you may need to contact Compaq. Using the Help and Support Window Select Start > Help and Support or press the Fn+F1 hotkeys.
CPQ-311245-001.book Page 14 Thursday, March 27, 2003 10:17 PM Software Updates, Restorations and Utilities Using Support Telephone Numbers Obtaining Support Telephone Numbers To obtain a list of worldwide customer support telephone numbers, use either of the following methods: ■ Select Start > Control Panel > Performance and Maintenance icon > System icon. Then, near the lower edge of the System Properties window, select the Support Information button.