333955-001.book Page i Monday, July 14, 2003 11:27 AM Hardware Guide HP Compaq Notebook Series Document Part Number: 333955-001 August 2003 This guide explains how to identify and use notebook hardware features, including connectors for external devices. It also includes power and environmental specifications, which may be helpful when traveling with the notebook.
333955-001.book Page iii Monday, July 14, 2003 11:27 AM © 2003 Hewlett-Packard Development Company, L.P. Microsoft and Windows are trademarks of Microsoft Corporation in the U.S. and/or other countries. Intel and SpeedStep are trademarks of Intel Corporation in the US and/or other countries. SD Logo is a trademark. The information contained herein is subject to change without notice.
33955-001.book Page iii Monday, July 14, 2003 11:27 AM Contents 1 Notebook Features Pointing Device Components. . . . . . . . . . . . . . . . . . . . . . 1–1 Top Components . . . . . . . . . . . . . . . . . . . . . . . . . . . . . . . 1–2 Lights . . . . . . . . . . . . . . . . . . . . . . . . . . . . . . . . . . . . . . . . 1–5 Left Side Components . . . . . . . . . . . . . . . . . . . . . . . . . . . 1–7 Right Side Components . . . . . . . . . . . . . . . . . . . . . . . . . . 1–9 Front View Components .
333955-001.book Page iv Monday, July 14, 2003 11:27 AM Contents Increasing Screen Brightness (fn+f10) . . . . . . . . . . . 2–8 Displaying System Information (fn+esc) . . . . . . . . . 2–9 Using Hotkeys and Shortcut Keys with External Keyboards . . . . . . . . . . . . . . . . . . . . . . . . . . . . . . . . . 2–9 Using Quick Launch Buttons . . . . . . . . . . . . . . . . . . . . . 2–10 Using Keypads . . . . . . . . . . . . . . . . . . . . . . . . . . . . . . . . 2–12 Using the Embedded Numeric Keypad . .
333955-001.book Page v Monday, July 14, 2003 11:27 AM Contents 4 Drives Caring for Drives . . . . . . . . . . . . . . . . . . . . . . . . . . . . . . . 4–1 Adding a Drive to the System . . . . . . . . . . . . . . . . . . . . . 4–3 Hard Drive . . . . . . . . . . . . . . . . . . . . . . . . . . . . . . . . . . . . 4–4 Identifying the Hard Drive Activity Light. . . . . . . . . 4–4 Replacing the Primary Hard Drive . . . . . . . . . . . . . . 4–5 Optical Drive . . . . . . . . . . . . . . . . . . . . . . . . .
333955-001.book Page vi Monday, July 14, 2003 11:27 AM Contents Connecting a Network Cable . . . . . . . . . . . . . . . . . . . . . . Linking to an Infrared Device . . . . . . . . . . . . . . . . . . . . . Setting Up an Infrared Transmission. . . . . . . . . . . . . Using Standby with Infrared . . . . . . . . . . . . . . . . . . . 6–4 6–5 6–6 6–6 7 External Devices Connecting a Monitor or Projector . . . . . . . . . . . . . . . . . Using a USB Device . . . . . . . . . . . . . . . . . . . . . . . . . .
333955-001.book Page 1 Monday, July 14, 2003 11:27 AM 1 Notebook Features Pointing Device Components Component Description 1 Pointing stick Moves the pointer and selects or activates items on the screen. 2 Left and right pointing stick buttons Function like the left and right buttons on an external mouse. 3 TouchPad Moves the pointer and selects or activates items on the screen. Can be set to perform other mouse functions, such as scrolling and double-clicking.
333955-001.book Page 2 Monday, July 14, 2003 11:27 AM Notebook Features Top Components Component Description 1 Quick Launch buttons (3) Enable you to access common functions with a single keystroke. Refer to “Using Quick Launch Buttons,” in Chapter 2 of this guide. 2 Power button When the notebook is: ■ Off, press and release to turn on the notebook. ■ In Standby, press and release to exit Standby. ■ In Hibernation, press and release to exit Hibernation.
333955-001.book Page 3 Monday, July 14, 2003 11:27 AM Notebook Features Component Description ✎ This table describes default settings. For information about changing the functions of the power button and using Standby and Hibernation, refer on the Documentation Library CD to the Software Guide, “Power” chapter. 3 fn key Executes frequently used system functions when pressed in combination with a function key or the esc key. 4 Microsoft logo key Displays the Windows Start menu.
333955-001.book Page 4 Monday, July 14, 2003 11:27 AM Notebook Features 9 1–4 Component Description Display latch recess Secures the display when the notebook is closed. Memory compartment (not shown; located under the keyboard) Contains one primary memory module slot (populated) and one expansion slot.
333955-001.book Page 5 Monday, July 14, 2003 11:27 AM Notebook Features Lights Component Description 1 Num lock On: Num lock is on or the embedded numeric keypad is enabled. 2 Caps lock On: Caps lock is on. 3 Scroll lock On: Scroll lock is on. 4 Wireless On/Off On: An integrated wireless device has been enabled. 5 Power/Standby On: Power is turned on. Blinking: Notebook is in Standby.
333955-001.book Page 6 Monday, July 14, 2003 11:27 AM Notebook Features Component Description 6 Battery On: A battery pack is charging. Blinking: A battery pack that is the only available power source has reached a low-battery condition. When the battery reaches a critical low-battery condition, the battery light begins blinking more quickly.
333955-001.book Page 7 Monday, July 14, 2003 11:27 AM Notebook Features Left Side Components 1 Component Description Security cable slot Attaches an optional security cable to the notebook. Ä 2 Exhaust vent Enables airflow to cool internal components. Ä 3 Optical disc drive The purpose of security solutions is to act as a deterrent. These solutions do not prevent the product from being mishandled or stolen. To prevent overheating, do not obstruct vents.
333955-001.book Page 8 Monday, July 14, 2003 11:27 AM Notebook Features 1–8 Component Description 4 Optical disc drive eject button Opens the optical disc drive when pressed. 5 Battery bay Holds the primary battery pack. Battery pack ships outside the notebook.
333955-001.book Page 9 Monday, July 14, 2003 11:27 AM Notebook Features Right Side Components Component Description 1 PC Card eject buttons (2) Eject an optional PC Card or Smart Card (if a Smart Card Reader is installed) from the top or bottom PC Card slot. 2 PC Card slots (2) Support optional Type I, Type II, or Type III 32-bit (CardBus) or 16-bit PC Cards. ✎ In select notebooks, one PC Card slot may be replaced with a factory-installed Smart Card Reader.
333955-001.book Page 10 Monday, July 14, 2003 11:27 AM Notebook Features Component Description 5 RJ-11 jack Connects a modem cable. 6 Audio line-out jack Connects optional powered stereo speakers, headphones, headset, or television audio. 7 Microphone jack Connects an optional monaural microphone. 8 MultiBay Supports an optional MultiBay device, such as a drive or battery pack. 9 Bluetooth compartment Holds a Bluetooth device. ✎ 1–10 Bluetooth is not available in all countries.
333955-001.book Page 11 Monday, July 14, 2003 11:27 AM Notebook Features Front View Components Component Description 1 Speakers (2) Produce system sound. 2 Display release latch Opens the notebook. 3 Mute button Mutes the system volume. The button lights up when volume is muted. 4 Volume control buttons Increase and decrease system volume. Press the volume up button (on right) to increase sound. Press the volume down button (on left) to decrease sound.
333955-001.book Page 12 Monday, July 14, 2003 11:27 AM Notebook Features Rear Panel Components I Component Description 1 USB connector Connects USB 1.1- and 2.0-compliant devices to the notebook using a standard USB cable. 2 Self-powered USB connector Connects USB 1.1- and 2.0-compliant devices to the notebook using a standard USB cable. Also connects an optional External MultiBay to the notebook using the External MultiBay-powered USB cable.
333955-001.book Page 13 Monday, July 14, 2003 11:27 AM Notebook Features Component Description 7 S-Video out jack Connects an optional S-Video device, such as a television, VCR, camcorder, overhead projector, or video capture card. 8 External monitor connector Connects an optional external monitor or overhead projector. 9 RJ-45 jack Connects a network cable. : Intake vent Enables airflow to cool internal components. Ä Hardware Guide To prevent overheating, do not obstruct vents.
333955-001.book Page 14 Monday, July 14, 2003 11:27 AM Notebook Features Bottom Components 1 Component Description Intake Vent Provides airflow to cool internal components. Ä To prevent overheating, do not obstruct vents. Using the notebook on a soft surface, such as a pillow, blanket, rug, or thick clothing may block airflow. 2 Docking connector Connects the notebook to an optional Port Replicator. 3 Keyboard access screw Allow you to remove the keyboard in order to access system memory.
333955-001.book Page 15 Monday, July 14, 2003 11:27 AM Notebook Features Component Description 6 Hard drive cover latch Releases the cover on the hard drive bay. 7 Hard drive bay Holds the primary hard drive. 8 MultiBay release latch Allows removal of the MultiBay drive.
333955-001.book Page 16 Monday, July 14, 2003 11:27 AM Notebook Features Labels 1 Label Description Bluetooth label Provides regulatory information about the Bluetooth device that is available on some notebook models. ✎ You will need this information to use the Bluetooth device while traveling internationally. Bluetooth is not available in all countries.
333955-001.book Page 17 Monday, July 14, 2003 11:27 AM Notebook Features Label Description 4 Serial number label Identifies the notebook. You may need this number if you call customer support. 5 System label Provides regulatory information about the notebook. 6 Modem label Lists the countries in which the modem has been approved for use. ✎ Hardware Guide You will need this information to use the modem while traveling internationally.
333955-001.book Page 1 Monday, July 14, 2003 11:27 AM 2 Pointing Devices and Keyboard Using a Pointing Device By default, the pointing stick and TouchPad components can be used interchangeably. I Component Description 1 Pointing stick Moves the pointer and selects or activates items on the screen. 2 Left and right pointing stick buttons Function like the left and right buttons on an external mouse.
333955-001.book Page 2 Monday, July 14, 2003 11:27 AM Pointing Devices and Keyboard 2–2 Component Description 3 TouchPad Moves the pointer and selects or activates items on the screen. Can be set to perform other mouse functions, such as scrolling and double-clicking. 4 Left and right TouchPad buttons Function like the left and right buttons on an external mouse.
333955-001.book Page 3 Monday, July 14, 2003 11:27 AM Pointing Devices and Keyboard Using the Pointing Stick To move the pointer, press the pointing stick in the direction you want to move the pointer. Use the left and right pointing stick buttons as you would the left and right buttons on an external mouse. To change the pointing stick cap: 1. Turn off the notebook. 2. Gently pull off the used pointing stick cap. 3. Push a replacement cap into place.
333955-001.book Page 4 Monday, July 14, 2003 11:27 AM Pointing Devices and Keyboard Using an External Mouse An external USB mouse can be connected to the notebook using one of the connectors on the back panel. An external PS/2 or USB mouse can be connected to the system through an optional Port Replicator. Setting Pointing Device Preferences Mouse Properties in Windows enables you to customize settings for pointing devices, including: ■ Enabling or disabling a pointing device (enabled by default).
333955-001.book Page 5 Monday, July 14, 2003 11:27 AM Pointing Devices and Keyboard Using Hotkeys and Shortcut Keys Hotkeys and shortcut keys, which are preset combinations of the fn key and another key, execute specific system functions. Identifying fn and Function Keys Component 1 Function keys 2 fn key ■ A hotkey is a combination of the fn key and one of the function keys. The icons on the function keys represent the hotkey functions available on your notebook.
333955-001.
333955-001.book Page 7 Monday, July 14, 2003 11:27 AM Pointing Devices and Keyboard Initiating Standby (fn+f3) ■ When the notebook is on, press the fn+f3 hotkey to initiate Standby. When Standby is initiated, your work is saved in random access memory (RAM), the screen is cleared, and power is conserved. While the notebook is in Standby, the Power/Standby light blinks. ■ To exit Standby, briefly press the power button. The fn+f3 hotkey is set at the factory to initiate Standby.
333955-001.book Page 8 Monday, July 14, 2003 11:27 AM Pointing Devices and Keyboard ■ S-Video (televisions, camcorders, VCRs, and video capture boards with S-Video-in jacks) ■ Composite video (televisions, camcorders, VCRs, and video capture boards with composite-video-in jacks) ■ DVI-D (external monitors that support the DVI-D interface) video and DVI-D devices can only be connected to the ✎ Composite notebook when it is docked in an optional Advanced Port Replicator.
333955-001.book Page 9 Monday, July 14, 2003 11:27 AM Pointing Devices and Keyboard Displaying System Information (fn+esc) Press fn+esc to display information about system hardware components and software version numbers. Press fn+esc a second time to remove the system information from the screen. system BIOS date is the version number of the system ROM. ✎ The The BIOS date may display in a decimal format, such as 10/19/2002 F.07.
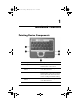
3955-001.book Page 10 Monday, July 14, 2003 11:27 AM Pointing Devices and Keyboard Using Quick Launch Buttons The 3 Quick Launch buttons enable you to execute specific system functions with a single keystroke. Quick Launch button descriptions 1 Component Description QuickLock button Disables the keyboard and pointing device and clears the display. Before you can use QuickLock, you must set a password and select preferences.
333955-001.book Page 11 Monday, July 14, 2003 11:27 AM Pointing Devices and Keyboard Component Description 2 Wireless On/Off button Turns the wireless LAN and optional Bluetooth device on and off when these devices are enabled in the software utilities. 3 Presentation Mode button Sets the notebook to presentation mode, which opens a user-defined application, folder, file, or Web site.
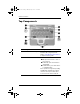
333955-001.book Page 12 Monday, July 14, 2003 11:27 AM Pointing Devices and Keyboard Using Keypads The notebook has an embedded numeric keypad and supports an optional external keypad or an optional external keyboard that includes a numeric keypad. Using the Embedded Numeric Keypad The 15 keys of the embedded numeric keypad can be used like the keys on an external keypad.
333955-001.book Page 13 Monday, July 14, 2003 11:27 AM Pointing Devices and Keyboard Enabling and Disabling the Embedded Numeric Keypad Press fn+num lk to enable the embedded numeric keypad. The num lock light turns on. Press fn+num lk again to return the keys to their standard keyboard functions. embedded numeric keypad does not work while an external ✎ The keyboard or keypad is connected to the notebook or to an optional Port Replicator.
333955-001.book Page 14 Monday, July 14, 2003 11:27 AM Pointing Devices and Keyboard Using an External Keypad Most keys on most external keypads function differently, depending on whether num lock mode is on or off. For example: ■ When num lock mode is on, most keypad keys type numbers. ■ When num lock mode is off, most keypad keys function like arrow, page up, or page down keys. When num lock on an external keypad is turned on, the num lock light on the notebook turns on.
333955-001.book Page 15 Monday, July 14, 2003 11:27 AM Pointing Devices and Keyboard 4. Select or clear the Num Lock State at Boot field: ❏ To enable num lock mode on an external keypad, select the field. ❏ To disable num lock mode on an external keypad, clear the field. 5. Press f10. 6. To save your preference and exit Computer Setup, select File > Save Changes and Exit, then follow the instructions on the screen.
333955-001.book Page 1 Monday, July 14, 2003 11:27 AM 3 Battery Packs Running the Notebook on Battery Power When the notebook is connected to external AC power, the notebook runs on external power. When a charged battery pack is in the notebook and the notebook is not connected to external power, the notebook runs on battery power. The notebook switches between external power and battery power according to the availability of an external power source.
333955-001.book Page 2 Monday, July 14, 2003 11:27 AM Battery Packs If you will not be using the notebook for 2 weeks or more, remove the battery pack and store it as described in “Storing a Battery Pack” (later in this section) to prolong its life. For more information about leaving your work, refer on the Documentation Library CD to the Software Guide, “Power” chapter. compatible AC adapters and battery packs should be used ✎ Only with the notebook.
333955-001.book Page 3 Monday, July 14, 2003 11:27 AM Battery Packs Inserting or Removing a Primary Battery Pack Ä CAUTION: To prevent loss of work when removing a battery pack that is the sole power source, initiate Hibernation or turn off the notebook before removing the battery pack. To insert a battery pack, slide the battery pack into the battery bay until it is seated.
333955-001.book Page 4 Monday, July 14, 2003 11:27 AM Battery Packs To remove a battery pack, turn the notebook upside down. Slide and hold the battery release latch 1 as you pull the battery pack 2 from the battery bay.
333955-001.book Page 5 Monday, July 14, 2003 11:27 AM Battery Packs Inserting or Removing a MultiBay Battery Pack Ä CAUTION: To prevent loss of work when removing a battery pack that is the sole power source, initiate Hibernation or turn off the notebook before removing the battery pack. To insert a battery pack, turn the notebook upside down and slide the battery pack into the MultiBay until it is seated.
333955-001.book Page 6 Monday, July 14, 2003 11:27 AM Battery Packs To remove a battery pack, turn the notebook upside down. Slide and hold the MultiBay release latch 1 as you pull the battery pack 2 from the MultiBay. Ä 3–6 CAUTION: To prevent damage to the MultiBay when no device is in the MultiBay, insert the weight saver to protect the bay opening. The weight saver can be inserted or removed while the notebook is on, off, in Standby, or in Hibernation.
333955-001.book Page 7 Monday, July 14, 2003 11:27 AM Battery Packs Charging a Battery Pack All battery packs inserted into the notebook charge whenever the notebook is connected to external power through an AC adapter or an optional Automobile Power Adapter/Charger. optional Aircraft Power Adapter can be used to run the ✎ An notebook, but it cannot be used to charge a battery pack. A Battery pack can charge whether the notebook is off or in use, but it will charge faster when the notebook is off.
333955-001.book Page 8 Monday, July 14, 2003 11:27 AM Battery Packs Charging a New Battery Pack Fully charge the battery pack while the notebook is connected to external power through the AC adapter. A new battery pack that has been partially but not fully charged can run the notebook, but the battery charge indicators may be inaccurate.
333955-001.book Page 9 Monday, July 14, 2003 11:27 AM Battery Packs Monitoring the Charge in a Battery Pack This section explains several ways you can determine the amount of charge in your battery pack. Obtaining Accurate Charge Information To increase the accuracy of all battery charge displays: ■ Allow a battery pack to discharge to about 10 percent of a full charge through normal use before charging it. ■ When you charge a battery pack, charge it fully.
333955-001.book Page 10 Monday, July 14, 2003 11:27 AM Battery Packs Interpreting Charge Displays Most charge displays report battery status as both a percentage and in the number of minutes of charge remaining. ■ The percent indicates the amount of charge remaining in the battery pack. ■ The time indicates the approximate running time remaining on the battery pack if the battery pack continues to provide power at the current level.
333955-001.book Page 11 Monday, July 14, 2003 11:27 AM Battery Packs Displaying Charge Information on a MultiBay Battery Pack You can determine the percent of a full charge remaining in a battery pack that is not inserted into the notebook by using the battery Quick Check feature. MultiBay battery packs have battery Quick Check. Primary battery packs do not. To display the percent of a full charge remaining in a MultiBay battery pack, press the Quick Check button 1 on the MultiBay battery pack.
333955-001.book Page 12 Monday, July 14, 2003 11:27 AM Battery Packs Managing Low-Battery Conditions Some low-battery condition alerts and system responses can be changed in the Power Options window of the operating system. The information in this section describes the alerts and system responses set at the factory. Preferences set in the Power Options window do not affect lights. Identifying Low-Battery Conditions This section explains how to identify low and critical low-battery conditions.
333955-001.book Page 13 Monday, July 14, 2003 11:27 AM Battery Packs Resolving Low-Battery Conditions Ä CAUTION: If the notebook has reached a critical low-battery condition and has initiated Hibernation, do not restore power the power/standby light turns off. When External Power Is Available To resolve a low-battery condition when external power is available, do one of the following: ■ Connect the AC adapter.
333955-001.book Page 14 Monday, July 14, 2003 11:27 AM Battery Packs Calibrating a Battery Pack This section describes when and how to calibrate a battery pack. When to Calibrate Even if a battery pack is heavily used, it should not be necessary to calibrate it more than once a month. It is not necessary to calibrate a new battery pack before first use. Calibrate the battery pack under the following conditions: ■ When battery charge displays seem inaccurate.
333955-001.book Page 15 Monday, July 14, 2003 11:27 AM Battery Packs Discharging the Battery Pack Before you begin a full discharge, disable Hibernation. To disable Hibernation: 1. Open the Power Options window: ❏ In Windows 2000, select Start > Settings > Control Panel > Power Options > Hibernate tab. ❏ In Windows XP, select Start > Control Panel > Performance and Maintenance > Power Options > Hibernate tab. 2. Clear the Enable Hibernation check box.
333955-001.book Page 16 Monday, July 14, 2003 11:27 AM Battery Packs To fully discharge a battery pack: 1. Select the power icon on the taskbar, or access the Power Schemes tab: ❏ In Windows 2000, select Start > Settings > Control Panel > Power Management icon > Power Schemes tab. ❏ In Windows XP, select Start > Control Panel > Performance and Maintenance > Power Options icon > Power Schemes tab. 2.
333955-001.book Page 17 Monday, July 14, 2003 11:27 AM Battery Packs Recharging the Battery Pack 1. Connect the notebook to external power and maintain the connection until the battery pack is fully recharged. The battery light on the notebook turns off. You can use the notebook while the battery pack is recharging but the battery pack will charge faster if the notebook is off. 2. If the notebook is off, turn it on when the battery pack is fully charged and the battery light turns off. 3.
333955-001.book Page 18 Monday, July 14, 2003 11:27 AM Battery Packs Battery Conservation Procedures and Settings Using the battery conservation procedures and settings described below extends the time that a battery pack can run the notebook from a single charge. Conserving Power as You Work To conserve power as you use the notebook: 3–18 ■ Turn off wireless and local area network (LAN) connections and exit modem applications when you are not using them.
333955-001.book Page 19 Monday, July 14, 2003 11:27 AM Battery Packs Selecting Power Conservation Settings To set the notebook to conserve power: ■ Select a short wait for the screen saver and select a screen saver with minimal graphics and motion. To access screen saver settings: ❏ In Windows 2000, select Start > Settings > Control Panel > Display > Screen Saver tab. ❏ In Windows XP, select Start > Control Panel > Appearance and Themes > Display icon > Screen Saver tab.
333955-001.book Page 20 Monday, July 14, 2003 11:27 AM Battery Packs Storing a Battery Pack If a notebook will be unused and unplugged for more than 2 weeks, remove any battery packs from the notebook and store them separately. Ä CAUTION: To prevent damage to a battery pack, do not expose it to high temperatures for extended periods of time. High temperatures accelerate the self-discharge rate of a stored battery pack. To prolong the charge of a stored battery pack, place it in a cool, dry place.
333955-001.book Page 21 Monday, July 14, 2003 11:27 AM Battery Packs Disposing of a Used Battery Pack Å WARNING: There is a risk of fire and chemical burn if a battery pack is handled improperly. Do not disassemble, crush, or puncture a battery pack or short the contacts on a battery pack. Do not expose a battery pack to temperatures higher than 60° C (140° F), or dispose of a battery pack in water or fire.