Hardware Guide Part 2
Manuals
Brands
HP Manuals
Computers & Accessories
Notebook PC with Built-in Wireless
1
2
3
4
5
6
7
8
9
10
Table Of Contents
Drives
Caring for Drives
Adding a Drive to the System
Hard Drive
Identifying the Hard Drive Activity Light
Replacing the Primary Hard Drive
Optical Drive
Inserting an Optical Disc
Removing an Optical Disc (with Power)
Removing an Optical Disc (No Power)
Displaying Optical Disc Contents
Locating Optical Disc Software
Initiating Standby or Hibernation
MultiBay Drive
Identifying the MultiBay Activity Light
Using a MultiBay Hard Drive Adapter
Inserting a Hard Drive into the Adapter
Removing a Hard Drive from the Adapter
Inserting a Drive into the MultiBay
Removing a Drive from the MultiBay
Audio and Video
Using Audio Features
Using the Audio Line-Out Jack
Using the Microphone Jack
Adjusting Volume
Using Video Features
Using the S-Video Out Jack
Communication Devices
Connecting a Modem Cable
Using the RJ-11 Cable
Using a Country-Specific Adapter Cable
Connecting a Network Cable
Linking to an Infrared Device
Setting Up an Infrared Transmission
Using Standby with Infrared
External Devices
Connecting a Monitor or Projector
Using a USB Device
Enabling USB Legacy Support
Connecting an Optional External MultiBay
Connecting an Optional Cable Lock
Hardware Upgrades
Using PC Cards
Inserting a PC Card
Removing a PC Card
Using SD Cards
Inserting an SD Card
Removing an SD Card
Adding and Upgrading Memory Modules
Effects of Increasing Memory
Specifications
Notebook Dimensions
Operating Environment
Rated Input Power
Modem Specifications
Index
4–6
Har
dw
are Guid
e
Dri
ves
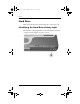
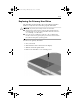
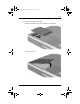
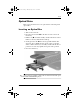
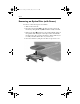
5.
Slide the hard driv
e latch
1
forward to open the hard d
ri
ve
compartment, and remov
e the hard driv
e cov
er
2
.
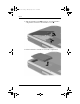
6.
Lift the hard driv
e and remov
e it from the compartment.
3339
55-001
.boo
k Page
6 M
onday,
July
14,
2003
11:
27 AM
1
...
...
4
5
6
7
8
...
...
58