ProCurve Network Access Controller 800 Hardware Installation Guide
© Copyright 2007, 2012 Hewlett-Packard Development Company, LP. The information contained herein is subject to change without notice. Publication Number 5998-3237 March 2012 Applicable Products • ProCurve Network Access Controller 800 J9065A Trademark Credits Microsoft®, Windows®, and Windows NT® are US registered trademarks of Microsoft Corporation. Adobe® and Acrobat® are trademarks of Adobe Systems Incorporated. Java™ is a US trademark of Sun Microsystems, Inc.
Contents 1 Introduction ProCurve Network Access Controller 800 . . . . . . . . . . . . . . . . . . . . . . . . . . 1-1 The ProCurve NAC 800 Endpoint Integrity Solution . . . . . . . . . . . . . . 802.1X . . . . . . . . . . . . . . . . . . . . . . . . . . . . . . . . . . . . . . . . . . . . . . . . . Inline . . . . . . . . . . . . . . . . . . . . . . . . . . . . . . . . . . . . . . . . . . . . . . . . . . DHCP . . . . . . . . . . . . . . . . . . . . . . . . . . . . . . . . . . . . . . . . . . . . . . . . . .
Informations concernant la sécurité . . . . . . . . . . . . . . . . . . . . . . . . . . . . . . A-2 Hinweise zur Sicherheit . . . . . . . . . . . . . . . . . . . . . . . . . . . . . . . . . . . . . . . . . A-3 Considerazioni sulla sicurezza . . . . . . . . . . . . . . . . . . . . . . . . . . . . . . . . . . . A-4 Consideraciones sobre seguridad . . . . . . . . . . . . . . . . . . . . . . . . . . . . . . . . A-5 Safety Information (Japan) . . . . . . . . . . . . . . . . . . . . . . . . . . . . . . . . . . .
Introduction ProCurve Network Access Controller 800 1 Introduction Introduction ProCurve Network Access Controller 800 The ProCurve Network Access Controller 800 (ProCurve NAC 800) provides a complete solution for managing network access at the network edge. When used with the ProCurve Manager (PCM) and ProCurve Identity Driven Manager (IDM) products, you get a single, centralized network management tool, that lets you secure your network from unauthorized access.
Introduction ProCurve Network Access Controller 800 Introduction The ProCurve NAC 800 appliance is fully integrated into the ProCurve Management software. Once installed on a network with PCM, the appliance will be discovered by PCM and you can access the ProCurve NAC management and configuration application via the PCM and IDM windows.
Introduction ProCurve Network Access Controller 800 You can deploy each ProCurve NAC endpoint integrity cluster in one of the following configurations. When deploying ProCurve NAC in an 802.1X environment, you must install it where it can communicate with the Remote Authentication Dial-In User Service (RADIUS) server (or, use the built-in RADIUS server on the ProCurve NAC 800). The RADIUS server communicates with the 802.
(This page intentionally left blank)
2 Quick Install Quick Install Summary Follow these steps to install the ProCurve NAC 800. The rest of this chapter provides details on these steps. 1. Prepare the installation site (page 2-5). Ensure the physical environment is properly prepared, including having the correct network cabling ready to connect to the unit and having an appropriate location for the unit. Please see page 2-3 for some installation precautions. 2. Mount the appliance (page 2-6).
Quick Install Quick Install Summary At this point, the unit is fully installed. See the rest of this chapter if you need more detailed information on any of these installation steps.
Quick Install Quick Install Summary Installation Precautions: Follow these precautions when installing the ProCurve NAC 800 appliance. Wa r n i n g ■ The rack or cabinet should be adequately secured to prevent it from becoming unstable and/or falling over. Units installed in a rack or cabinet should be mounted as low as possible, with the heaviest devices at the bottom and progressively lighter devices installed above. For safe operation, only install the unit horizontally, with the bottom side down.
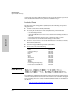
Quick Install Quick Install Summary Hardware Specifications System specifications for ProCurve Network Access Controller 800 (J9065A). Physical Width: 44.3 cm (17.42 in) Depth: 39 cm (15.4 in) Height: 4.2 cm (1.64 in) Weight: 6.1 kg (13.45 lbs) Electrical Quick Install The appliance automatically adjusts to any voltage between 100-127 and 200240 volts and either 50 or 60 Hz.
Quick Install Installing the Appliance Installing the Appliance 1. Prepare the Installation Site ■ Cabling Infrastructure - Ensure the cabling infrastructure meets the necessary network specifications. See the following table for cable types and lengths, and see appendix B, “Cables and Connectors” for more information: Table 1.
Quick Install Installing the Appliance 2. Mount the Unit After determining the configuration and preparing the site, you are ready to mount the ProCurve NAC 800 appliance in a stable location. The ProCurve NAC 800 unit can be mounted in a rack or cabinet Wa r n i n g For safe operation, please read the mounting precautions on page 2-3, before mounting a switch. Rack Mounting the ProCurve NAC 800 Quick Install The ProCurve NAC 800 appliance is.
Quick Install Installing the Appliance Note The mounting brackets have multiple mounting holes and can be rotated, allowing for a variety of mounting options. 2. Hold the unit with attached brackets up to the rack and move it vertically until rack holes line up with the bracket holes, then insert and tighten the four number 12-24 screws holding the brackets to the rack. Quick Install Figure 4.
Quick Install Installing the Appliance Horizontal Surface Mounting Place the ProCurve NAC 800 on a table or other horizontal surface. The unit comes with rubber feet in the accessory kit that can be used to help keep it from sliding on the surface. Attach the rubber feet to the four corners on the bottom of the box within the embossed angled lines. Use a sturdy surface in an uncluttered area.
Quick Install Installing the Appliance 4. Connect the Network Cables Connect the network cables, described under “Cabling Infrastructure” (page 5), from the network devices or your patch panels to the fixed RJ-45 ports on the front of the ProCurve NAC 800. For deployment as a standalone RADIUS sever, or for the RADIUS server with IDM agent, insert the network cable in the LAN port (LAN Port 1) on the front of the box. Quick Install Figure 6.
Quick Install Installing the Appliance Power Fault Locator Console Quick Install Connect RJ-45 cable to Console port.
Quick Install Installing the Appliance 6. Initial Appliance Configuration When you first power up the ProCurve NAC 800 appliance, you can use the LCD menu and buttons on the front panel to set the IP address for the unit. These same functions are available via the Console menu. 1. To access the Console Menu, connect a console and login to the ProCurve NAC using the default administrator account: Login = admin Password = procurve The Application Main Menu will display. 2.
Quick Install Installing the Appliance Quick Install Configuring via the Front LCD Display Figure 7. Front Panel LCD and Buttons ■ To select the menu, push the center button (3). ■ To scroll up or down through a menu list, push the top (S) or bottom (T) buttons, respectively. ■ An arrow (->) indicates the selected item in a menu or options list. To set the server IP Address: 1. At the Configuration menu, press the down button T to select the IP Address option, then press the select 3 button.
Quick Install Installing the Appliance 2. b. To move to the next number in the entry, press the X button to move right, or the W button to move left. Press once for each number space you want to move. The underscore ( _ ) indicates the selected number. c. When the IP address is set correctly, press the 3 button to apply the new IP address, and continue to the Subnet Mask configuration. To change the Subnet Mask entry, use the same procedure described in steps a. and b. above. 3.
Quick Install Installing the Appliance To set the server personality to Management or Enforcement Server for Endpoint Integrity: 1. Press 3 to display the LCD menu. When the menu displays, the Configuration option is selected. 2. Press 3 to continue. Quick Install The Configuration menu appears with the Server Type option selected. 3. Press 3 to continue. The Server Type menu appears with the Combination Server option selected. The current server type is indicated by an asterisk. 4.
Quick Install Installing the Appliance 6. Press the center 3 button to apply changes. When the server type has been set the display returns to the top of the Configuration menu.
(This page intentionally left blank)
A Safety and EMC Regulatory Statements Safety Information ! Documentation reference symbol. If the product is marked with this symbol, refer to the product documentation to get more information about the product. WARNING A WARNING in the manual denotes a hazard that can cause injury or death. CAUTION A CAUTION in the manual denotes a hazard that can damage equipment. Do not proceed beyond a WARNING or CAUTION notice until you have understood the hazardous conditions and have taken appropriate steps.
Safety and EMC Regulatory Statements Informations concernant la sécurité Informations concernant la sécurité ! Symbole de référence à la documentation. Si le produit est marqué de ce symbole, reportez-vous à la documentation du produit afin d'obtenir des informations plus détaillées. WARNING Dans la documentation, un WARNING indique un danger susceptible d'entraîner des dommages corporels ou la mort.
Safety and EMC Regulatory Statements Hinweise zur Sicherheit Hinweise zur Sicherheit ! Symbol für Dokumentationsverweis. Wenn das Produkt mit diesem Symbol markiert ist, schlagen Sie bitte in der Produktdokumentation nach, um mehr Informationen über das Produkt zu erhalten. WARNING Eine WARNING in der Dokumentation symbolisiert eine Gefahr, die Verletzungen oder sogar Todesfälle verursachen kann. CAUTION CAUTION in der Dokumentation symbolisiert eine Gefahr, die dis Gerät beschädigen kann.
Safety and EMC Regulatory Statements Considerazioni sulla sicurezza Considerazioni sulla sicurezza ! Simbolo di riferimento alla documentazione. Se il prodotto è contrassegnato da questo simbolo, fare riferimento alla documentazione sul prodotto per ulteriori informazioni su di esso. WARNING La dicitura WARNINGdenota un pericolo che può causare lesioni o morte. CAUTION La dicituraCAUTION denota un pericolo che può danneggiare le attrezzature.
Safety and EMC Regulatory Statements Consideraciones sobre seguridad Consideraciones sobre seguridad ! Símbolo de referencia a la documentación. Si el producto va marcado con este símbolo, consultar la documentación del producto a fin de obtener mayor información sobre el producto. WARNING Una WARNING en la documentación señala un riesgo que podría resultar en lesiones o la muerte. CAUTION Una CAUTION en la documentación señala un riesgo que podría resultar en averías al equipo.
Safety and EMC Regulatory Statements Safety Information (Japan) Safety and EMC Regulatory Statements Safety Information (Japan) A-6
Safety and EMC Regulatory Statements Safety Information (China) Safety Information (China) Safety and EMC Regulatory Statements A-7
Safety and EMC Regulatory Statements EMC Regulatory Statements EMC Regulatory Statements U.S.A. FCC Class A This equipment has been tested and found to comply with the limits for a Class A digital device, pursuant to Part 15 of the FCC Rules. These limits are designed to provide reasonable protection against interference when the equipment is operated in a commercial environment.
Safety and EMC Regulatory Statements EMC Regulatory Statements Korea Taiwan Safety and EMC Regulatory Statements A-9
Safety and EMC Regulatory Statements EMC Regulatory Statements A-10
B Recycle Statements Waste Electrical and Electronic Equipment (WEEE) Statements Disposal of Waste Equipment by Users in Private Household in the European Union This symbol on the product or on its packaging indicates that this product must not be disposed of with your other household waste. Instead, it is your responsibility to dispose of your waste equipment by handing it over to a designated collection point for the recycling of waste electrical and electronic equipment.
Recycle Statements Waste Electrical and Electronic Equipment (WEEE) Statements Laitteiden hävittäminen kotitalouksissa Euroopan unionin alueella Jos tuotteessa tai sen pakkauksessa on tämä merkki, tuotetta ei saa hävittää kotitalousjätteiden mukana. Tällöin hävitettävä laite on toimitettava sähkölaitteiden ja elektronisten laitteiden kierrätyspisteeseen.
Recycle Statements Waste Electrical and Electronic Equipment (WEEE) Statements Smaltimento delle apparecchiature da parte di privati nel territorio dell'Unione Europea Questo simbolo presente sul prodotto o sulla sua confezione indica che il prodotto non può essere smaltito insieme ai rifiuti domestici. È responsabilità dell'utente smaltire le apparecchiature consegnandole presso un punto di raccolta designato al riciclo e allo smaltimento di apparecchiature elettriche ed elettroniche.
Recycle Statements Waste Electrical and Electronic Equipment (WEEE) Statements Descarte de Lixo Elétrico na Comunidade Européia Este símbolo encontrado no produto ou na embalagem indica que o produto não deve ser descartado no lixo doméstico comum. É responsabilidade do cliente descartar o material usado (lixo elétrico), encaminhando-o para um ponto de coleta para reciclagem.
Index E 1000Base-T connections, length limitations … 2-5 ports, cables used with … 2-5 802.
Index N network cables 1000Base-T connections … 2-5 required types … 2-5 network devices connecting to the appliance … 2-9 network ports connecting to … 2-9 standards compliance … 2-4 types of … 2-5 P part number … i-ii parts, included with the appliance … 2-2 physical specifications, appliance … 2-4 ports connecting to … 2-9 console … 2-9 network connections … 2-9 power source connecting the appliance to … 2-8 precautions mounting the appliance … 2-3 power requirements … 2-3 preparing the installation si
PNAC_HwIG.
PNAC_HwIG.
PNAC_HwIG.
© 2007, 2012 Hewlett-Packard Development Company, LP. The information contained herein is subject to change without notice.