
Specifications


Table Of Contents
- HP ProLiant ML350 Generation 4 Server Maintenance and Service Guide
- Notice
- Contents
- Illustrated parts catalog
- Removal and replacement procedures
- Required Tools
- Safety considerations
- Preparation procedures
- Removing tower feet
- Removing the front bezel (tower model)
- Rack rails
- Removing the power supply blank
- Hot-plug power supply
- Non-hot-plug power supply
- Hot-Plug Power Supply Backplane
- Removing a hard drive blank
- Hot-Plug SCSI Hard Drive
- Non-hot-plug SCSI hard drive
- Redundant system fan
- Expansion Slot Cover
- Expansion board
- CD-ROM drive
- Tape drive
- Internal two-bay hot-plug SCSI drive cage
- Processor and Heatsink
- PPM
- Second serial port
- Duplex SCSI backplane
- Battery
- System Board
- Re-entering the server serial number and product ID
- Diagnostic tools
- Server component identification
- Specifications
- Acronyms and abbreviations
- Index
Removal and replacement procedures 11
Powering down the server
WARNING: To reduce the risk of personal injury, electric shock, or damage to the
equipment, remove the power cord to remove power from the server. The front panel
Power On/Standby button does not completely shut off system power. Portions of the
power supply and some internal circuitry remain active until AC power is removed.
IMPORTANT: If installing a hot-plug device, it is not necessary to power down the server.
1. Shut down the operating system as directed by the operating system documentation.
2. Press the Power On/Standby button to place the server in standby mode. When the server activates
standby power mode, the system power LED changes to amber.
3. Disconnect the power cords.
The system is now without power.
CAUTION: Due to the high capacitance in the power supply, please wait 30 seconds after removing the
power cable before opening the access panel.
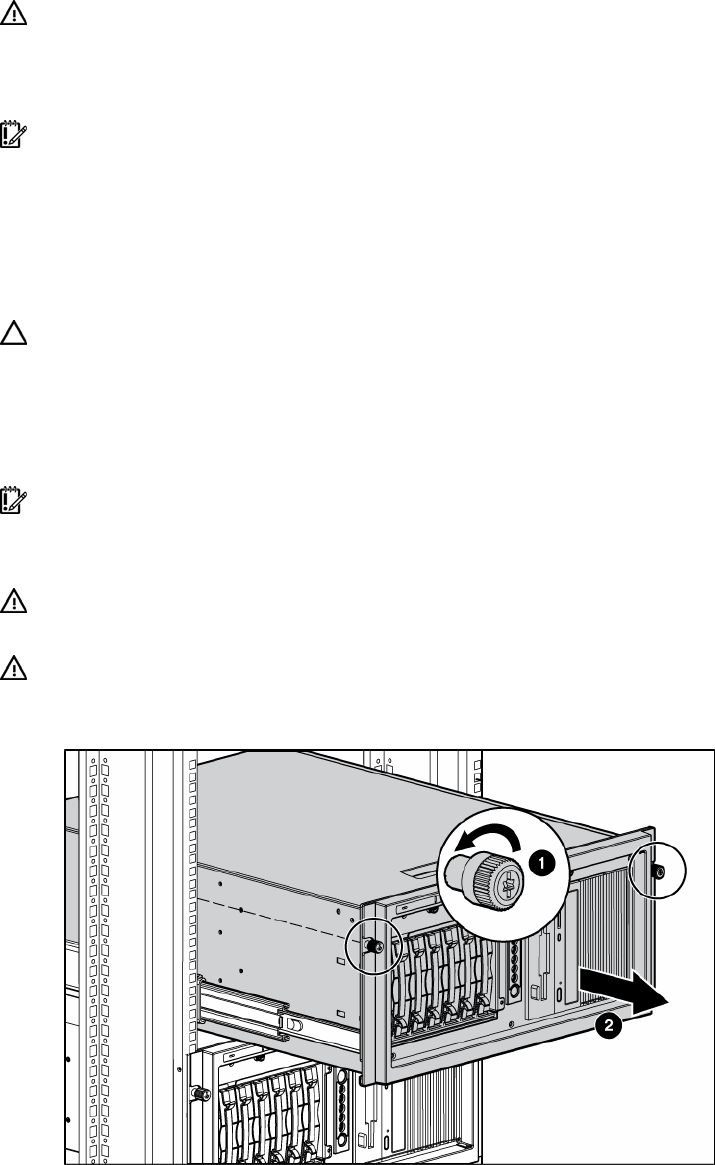
Extending the server from the rack
1. Loosen the thumbscrews that secure the server faceplate to the front of the rack.
IMPORTANT: If the server is installed in a telco rack, remove the server from the rack to access internal
components.
2. Extend the server on the rack rails until the server rail-release latches engage.
WARNING: To reduce the risk of personal injury or equipment damage, be sure that the
rack is adequately stabilized before extending a component from the rack.
WARNING: To reduce the risk of personal injury, be careful when pressing the server
rail-release latches and sliding the server into the rack. The sliding rails could pinch your
fingers.
3. After performing the installation or maintenance procedure, slide the server back into the rack:
a. Press the server rail-release latches and slide the server fully into rack.
b. Secure the server by tightening the thumbscrews.