Installing and Configuring SAS Hardware RAID on HP Workstations Introduction This document provides an overview of hardware RAID solutions for HP workstations running the Windows and Linux operating systems. It assumes a basic understanding of computer hardware, filesystems, and the Linux operating system. It covers an overview of hardware RAID solutions, the differences between software and hardware RAID offerings, and information regarding the configuration of hardware RAID on HP workstations.
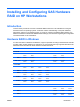
RAID 10 4 or more drives 4 or more drives 4 or more drives RAID 50 6 or more drives 6 or more drives 6 or more drives LSI 1064 RAID 0 2 or more drives RAID 1 2 drives RAID 1/10E 3 or more drives LSI 1068 RAID 0 2 or more drives 2 or more drives RAID 1 2 drives 2 drives 3 or more drives 3 or more drives RAID 1/10E Hardware RAID in Linux There are different levels of hardware RAID available; not all of them are supported options for HP Linux workstations.
LSI 8344ELP RAID 0 2-4 drives 2-4 drives RAID 1 2 drives 2 drives RAID 5 3-4 drives 3-4 drives LSI 8888ELP RAID 0 2-4 drives 2-3 drives 2-6 drives* RAID 1 2 drives 2 drives 2 drives RAID 5 3-4 drives 3 drives 3-6 drives* LSI 1064 RAID 0 2-4 drives RAID 1 2 drives LSI 1068 RAID 0 2-5 drives 2-6 drives* RAID 1 2 drives 2 drives * HP xw8600 Workstation can accommodate 6 internal 2.5” drives Not all possible hardware RAID configurations are supported on HP Linux workstations.
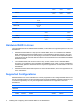
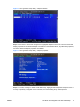
onboard LSI controllers for SAS RAID; details will vary based on the specific configuration (RAID level, number of disks) used. Step 1: Boot the workstation, and when prompted, press any key to view option ROM messages. A message indicating the presence of the LSI onboard controller or plug-in card and the LSI Logic MPT SAS BIOS will appear. Figure 1 LSI Logic MPT SAS BIOS Step 2: Press CTRL-C when indicated to begin RAID configuration and enter the LSI Logic MPT Setup Utility.
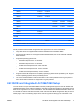
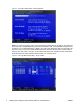
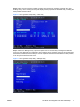
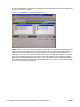
Figure 2 LSI Logic MPT Setup Utility – Adapter selection Step 3: Press enter to select and configure the highlighted adapter from the list. The next screen will display properties of the selected adapter. Information on the attached drives, any RAID arrays present, and more advanced adapter properties is available. Figure 3 LSI Logic MPT Setup Utility – Adapter properties Step 4: To create, manage or delete a SAS RAID array, highlight RAID Properties and press enter.
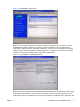
Figure 4 Logic MPT Setup Utility – RAID properties Step 5: To create a new array, select one of the options to create either an IM, IME, or IS volume and press enter. IM, or Integrated Mirroring, is also known as RAID-1. IME, or Integrated Mirroring Enhanced, is RAID-10. IS, or Integrated Striping, is RAID-0. The next screen will list the disks. For each disk to be part of the array, move to the column labeled “RAID Disk” and press the space bar to add the disk to the array.
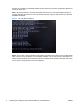
Step 6: After an array has been created, the utility gives options for managing it through the “View Existing Array” menu. Viewing the array will display various properties of the RAID array, including the disks present and their status. Figure 6 LSI Logic MPT Setup Utility – View array Step 7: Select the “Manage Array” option and press enter to use the utility’s management features.
When finished, or at any step in the process, the escape key can be used to exit the current view, canceling or saving any changes as needed. LSI 8344ELP and LSI 8888ELP Setup The LSI 8344ELP and LSI 8888ELP are 8-port SATA/SAS RAID controllers providing additional SAS support for the HP xw8000 and xw9000 family platforms. Note that while the controller provides functionality for SATA RAID, SATA RAID is not supported on HP Linux workstations.
Figure 9 LSI WebBIOS – Main screen Step 3: The Configuration Wizard can be used to create a new RAID array on the device. From the MegaRAID Configuration Wizard screen, there are options available to clear any existing device configuration, add new drives to an existing configuration, or create a new configuration from scratch. Clicking on either “New Configuration” or “Add Configuration” proceeds to the next step of the wizard, where there are options for either custom or automatic configurations.
be part of the RAID array. Select from the available disks those disks that will be part of the RAID array and click “Accept DG” to proceed. Figure 11 LSI WebBIOS – Configuration of disk group Step 5: The next screen allows for more advanced configuration of the RAID array. Many details about the disk policies can be selected here. The most important options on this screen are the RAID level and size.
Figure 12 LSI WebBIOS – Virtual disk configuration Step 6: The next screen will display the physical disks on the left and the proposed virtual disk (RAID array) on the right as a preview of the proposed disk configuration. If changes are needed, press “Back” to go back and change details of the configuration, or press “Accept” to accept the configuration. On the next screen, press “Yes” to save the configuration, then press “Yes” to initialize the new RAID array.
Step 7: Press C or CTRL-H when indicated to enter the utility. When the home screen appears, the new disk will be marked as “Unconfigured bad” and the missing disk will be labeled in red. Click on the new unconfigured disk in order to configure it and add it to the RAID array. Figure 14 LSI WebBIOS – Unconfigured bad disk Step 8: From the next screen, select the option to make the disk “Unconfigured good” so it can be made to be part of a disk group and click “Go.
Step 9: After the disk has been replaced, it will start with an offline status. Select the option marked “Make Online” to bring the physical disk online and finish rebuilding the RAID array. At any point during RAID configuration or management, the home button will return to the main screen of the configuration utility, and the exit button will cancel any unsaved changes and exit the application.
Installing and Configuring SAS Hardware RAID on HP Workstations ENWW