
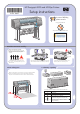
HP Designjet 4000 Printer Series - Setup instructions


10
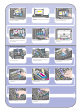
Lower the printer window.Using the stops, carefully wind the excess paper
back on to the spindle.
Using the stops, carefully wind the excess paper
back on to the spindle.
You should see the front panel message above.
You should see the front panel message above.
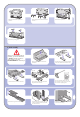
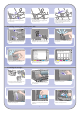
Pull out approximately 1 m (3 ft) of the roll.
Insert the edge of the roll above the black roller.
Lift the paper load lever.
Wait until the paper emerges from the printer
as shown above.
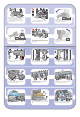
Make sure the paper is aligned with the blue
line and half circle on the platen.
Lower the paper load lever.
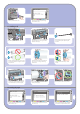
The printer will automatically perform printhead
alignment and a color calibration for the paper
type that you have inserted. During this process
the printer will advance the paper up to 3 m
(~10 ft) before printing.
Please do not try to stop the paper advance; it
is necessary to ensure a successful printhead
alignment.
The whole alignment and calibration process
will take about twenty minutes; while it is going
on, you can proceed to the next section.
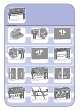
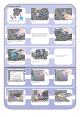
The front panel displays the above. Highlight the
paper type you have loaded and press the
Select (
) key.
Wait until you see this front panel message.
Open the printer window.