
HP Designjet 4000 Printer Series - Setup instructions
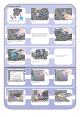


1. Make sure that the printer is on and connected to a working Ethernet network, and
that all computers in the network are on and connected (including hubs and routers).
2. From the Setup menu on your printer’s front panel, select ‘I/O setup’, then ‘Fast
Ethernet’, then ‘Show configuration’. Note the mDNS service name and IP address of
your printer, as shown on the front panel.
3. Open the Print Center or Printer Setup Utility, as follows:
a. Select the Finder icon on your desktop.
b. Click the Applications icon in the top right corner of the Finder window.
c. Select ‘Utilities’ from the list of applications.
d. Select ‘Print Center’ or ‘Printer Setup Utility’ from the list of utilities.
4. Click the Add button. The Printer List dialog box is displayed. Ensure that Rendezvous
is selected in this dialog box.
5. Click the name of the printer. If you cannot identify the printer by name (if there is
more than one printer with the same name), use the mDNS Service Name that you
noted in step 2.
6. The connection is configured automatically. Your printer is now available on the
network.
7. Now turn the page and go to the Embedded Web Server information.
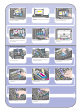
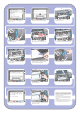
2. Network connection
OS X – Rendezvous
1. Make sure that
the printer is on and connected to a working Ethernet network, and
that all computers in the network are on and connected (including hubs and routers)
.
2.
From the Setup menu on your printer’s front panel, select ‘I/O setup’, then ‘Fast
Ethernet’, then ‘Show configuration’.
Note the IP address of your printer, as shown on
the front panel.
3. Go to your computer and open the Desktop Printer Utility located in the ‘HP Designjet
4000ps’ folder on the hard disk.
4. Choose the AdobePS driver and the Printer (LPR) connection. Click OK.
5. Use the first Change button to select the ‘HP Designjet 4000 PS3’ PostScript Printer
Description (PPD) file.
6. Use the second Change button to enter the printer’s IP address into the Printer Address
field. Click Verify and then OK.
7. Check that your changes appear correctly on the screen, then click Create.
8. Click Save to save your new printer setup on the Desktop.
9.
Now turn the page and go to the Embedded Web Server information.
2. Network connection
OS 9 – TCP/IP
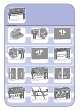
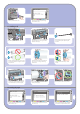
1. Driver installation
OS X & OS 9
1. Connect the cable from your computer or network to the printer.
2. Insert the HP Designjet Software Setup CD into your CD drive, open the CD icon on
your screen, and look for these icons:
• ‘OS X HP DJ 4000ps Install’ (for Mac OS X Native)
• ‘OS 9 HP DJ 4000ps Install’ (for Mac OS X Classic or Mac OS 9)
3. Double-click the appropriate icon for your operating system to launch the installer, and
then follow the instructions on your screen.
Note: We recommend that you select ‘Easy Install’ to install all elements.
4. When the installation has finished, remove the CD from the CD-ROM drive.
5. If you are connecting your printer directly to your computer with a FireWire or USB
cable, see ‘Direct connection’ for OS X or OS 9 below.
If you are connecting your printer to a network, see ‘Network connection’ for OS X or
OS 9 below.
For other network configurations or
further details, please refer to the
‘Using Your Printer’ CD.
Setting up and connecting your printer
Mac OS
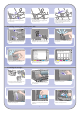
2. Direct connection
OS X – FireWire
1. Ensure that the printer is connected to your computer by a FireWire cable, and that the
printer is turned on.
2. Open the Print Center or Printer Setup Utility, as follows:
a. Select the Finder icon on your desktop.
b. Click the Applications icon in the top right corner of the Finder window.
c. Select ‘Utilities’ from the list of applications.
d. Select ‘Print Center’ or ‘Printer Setup Utility’ from the list of utilities.
3. Click the Add button. The Printer List dialog box is displayed.
4. Select HP FireWire from the popup menu.
5. Click the name of the printer.
6. Click the Add button.
7. Your printer is now ready to use, printer setup is complete.
2. Direct connection
OS 9
Mac OS 9 does not support a FireWire connection.
A direct USB connection is possible, but it requires an optional accessory card. If you
have the USB accessory card, see the Using Your Printer CD for setup instructions.
12