
HP Designjet 4000 Printer Series - Setup instructions


Network connection
Windows
A network connection is the best way to share your printer with your
team.
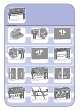
1. Make sure that the printer and the computer are both connected to the network.
2. Go to the printer’s front panel and highlight the Setup icon.
3. The front panel will display some information, including the printer’s IP address. Make
a note of the IP address.
4. Insert the HP Designjet 4000 Series Printer Software Setup for Windows CD into your
CD drive. If the CD does not autorun, run the SETUP.EXE program in the root folder of
the CD.
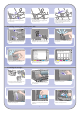
5. Follow the instructions on your screen to set up the printer.
6. When asked how the printer is connected, choose ‘Connected via the network’.
7. When asked what network setup you require, choose ‘Basic network setup’.
8. Select your printer from the list. If you have more than one HP Designjet printer, use
the IP address that you noted earlier to confirm that you have selected the correct
printer.
9. The network settings of the selected printer are displayed. Check that they are correct,
then click ‘Next’ to continue.
10. Select your printer model and click ‘Next’ to continue.
11. Click ‘Next’ until you have completed the installation of the printer driver.
12. We recommend that you take the opportunity to print a test page when prompted to
do so.
13. Now turn the page and go to the Embedded Web Server information.
Connecting your printer
Windows
Direct connection
Windows
A direct connection using FireWire or USB may be faster than a network
connection, but the cable is limited in length and it is more difficult to
share the printer.
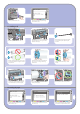
Please note that a USB connection requires an optional accessory card.
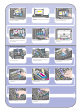
1. Do not connect the computer to the printer yet. You must first install the printer driver
software on the computer, as follows.
2. Insert the HP Designjet 4000 Series Printer Software Setup for Windows CD into your
CD drive. If the CD does not autorun, run the SETUP.EXE program in the root folder of
the CD.
3. Follow the instructions on your screen to set up the printer.
4. When asked how the printer is connected, choose ‘Connected directly to this
computer’.
5. Choose your connection method and click ‘Next’.
6. Choose your printer model and click ‘Next’.
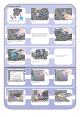
7. When prompted to do so, connect your computer to the printer, using a FireWire or
USB cable. Ensure that the printer is switched on. When the printer software has
detected the printer, the installation process will be completed automatically.
8. We recommend that you take the opportunity to print a test page when prompted to
do so.
9. Your printer is now ready to use, printer setup is complete.
For further details, please refer to
the ‘Using Your Printer’ CD.
13