
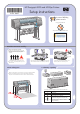
HP Designjet 4000 Printer Series - Setup instructions


3
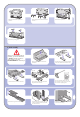
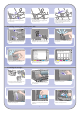
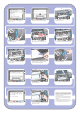
Fix the left leg to the cross-brace using two screws
on the outer side of the leg.
Lower the right leg onto the right side of the
cross-brace. The right leg will fit only on the right
side of the cross-brace.
Fix the right leg to the cross-brace using four
screws on the inner side of the leg.
Position a foot on the left leg. There are pins to
help you to position the foot correctly.
Do not remove the anti-slip material from the wheel.
Fix the right leg to the cross-brace using two
screws on the outer side of the leg.
Fix the left foot using four screws.
Position a foot on the right leg. There are pins to
help you to position the foot correctly
Do not remove the anti-slip material from the wheel.
Fix the right foot using four screws.
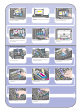
Lift the stand assembly onto the printer body.
The anti-slip material should face to the rear of
the printer.
Advance warning: in the next step, make sure
you position the stand pins in the holes in the
center of the printer body brackets.
Right
leg.
Left
leg.
Fix the right side of the stand to the printer using
one screw. Make sure that the screw is fully
tightened.
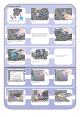
3 Installing the stand onto the printer
Pull open the protective plastic from the base of
the printer. Please ensure that there is a three-
meter space clear of obstructions to the rear of
the printer.
Remove the two desiccant bags from the printer.
You now need to identify the left and right of the
printer. This information is shown on the foam end
packs. Also identify the rear of the printer.
Fix the left side of the stand to the printer using
two screws. Make sure that the screws are fully
tightened.
3m (9ft)