
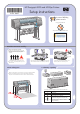
HP Designjet 4000 Printer Series - Setup instructions


1
2
1
2
7
8
9
10
3
4
5
6
1
2
1
2
4
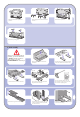
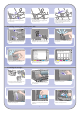
Using four people, rotate the printer on to the
spare and consumables boxes.
Rotate the printer until its rear rests on the spare
and consumables boxes and the wheels with the
anti-slip material touch the floor.
Remove the two foam end packs and the plastic
covering the printer.
Using four people and the hand holds on the rear
of the printer body, carefully lift the printer into an
upright position.
Remove the pallet before trying to lift the printer
into an upright position.
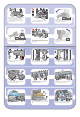
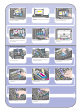
Position the left leg cover on the front of the left
leg (1), then clip the rear edge (2) into place.
Position the right leg cover on the front of the right
leg (1), then clip the rear edge (2) into place.
Remove the anti-slip material from the two rear
wheels on the stand assembly.
Remove the spindle lock.
Open the printhead cleaner door and remove the
carriage packing material. Then close the cleaner
door.
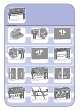
4 More unpacking
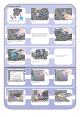
Remove the packing tapes 1 to 8.
Open the printer window and remove the two
window inserts 9 and 10.
Remove the protective covering from the printer
window and the front panel screen.
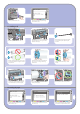
Rotate the printer into an upright position. The
anti-slip material should stop the printer from
sliding forwards.
Place the spare and consumables boxes against
the rear of the printer box. The arrows on the
boxes must point towards the printer box.
Check that the anti-slip material is still fixed to
the two rear wheels.
Press the spindle lever down, which will unseat
the right-hand end of the spindle. Remove that
end of the spindle first, and then the left.