
HP Designjet 4000 Printer Series - Setup instructions


1
2
6
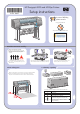
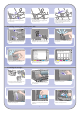
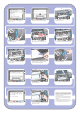
Install the Quick Reference Guide holder. Angle
the holder at the top (1), then position the two
hooks and clip the lower part (2) to the rear of
the printer.
Plug the power cable into the rear of the printer,
then plug the other end into the AC power outlet.
Turn the power switch at the rear of the printer to
the on position.
The front panel will now display how to install the
ink supplies.
If the power light on the front panel remains off,
press the Power key to switch on the printer.
Remove the printheads, printhead cleaners, and
ink cartridges from the consumables box.
Wait until you see this message (~10 minutes).
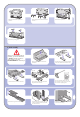
Highlight your language using the Up and Down
keys. Press the Select (
) key.
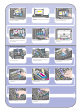
Press the ink cartridge door.
Find the ink cartridge door, which is on the left
side of the printer.
Open the ink cartridge door.
To release the ink cartridge drawer, pull the blue
handle down.
6 Installing accessory parts and the power cable
7 Installing ink cartridges
Slide the ink cartridge drawer out.
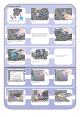
Carefully squeeze the mobile stopper and then
fit it onto the loop.
When the mobile stopper is engaged with the
loop, release your grip.
Move the three mobile stoppers into their parked
position. These stoppers are used only when
printing on sheets of paper less than 900 mm
in length (up to A1 size).