hp LaserJet 3020 hp LaserJet 3030 start memulai
procedures that could affect the operation of the equipment. If this happens, the telephone company will provide advance notice in order for you to make the necessary modifications in order to maintain uninterrupted service. If trouble is experienced with this equipment, please see the numbers in the front of this manual for repair and (or) warranty information.
HP LaserJet 3030 all-in-one은 사양과 기능 면에서 HP LaserJet 3020 all-in-one과 동일하며 팩스 포트가 내장되어 있습니다. 또한, HP LaserJet 3020 all-in-one과 HP LaserJet 3030 all-in-one에 는 USB 포트과 32MB RAM이 장착되어 있습니다.
English 简体中文 Bahasa Indonesia 한국어 ภาษาไทย Tiếng Việt Regulate the environment. Do not place the device in direct sunlight or in an area that has abrupt temperature and humidity changes. The recommended ranges are 15 degrees to 32.5 degrees C (59 degrees to 90.5 degrees F) and 10 percent to 80 percent relative humidity. 准备设备放置位置。 将设备放在通风良好的稳固平面 上。 确保设备周围有足够的空间,以防通风孔堵塞。 控制环境。 请勿将设备放在阳光直射或温度和湿度变 化剧烈的地方。 建议的温度为 15°C 至 32.5°C(59°C 至 90.5°F),相对湿度为 10% 至 80%。 Persiapkan lokasinya.
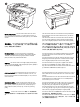
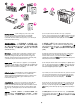
Package contents. 1) print cartridge; 2) power cord; 3) Start Guide and support flyer; 4) media input tray; 5) CD-ROMs containing the device software and electronic User Guide; 6) automatic document feeder (ADF) input tray; 7) Fax Guide (HP LaserJet 3030 all-in-one only); 8) fax cord (HP LaserJet 3030 all-in-one only); 9) output bin support; 10) HP LaserJet 3020 all-in-one or HP LaserJet 3030 all-inone; 11) control-panel faceplate (if not already installed).
English 简体中文 Bahasa Indonesia 한국어 ภาษาไทย Tiếng Việt 繁體中文 Documentation. The device includes the following documents: 1) Start Guide, for initial setup and configuration instructions; 2) Fax Guide, for fax configuration and operation instructions (HP LaserJet 3030 all-in-one only); 3) electronic User Guide on the device CD-ROMs, for extra information and troubleshooting; 4) Toolbox software Help, for instructions about operating the device through the software.
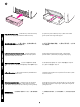
Locate the device parts. 1) ADF input tray; 2) flatbed scanner lid and ADF output bin; 3) control panel; 4) print-cartridge-door release; 5) output bin; 6) priority input tray; 7) media input tray; 8) parallel port; 9) USB port; 10) fax interface ports (HP LaserJet 3030 all-in-one only); 11) power switch; 12) power socket.
English 简体中文 Bahasa Indonesia 2) Press the far ends of the faceplate onto the device. Continue to press while moving your hands toward the center of the faceplate until it snaps into place. Note: Make sure that the faceplate is aligned correctly and is not pressing any buttons. 安装控制面板贴面(如果尚未安装)。 1) 将贴面顶部 的挂钩与设备上的插槽对齐。 2) 先将贴面的最外端按到设备上。 双手向贴面中心移 动,继续按下贴面,直至其卡入到位。 注:确保贴面正 确对齐,且没有按任何按钮。 Lakukan instalasi lembar tampilan panel kontrol (apabila belum terpasang).
The HP LaserJet 3020 all-in-one control panel includes the following controls: 1) scan controls; 2) alphanumeric buttons; 3) menu and cancel controls; 4) copy controls. The HP LaserJet 3030 all-in-one control panel includes the following controls: 1) fax controls; 2) alphanumeric buttons; 3) menu and cancel controls; 4) copy controls; 5) scan controls.
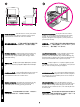
3) Open the top of the media input tray. 4) Slide out the media guides. 5) Pull out the long-media support. 安 装 介 质 进 纸 盘。 1) 滑 入 纸 盘, 直 至 其 固 定 好。 2) 撕下纸盘内外的所有装运胶带。 3) 打开介质进纸盘的顶盖。 4) 滑出介质导板。 5) 拉出 长介质撑条。 Lakukan instalasi baki masukan media. 1) Dorong masuk baki sampai terpasang dengan kuat. 2) Lepaskan semua pita perekat pengiriman di dalam dan di luar baki. 3) Buka bagian atas baki masukan media. 4) Geser keluar pemandu media. 5) Tarik keluar penyangga media-panjang. 입력 용지함을 다시 끼우십시오.
6) Place the media in the media input tray, and then adjust the media guides until they are flush with the media. Note: Do not fan the media before placing it in the tray. 7) Close the top of the media input tray. 8) Install the output bin support. 6) 将介质放入介质进纸盘,然后调整介质导板直至其与 介质齐平。 注:将介质放入进纸盘之前,请勿展开介 质。 7) 合上介质进纸盘的顶盖。 8) 安装出纸槽托板。 6) Tempatkan media ke dalam baki masukan, kemudian atur pemandu media sampai tepat menempel pada media. Catatan: Jangan mengipaskan media sebelum memasukkannya ke baki.
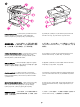
English 简体中文 Bahasa Indonesia 한국어 ภาษาไทย Tiếng Việt Install the print cartridge. 1) Press the print-cartridge-door release to open the print-cartridge door. 安装自动文档进纸器 (ADF) 进纸盘。 1) 将进纸盘上 的两个压片与 ADF 盖板中的两个凹槽对齐。 2) 将纸盘 滑入凹槽,直至其卡入到位。 安装打印碳粉盒。 1) 按下打印碳粉盒挡门释放栓,打 开打印碳粉盒挡门。 Lakukan instalasi baki masukan pengumpan dokumen otomatis (ADF). 1) Pasangkan kedua tonjolan pada baki masukan dengan kedua lubang pada penutup ADF 2) Dorong baki ke dalam lubang sampai baki terpasang pada tempatnya. Pasang kartrid cetak.
2) Remove the print cartridge from its packaging, and then shake the cartridge five or six times. 3) Remove the sealing tape from the cartridge. 4) Hold the print cartridge by the handle and insert the cartridge as shown. 5) Close the print-cartridge door. Press down until it latches completely. 2) 从包装中取出打印碳粉盒,然后摇晃碳粉盒五或六 次。 3) 从碳粉盒上撕下密封胶带。 4) 抓 住 打 印 碳 粉 盒 的 手 柄, 如 图 所 示 插 入 碳 粉 盒。 5) 合上打印碳粉盒挡门。 向下按,直至其锁紧。 2) Keluarkan kartrid cetak dari kemasannya, kemudian guncang kartrid lima atau enam kali.
English 简体中文 Bahasa Indonesia 한국어 ภาษาไทย Tiếng Việt Note: Hewlett-Packard Company cannot recommend using non-HP print cartridges, whether they are new, refilled, or remanufactured. Because they are not HP products, HP cannot influence their design or control their quality.
Connect the power cord. 1) Connect the power cord to the power socket on the back of the device. 2) Connect the other end of the power cord to a grounded alternating current (AC) outlet. Note: Use only the power cord that came with the device. Connect a printer cable to the device. Note: If you are using the device as a standalone fax machine or copier, go to step 13. 1) Locate the cable ports on the back of the device. 2) Connect the parallel or USB device cable (A/B) to the correct port.
Connect to a telephone line (HP LaserJet 3030 all-in-one only). Note: If you are not using the device fax functionality, go to step 14. 1) Locate the fax interface ports on the back of the device. 2) Connect the included fax cord to the device "line" port (the port English Note: Do not connect the cable to a computer or the network at this time.
3) Connect the fax cord to a telephone jack. Note: Use only the fax cord that came with the device. For more information about faxing, see the Fax Guide (HP LaserJet 3030 all-in-one only). Turn on the device. Turn on the device by pressing the power button next to the power socket on the back of the device. 3) 将传真线连接至电话插孔。 注:只能使用设备附带 的传真线。 有关传真的更多信息,请参阅传真指南(仅 适用于 HP LaserJet 3030 all-in-one)。 打开设备电源。 按下设备背面电源插孔旁边的电源按 钮,打开设备电源。 3) Sambungkan kabel faks ke jack telepon.
Set the control panel display language and location (if necessary). If prompted by the control panel, select your language and location information. Follow the instructions on the control panel. Note: The device automatically turns off and then turns on after you select the location.
Print a configuration report. 1) Press MENU/ENTER. 2) Press the < or the > button to select Reports, and then press MENU/ENTER. 3) Press the < or the > button to select Config report, and then press MENU/ ENTER. Tip: If the page that prints is totally blank, remove the print cartridge, make sure that the sealing tape is removed (see step 10), reinstall the print cartridge, and then try printing the page again.
English 简体中文 Bahasa Indonesia 한국어 ภาษาไทย Tiếng Việt 繁體中文 Self-test the copier by using the automatic document feeder (ADF) input tray. 1) Load the configuration report that you just printed print-side up into the ADF input tray. 2) Adjust the media guides to sit against the page. 3) Verify that the original is loaded print-side up, and then press START/COPY. Tip: If the copy job produces a blank page, make sure that the original is loaded print-side up and that no jams exist in the ADF and paper path.
Self-test the copier by using the flatbed scanner. 1) Open the scanner lid, place the configuration report print-side down on the flatbed scanner, and then close the scanner lid. 2) Press START/COPY. Tip: If the copy job produces a blank page, make sure that the original is loaded print-side down on the flatbed scanner and that no jams exist in the paper path. For information about removing jams and other troubleshooting tips, see the electronic User Guide on the device CD-ROMs.
English If you are connecting the device to a network, go to step 20. If you are connecting the device directly to a computer, go to step 21. If you are using all of the device functionality, see the Fax Guide to set up the fax (HP LaserJet 3030 all-in-one only), and then go to step 20 (network connection) or step 21 (computer connection) in this Start Guide.
Connect to a network. If you want to connect the device to a network, see the instructions that are included with the HP print server (which is not included with the HP LaserJet all-in-one). After completing the instructions, go to the next step. Connect to a computer. Note: To install the software for Macintosh, see step 23. 1) Close all programs running on the computer. 2) Insert the software CD-ROM into the CD drive.
English 简体中文 Bahasa Indonesia 한국어 ภาษาไทย Tiếng Việt 繁體中文 Note: You must have administrative privileges to install the software for Windows NT 4.0 service pack 3, Windows XP, or Windows 2000. 3) Select Install HP LaserJet software. 4) In the Printer Connection Wizard, select a connection type. 5) The software prompts you to connect the device to a computer. Connect the parallel or USB device cable (A/B) from the device to the correct computer port or the network. 注: 要在 Windows NT 4.
6) Select the Typical installation type, and then follow the instructions to install the software. Use the Toolbox. Note: The Toolbox does not support Macintosh operating systems. 1) On the computer, click Start, and then click Programs. 2) Click HP LaserJet all-in-one, and then click hp Toolbox to open the Toolbox. Use the Toolbox to perform many device functions from your computer. Go to step 25.
English 5) Follow the onscreen instructions, and then click Install. 6) When prompted, restart the computer. 7) When the HP All-in-One Setup Assistant starts, follow the instructions. Go to step 25.
Install the Macintosh software (OS X). 1) Connect the USB device cable (A/B) to the Macintosh. 2) Close all of the programs that are running on the computer. 3) Insert the software CD-ROM into the CD drive. 4) In the CD folder, double-click the HP All-inOne Installer icon. 5) Follow the onscreen instructions, and then click Install. 6) When prompted, restart the computer. 7) When the HP All-in-One Setup Assistant starts, follow the instructions.
English Register the device. Register with HP to keep your device running smoothly and to receive free device updates and information that is relevant to you, including driver or software update notifications, device support alerts, and tips for using your HP device. 简体中文 测试软件安装。 从任意程序打印一张页面以确保软件 安装正确。 如果安装失败,则重新安装软件。 如果重 新 安 装 失 败, 请参阅支持说明或访问 http://www.hp. com/ support/lj3020 或 http://www.hp.
You can register your device at http://www.hp.com/go/register . Hewlett-Packard and its subsidiaries respect your privacy and are committed to protecting it. Please see the HP privacy statement at the registration website. Support information. For customer support, see the support flyer or see http://www.hp.com/support/lj3020 or http://www.hp.com/ support/lj3030 . 您可以在 http://www.hp.
English 简体中文 Bahasa Indonesia 한국어 ภาษาไทย Tiếng Việt 繁體中文 Congratulations! The device is ready to use. See the Toolbox (Windows 98, Millennium Edition (ME), 2000, or XP only) to open the electronic User Guide and to use the tools to solve problems. 恭喜! 设备已准备就绪,可以使用。 请参阅工具箱 ( 仅适用于 Windows 98、 Millennium Edition (Me)、 2000 或 XP),以打开电子版用户指南并使用各种工具 解决问题。 Selamat! Piranti siap untuk digunakan.
30
© 2003 Hewlett-Packard Development Company, LP www.hp.com/support/lj3020 www.hp.