hp LaserJet 3020 all-in-one hp LaserJet 3030 all-in-one User Guide
Copyright Information FCC Requirements (United States) © 2003 Copyright Hewlett-Packard Development Company, L.P. Part number Q2665-90920 This equipment has been tested and found to comply with the limits for a Class B digital device, pursuant to Part 15 of the FCC rules. These limits are designed to provide reasonable protection against harmful interference in a residential installation. This equipment generates, uses, and can radiate radio frequency energy.
Trademark Credits Microsoft, Windows, Windows NT, and MSDOS are U.S. registered trademarks of Microsoft Corporation. All other devices mentioned herein may be trademarks of their respective companies. Safety Information WARNING! Potential Shock Hazard Always follow basic safety precautions when using this device to reduce risk of injury from fire or electric shock. Read and understand all instructions in the electronic User Guide. Observe all warnings and instructions marked on the device.
Hewlett-Packard Development Company, L.P. 20555 S.H.
Table of contents 1 Introduction Device overview......................................................................................................................... 8 Preparing the location................................................................................................................ 9 Package contents..................................................................................................................... 10 Hardware and software............................................
vi ENWW
1 ENWW Introduction ● Device overview ● Preparing the location ● Package contents ● Locating the device parts 7
Device overview ● The HP LaserJet 3020 all-in-one comes with a 150-sheet media input tray, a 10-sheet priority input tray, a 50-sheet automatic document feeder (ADF) input tray, and a flatbed scanner. ● The HP LaserJet 3030 all-in-one includes the same specifications and functionality as the HP LaserJet 3020 all-in-one, plus the fax interface ports.
Preparing the location Place the device on a sturdy, level surface in a well-ventilated area. Make sure that there is enough space around the device so that the air vents are not blocked. Do not place the device in direct sunlight or in an area that has abrupt temperature and humidity changes. The recommended ranges are 15 degrees to 32.5 degrees C (59 degrees to 90.5 degrees F) and 10 percent to 80 percent relative humidity.
Package contents Hardware and software 1. print cartridge 2. power cord 3. Start Guide and support flyer 4. media input tray 5. CD-ROMs containing the device software and electronic User Guide 6. automatic document feeder (ADF) input tray 7. Fax Guide (HP LaserJet 3030 all-in-one only) 8 9 10 11 8. fax cord (HP LaserJet 3030 all-in-one only) 9. output bin support 10. HP LaserJet 3020 all-in-one or HP LaserJet 3030 all-in-one 11. control-panel faceplate (if not already installed).
Documentation The package contains the following documents: ENWW ● Start Guide, for initial setup and configuration instructions ● Fax Guide, for fax configuration and operation instructions (HP LaserJet 3030 all-in-one only) ● electronic User Guide on the device CD-ROMs, for extra information and troubleshooting ● Toolbox software Help, for instructions about operating the device through the software Package contents 11
Locating the device parts 1. ADF input tray 2. flatbed scanner lid and ADF output bin 3. control panel 4. print-cartridge-door release 5. output bin 6. priority input tray 7. media input tray 8. parallel port 9. USB port 10. fax interface ports (HP LaserJet 3030 all-in-one only) 11. power switch 12.
2 ENWW Setting up your device ● Installing the control panel faceplate (if not already installed) ● Installing the media input tray ● Installing the automatic document feeder (ADF) input tray ● Installing the print cartridge ● Connecting the power cord ● Connecting a printer cable to the device ● Connecting to a telephone line (HP LaserJet 3030 all-in-one only) ● Turning on the device ● Setting the control panel display language and location (if necessary) ● Printing a configuration re
Installing the control panel faceplate (if not already installed) 1. Align the hooks on the top of the faceplate with the slots on the device. 2. Press the far ends of the faceplate onto the device. Continue to press while moving your hands toward the center of the faceplate until it snaps into place. Note Make sure that the faceplate is aligned correctly and is not pressing any buttons. The HP LaserJet 3020 all-in-one control panel includes the following controls: 1. scan controls 2.
3. menu and cancel controls 4. copy controls The HP LaserJet 3030 all-in-one control panel includes the following controls: 1. fax controls 2. alphanumeric buttons 3. menu and cancel controls 4. copy controls 5.
Installing the media input tray 1. Slide the tray in until it fits securely. 2. Remove any shipping tape inside and outside of the tray. 3. Open the top of the media input tray. 4. Slide out the media guides. 5. Pull out the long-media support. 6. Place the media in the media input tray, and then adjust the media guides until they are flush with the media. Note 16 Do not fan the media before placing it in the tray.
7. Close the top of the media input tray. 8. Install the output bin support. Installing the automatic document feeder (ADF) input tray 1. Align the two tabs on the input tray with the two grooves in the ADF lid. 2. Slide the tray into the grooves until the tray snaps into place.
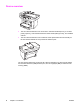
Installing the print cartridge 1. Press the print-cartridge-door release to open the print-cartridge door. 2. Remove the print cartridge from its packaging, and then shake the cartridge five or six times. 3. Remove the sealing tape from the cartridge. 4. Hold the print cartridge by the handle and insert the cartridge as shown. 5. Close the print-cartridge door. Press down until it latches completely.
Note Hewlett-Packard Company cannot recommend using non-HP print cartridges, whether they are new, refilled, or remanufactured. Because they are not HP products, HP cannot influence their design or control their quality. Connecting the power cord 1. Connect the power cord to the power socket on the back of the device. 2. Connect the other end of the power cord to a grounded alternating current (AC) outlet. Note Use only the power cord that came with the device.
Note 20 Do not connect the cable to a computer or a network at this time.
Connecting to a telephone line (HP LaserJet 3030 all-in-one only) Note If you are not using the device fax functionality, go to the next section. 1. Locate the fax interface ports on the back of the device. 2. Connect the included fax cord to the device "line" port (the port that is marked with a icon). 3. Connect the fax cord to a telephone jack. Note ENWW Use only the fax cord that came with the device. For more information about faxing, see the Fax Guide (HP LaserJet 3030 all-in-one only).
Turning on the device Turn on the device by pressing the power button next to the power socket on the back of the device. Tip: If the device has no power and no lights are lit on the control panel, make sure that the power cord is attached securely to both the device and a power outlet. Also, if the power cord is connected to a power strip, make sure that the power strip is switched on, or connect the device directly to a wall outlet to test the power strip.
Printing a configuration report 1. Press MENU/ENTER. 2. Press the < or the > button to select Reports, and then press MENU/ENTER. 3. Press the < or the > button to select Config report, and then press MENU/ENTER. Tip: If the page that prints is totally blank, remove the print cartridge, make sure that the sealing tape is removed (see "Installing the print cartridge"), reinstall the print cartridge, and then try printing the page again.
Testing the copier by using the flatbed scanner 1. Open the scanner lid, place the configuration report print-side down on the flatbed scanner, and then close the scanner lid. 2. Press START/COPY. Tip: If the copy job produces a blank page, make sure that the original is loaded print-side down on the flatbed scanner and that no jams exist in the paper path. For information about removing jams and other troubleshooting tips, see the electronic User Guide on the device CD-ROMs.
Completing your device setup ENWW ● If you are using the device as a standalone copier, the setup is complete. ● If you are using the device as a standalone fax (HP LaserJet 3030 all-in-one only), see the Fax Guide to set the fax header and complete the device setup. The Fax Guide also includes troubleshooting tips. ● If you are connecting the device to a network, see "Connecting to a network". ● If you are connecting the device directly to a computer, see "Connecting to a computer".
Connecting to a network If you want to connect the device to a network, see the instructions that are included with the HP print server (which is not included with the HP LaserJet all-in-one). After completing the instructions, see "Connecting to a computer". Connecting to a computer Note To install the software for Macintosh, see "Installing the Macintosh software (OS 9.x to OS X)". 1. Close all programs that are running on the computer. 2. Insert the software CD-ROM into the CD drive.
5. The software prompts you to connect the device to a computer. Connect the parallel or USB device cable (A/B) from the device to the correct computer port or the network. 6. Select the Typical installation type, and then follow the instructions to install the software. Using the Toolbox Note The Toolbox does not support Macintosh operating systems. 1. On the computer, click Start, and then click Programs. 2. Click HP LaserJet all-in-one, and then click hp Toolbox to open the Toolbox.
Installing the Macintosh software (OS 9.x to OS X) 1. Connect the USB device cable (A/B) to the Macintosh. 2. Close all of the programs that are running on the computer. 3. Insert the software CD-ROM into the CD drive. 4. In the CD folder, double-click the HP All-in-One Installer icon. 5. Follow the onscreen instructions, and then click Install. 6. When prompted, restart the computer. 7. When the HP All-in-One Setup Assistant starts, follow the instructions.
Testing the software installation Print a page from any program to make sure that the software is correctly installed. If the installation failed, reinstall the software. If the reinstallation fails, see http://www.hp.com/ support/lj3020 or http://www.hp.com/support/lj3030 or the support flyer for more information.
30 Chapter 2 Setting up your device ENWW
ENWW 31
32 ENWW