hp LaserJet 3020 hp LaserJet 3030 start ‛“ ‚“ početak start başlat
procedures that could affect the operation of the equipment. If this happens, the telephone company will provide advance notice in order for you to make the necessary modifications in order to maintain uninterrupted service. If trouble is experienced with this equipment, please see the numbers in the front of this manual for repair and (or) warranty information.
The HP LaserJet 3030 all-in-one includes the same specifications and functionality as the HP LaserJet 3020 all-in-one, plus the fax interface ports. The HP LaserJet 3020 all-in-one and the HP LaserJet 3030 all-inone also include parallel and universal serial bus (USB) interface ports, and 32 megabytes (MB) of random-access memory (RAM). Konfiguracije uređaja.
English Hrvatski Română Türkçe БЪлгарски Prepare the location. Place the device on a sturdy, level surface in a well-ventilated area. Make sure that there is enough space around the device so that the air vents are not blocked. Regulate the environment. Do not place the device in direct sunlight or in an area that has abrupt temperature and humidity changes. The recommended ranges are 15 degrees to 32.5 degrees C (59 degrees to 90.5 degrees F) and 10 percent to 80 percent relative humidity.
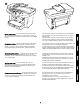
Package contents. 1) print cartridge; 2) power cord; 3) Start Guide and support flyer; 4) media input tray; 5) CD-ROMs containing the device software and electronic User Guide; 6) automatic document feeder (ADF) input tray; 7) Fax Guide (HP LaserJet 3030 all-in-one only); 8) fax cord (HP LaserJet 3030 all-in-one only); 9) output bin support; 10) HP LaserJet 3020 all-in-one or HP LaserJet 3030 all-inone; 11) control-panel faceplate (if not already installed).
English Hrvatski Română Türkçe БЪлгарски Documentation. The device includes the following documents: 1) Start Guide, for initial setup and configuration instructions; 2) Fax Guide, for fax configuration and operation instructions (HP LaserJet 3030 all-in-one only); 3) electronic User Guide on the device CD-ROMs, for extra information and troubleshooting; 4) Toolbox software Help, for instructions about operating the device through the software. Dokumentacija.
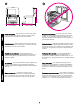
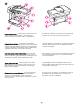
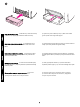
Locate the device parts. 1) ADF input tray; 2) flatbed scanner lid and ADF output bin; 3) control panel; 4) print-cartridge-door release; 5) output bin; 6) priority input tray; 7) media input tray; 8) parallel port; 9) USB port; 10) fax interface ports (HP LaserJet 3030 all-in-one only); 11) power switch; 12) power socket. Lociranje dijelova uređaja.
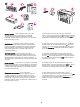
English Hrvatski Română 2) Press the far ends of the faceplate onto the device. Continue to press while moving your hands toward the center of the faceplate until it snaps into place. Note: Make sure that the faceplate is aligned correctly and is not pressing any buttons. Instalirajte prednju ploču upravljačke ploče (ako nije već instalirana). 1) Poravnajte kvačice na vrhu prednje ploče s utorima na uređaju. 2) Pritisnite krajeve prednje ploče na uređaj.
The HP LaserJet 3020 all-in-one control panel includes the following controls: 1) scan controls; 2) alphanumeric buttons; 3) menu and cancel controls; 4) copy controls. The HP LaserJet 3030 all-in-one control panel includes the following controls: 1) fax controls; 2) alphanumeric buttons; 3) menu and cancel controls; 4) copy controls; 5) scan controls.
3) Open the top of the media input tray. 4) Slide out the media guides. 5) Pull out the long-media support. Instaliranje ulazne ladice za medije. 1) Gurajte ladice dok ne škljocne na mjesto. 2) Uklonite svu zaštitnu traku unutar i izvan ladice. 3) Otvorite poklopac ulazne ladice za medije. 4) Izvucite vodilice za medije. 5) Izvucite podložak za dugačke medije. Instalaţi tava de alimentare cu hârtie. 1) Introduceţi tava până când aceasta se fixează.
6) Place the media in the media input tray, and then adjust the media guides until they are flush with the media. Note: Do not fan the media before placing it in the tray. 7) Close the top of the media input tray. 8) Install the output bin support. 6) Stavite medij u ulaznu ladicu za medij te zatim podesite vodilice za medij dok ih medij ne prekrije. Napomena: Nemojte rastresati medij prije nego ga stavite u ladicu. 7) Zatvorite poklopac ulazne ladice za medije.
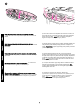
Install the print cartridge. 1) Press the print-cartridge-door release to open the print-cartridge door. Instaliranje spremnika s tintom. 1) Pritisnite polugu za otpuštanje vrata spremnika s tintom za otvaranje vrata spremnika s tintom. Hrvatski Instaliranje ulazne ladice za dokument za automatsko ulaganje dokumenata (ADF). 1) Poravnajte dva jezičca na ulaznom ladici s dva utora na poklopcu uređaja za automatsko ulaganje dokumenata. 2) Ugurajte ladicu u utore sve dok ne škljocne na mjesto.
2) Remove the print cartridge from its packaging, and then shake the cartridge five or six times. 3) Remove the sealing tape from the cartridge. 4) Hold the print cartridge by the handle and insert the cartridge as shown. 5) Close the print-cartridge door. Press down until it latches completely. 2) Uklonite spremnik s tintom iz kutije te ga pet ili šest puta protresite. 3) Uklonite pečatnu traku sa spremnika. 4) Držite spremnik s tintom za ručicu i umetnite ga kako je prikazano.
English Hrvatski Română Türkçe БЪлгарски CAUTION: If toner gets on your clothing, wipe the toner off with a clean cloth, wash the items in cold water, and air dry. Using hot water or heat from a dryer will set the toner in the fabric. Note: Hewlett-Packard Company cannot recommend using non-HP print cartridges, whether they are new, refilled, or remanufactured. Because they are not HP products, HP cannot influence their design or control their quality.
Connect the power cord. 1) Connect the power cord to the power socket on the back of the device. 2) Connect the other end of the power cord to a grounded alternating current (AC) outlet. Note: Use only the power cord that came with the device. Connect a printer cable to the device. Note: If you are using the device as a standalone fax machine or copier, go to step 13. 1) Locate the cable ports on the back of the device. 2) Connect the parallel or USB device cable (A/B) to the correct port.
Connect to a telephone line (HP LaserJet 3030 all-in-one only). Note: If you are not using the device fax functionality, go to step 14. 1) Locate the fax interface ports on the back of the device. 2) Connect the included fax cord to the device "line" port (the port English Note: Do not connect the cable to a computer or the network at this time. that is marked with a Napomena: Zasada još nemojte kabel spajati na računalo ili mrežu.
3) Connect the fax cord to a telephone jack. Note: Use only the fax cord that came with the device. For more information about faxing, see the Fax Guide (HP LaserJet 3030 all-in-one only). Turn on the device. Turn on the device by pressing the power button next to the power socket on the back of the device. 3) Spojite kabel za faks na telefonsku utičnicu. Napomena: Koristite samo kabel za faks koji se isporučuje s uređajem.
English Hrvatski Română Türkçe БЪлгарски Tip: If the device has no power and no lights are lit on the control panel, make sure that the power cord is attached securely to both the device and a power outlet. Also, if the power cord is connected to a power strip, make sure that the power strip is switched on, or connect the device directly to a wall outlet to test the power strip. Set the control panel display language and location (if necessary).
Print a configuration report. 1) Press MENU/ENTER. 2) Press the < or the > button to select Reports, and then press MENU/ENTER. 3) Press the < or the > button to select Config report, and then press MENU/ ENTER. Tip: If the page that prints is totally blank, remove the print cartridge, make sure that the sealing tape is removed (see step 10), reinstall the print cartridge, and then try printing the page again. Ispišite izvješće o konfiguraciji. 1) Pritisnite MENU/ENTER.
English Hrvatski Română Türkçe БЪлгарски Self-test the copier by using the automatic document feeder (ADF) input tray. 1) Load the configuration report that you just printed print-side up into the ADF input tray. 2) Adjust the media guides to sit against the page. 3) Verify that the original is loaded print-side up, and then press START/COPY. Tip: If the copy job produces a blank page, make sure that the original is loaded print-side up and that no jams exist in the ADF and paper path.
Self-test the copier by using the flatbed scanner. 1) Open the scanner lid, place the configuration report print-side down on the flatbed scanner, and then close the scanner lid. 2) Press START/COPY. Tip: If the copy job produces a blank page, make sure that the original is loaded print-side down on the flatbed scanner and that no jams exist in the paper path. For information about removing jams and other troubleshooting tips, see the electronic User Guide on the device CD-ROMs.
English Hrvatski Română Türkçe БЪлгарски Complete your device setup. If you are using the device as a standalone copier, the setup is complete. If you are using the device as a standalone fax (HP LaserJet 3030 all-in-one only), see the Fax Guide to set the fax header and complete the device setup. The Fax Guide also includes troubleshooting tips. If you are connecting the device to a network, go to step 20. If you are connecting the device directly to a computer, go to step 21.
Connect to a network. If you want to connect the device to a network, see the instructions that are included with the HP print server (which is not included with the HP LaserJet all-in-one). After completing the instructions, go to the next step. Connect to a computer. Note: To install the software for Macintosh, see step 23. 1) Close all programs running on the computer. 2) Insert the software CD-ROM into the CD drive.
5) The software prompts you to connect the device to a computer. Connect the parallel or USB device cable (A/B) from the device to the correct computer port or the network. Hrvatski Napomena: Morate imate administratorske povlastice za instaliranje softvera za Windows NT 4.0 service pack 3, Windows XP ili Windows 2000. 3) Odaberite Install HP LaserJet Software. 4) U Printer Connection Wizard (Čarobnjaku za povezivanje pisača) odaberite vrstu veze. 5) Softver od vas traži da spojite uređaj s računalom.
6) Select the Typical installation type, and then follow the instructions to install the software. Use the Toolbox. Note: The Toolbox does not support Macintosh operating systems. 1) On the computer, click Start, and then click Programs. 2) Click HP LaserJet all-in-one, and then click hp Toolbox to open the Toolbox. Use the Toolbox to perform many device functions from your computer. Go to step 25. 6) Odaberite vrstu instalacije Typical te slijedite upute za instaliranje softvera.
English 5) Follow the onscreen instructions, and then click Install. 6) When prompted, restart the computer. 7) When the HP All-in-One Setup Assistant starts, follow the instructions. Go to step 25. Hrvatski Instalirajte softver za Macintosh (OS 9). Napomena: Korisnici OS Macintosh trebali bi ići na korak 24. 1) Spojite USB kabel (A/B) za uređaj na Macintosh. 2) Zatvorite sve programe koji su pokrenuti na računalu. 3) Umetnite CD-ROM sa softverom u CD pogon.
Install the Macintosh software (OS X). 1) Connect the USB device cable (A/B) to the Macintosh. 2) Close all of the programs that are running on the computer. 3) Insert the software CD-ROM into the CD drive. 4) In the CD folder, double-click the HP All-inOne Installer icon. 5) Follow the onscreen instructions, and then click Install. 6) When prompted, restart the computer. 7) When the HP All-in-One Setup Assistant starts, follow the instructions. Instaliranje softvera za Macintosh (OS X).
English Hrvatski Română Türkçe БЪлгарски Test the software installation. Print a page from any program to make sure that the software is correctly installed. If the installation failed, reinstall the software. If the reinstallation fails, see the support flyer or see http://www.hp.com/support/lj3020 or http://www. hp.com/support/lj3030 for more information. Register the device.
You can register your device at http://www.hp.com/go/register . Hewlett-Packard and its subsidiaries respect your privacy and are committed to protecting it. Please see the HP privacy statement at the registration website. Support information. For customer support, see the support flyer or see http://www.hp.com/support/lj3020 or http://www.hp.com/ support/lj3030 . Uređaj možete registrirati na http://www.hp.com/go/register .
English Hrvatski Română Türkçe БЪлгарски Congratulations! The device is ready to use. See the Toolbox (Windows 98, Millennium Edition (ME), 2000, or XP only) to open the electronic User Guide and to use the tools to solve problems. Èestitamo! Uređaj je spreman za korištenje. Pogledajte Skupinu programskih alata (samo Windows 98, Millennium Edition (ME), 2000 ili XP) za otvaranje elektronskih uputa za korištenje te korištenje alata za rješavanje problema. Felicitări! Echipamentul dvs.
30
© 2003 Hewlett-Packard Development Company, LP www.hp.com/support/lj3020 www.hp.