hp LaserJet 3020 hp LaserJet 3030 start start осу s kums pradžia ‗ ‡ ―‘
procedures that could affect the operation of the equipment. If this happens, the telephone company will provide advance notice in order for you to make the necessary modifications in order to maintain uninterrupted service. If trouble is experienced with this equipment, please see the numbers in the front of this manual for repair and (or) warranty information.
Ierīces konfigurācijas. HP LaserJet 3020 viss vienā ir aprīkots ar 150 lappušu apdrukājamā materiāla padevi, 10 lappušu prioritāro padevi, 50 lappušu automātisko dokumentu padevi (ADP) un planšetskeneri. Prietaiso konfigūracijos. HP LaserJet 3020 all-in-one yra 150 lapų talpos spausdinimo laikmenų įvesties dėklas, 10 lapų talpos pirmenybinės įvesties dėklas, 50 lapų talpos automatinio dokumentų tiektuvo (ADT) įvesties dėklas ir plokščiasis skaitytuvas. Конфигурации устройства.
English Eesti Казак Latviešu Lietuviškai Русский Prepare the location. Place the device on a sturdy, level surface in a well-ventilated area. Make sure that there is enough space around the device so that the air vents are not blocked. Regulate the environment. Do not place the device in direct sunlight or in an area that has abrupt temperature and humidity changes. The recommended ranges are 15 degrees to 32.5 degrees C (59 degrees to 90.5 degrees F) and 10 percent to 80 percent relative humidity.
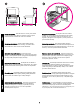
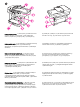
Package contents. 1) print cartridge; 2) power cord; 3) Start Guide and support flyer; 4) media input tray; 5) CD-ROMs containing the device software and electronic User Guide; 6) automatic document feeder (ADF) input tray; 7) Fax Guide (HP LaserJet 3030 all-in-one only); 8) fax cord (HP LaserJet 3030 all-in-one only); 9) output bin support; 10) HP LaserJet 3020 all-in-one or HP LaserJet 3030 all-inone; 11) control-panel faceplate (if not already installed).
English Eesti Казак Latviešu Lietuviškai Русский Documentation. The device includes the following documents: 1) Start Guide, for initial setup and configuration instructions; 2) Fax Guide, for fax configuration and operation instructions (HP LaserJet 3030 all-in-one only); 3) electronic User Guide on the device CD-ROMs, for extra information and troubleshooting; 4) Toolbox software Help, for instructions about operating the device through the software. Dokumentatsioon.
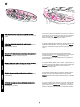
Locate the device parts. 1) ADF input tray; 2) flatbed scanner lid and ADF output bin; 3) control panel; 4) print-cartridge-door release; 5) output bin; 6) priority input tray; 7) media input tray; 8) parallel port; 9) USB port; 10) fax interface ports (HP LaserJet 3030 all-in-one only); 11) power switch; 12) power socket. Leidke seadme osad.
English Eesti Казак 2) Press the far ends of the faceplate onto the device. Continue to press while moving your hands toward the center of the faceplate until it snaps into place. Note: Make sure that the faceplate is aligned correctly and is not pressing any buttons. Paigaldage juhtpaneeli katteplaat (kui seda pole juba paigaldatud). 1) Joondage katteplaadi ülaosas olevad konksud seadmel olevate piludega. 2) Vajutage katteplaadi otsad seadmesse.
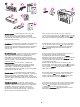
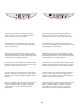
The HP LaserJet 3020 all-in-one control panel includes the following controls: 1) scan controls; 2) alphanumeric buttons; 3) menu and cancel controls; 4) copy controls. The HP LaserJet 3030 all-in-one control panel includes the following controls: 1) fax controls; 2) alphanumeric buttons; 3) menu and cancel controls; 4) copy controls; 5) scan controls. HP LaserJet 3020 all-in-one juhtpaneelil on järgnevad nupud: 1) skannimisnupud; 2) numbriklahvid; 3) menüü ja katkestamise nupud; 4) kopeerimisnupud.
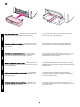
3) Open the top of the media input tray. 4) Slide out the media guides. 5) Pull out the long-media support. Paigaldage trükikandjate sisendsalv. 1) Libistage salv sisse, kuni see kohale kinnitub. 2) Eemaldage salve peal ja sees olla võivad transpordilindid. 3) Avage trükikandjate salve kaas. 4) Libistage trükikandjate juhikud väljapoole. 5) Tõmmake välja pikkade kandjate tugi. Тасушыдан енгізу науасын орнатыңыз. 1) Нақты орнына келгенше науаны ішке қарай жылжытыңыз.
6) Place the media in the media input tray, and then adjust the media guides until they are flush with the media. Note: Do not fan the media before placing it in the tray. 7) Close the top of the media input tray. 8) Install the output bin support. 6) Asetage kandjad trükikandjate sisendsalve ning seejärel seadke juhikud vastu trükikandjat. Märkus: Ärge trükikandjaid enne salve asetamist lehvitage. 7) Sulgege trükikandjate salve kaas. 8) Paigaldage väljundsalve tugi.
English Eesti Казак Latviešu Lietuviškai Русский Install the automatic document feeder (ADF) input tray. 1) Align the two tabs on the input tray with the two grooves in the ADF lid. 2) Slide the tray into the grooves until the tray snaps into place. Install the print cartridge. 1) Press the print-cartridge-door release to open the print-cartridge door. Paigaldage automaatse etteandja (ADF) sisendsalv. 1) Joondage sisendsalvel olevad kaks sakki ADF kaanes oleva kahe vaoga.
2) Remove the print cartridge from its packaging, and then shake the cartridge five or six times. 3) Remove the sealing tape from the cartridge. 4) Hold the print cartridge by the handle and insert the cartridge as shown. 5) Close the print-cartridge door. Press down until it latches completely. 2) Eemaldage printerikassett pakendist ning seejärel raputage seda viis või kuus korda. 3) Eemaldage pitserlint kassetist. 4) Hoidke printerikassetti käepidemest ja sisestage see nagu näidatud.
English Eesti Казак Latviešu Lietuviškai Русский CAUTION: If toner gets on your clothing, wipe the toner off with a clean cloth, wash the items in cold water, and air dry. Using hot water or heat from a dryer will set the toner in the fabric. Note: Hewlett-Packard Company cannot recommend using non-HP print cartridges, whether they are new, refilled, or remanufactured. Because they are not HP products, HP cannot influence their design or control their quality.
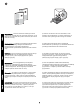
Connect the power cord. 1) Connect the power cord to the power socket on the back of the device. 2) Connect the other end of the power cord to a grounded alternating current (AC) outlet. Note: Use only the power cord that came with the device. Connect a printer cable to the device. Note: If you are using the device as a standalone fax machine or copier, go to step 13. 1) Locate the cable ports on the back of the device. 2) Connect the parallel or USB device cable (A/B) to the correct port.
Connect to a telephone line (HP LaserJet 3030 all-in-one only). Note: If you are not using the device fax functionality, go to step 14. 1) Locate the fax interface ports on the back of the device. 2) Connect the included fax cord to the device "line" port (the port English Note: Do not connect the cable to a computer or the network at this time. that is marked with a Märkus: Ärge kaablit praegu veel arvuti ega võrguga ühendage. icon).
3) Connect the fax cord to a telephone jack. Note: Use only the fax cord that came with the device. For more information about faxing, see the Fax Guide (HP LaserJet 3030 all-in-one only). Turn on the device. Turn on the device by pressing the power button next to the power socket on the back of the device. 3) Ühendage faksikaabel telefonipistikuga. Märkus: Kasutage ainult seadmega kaasas olnud faksikaablit. Lisainformatsiooni faksimise kohta vaadake faksijuhendist (ainult HP LaserJet 3030 all-in-one).
English Eesti Казак Latviešu Lietuviškai Русский Tip: If the device has no power and no lights are lit on the control panel, make sure that the power cord is attached securely to both the device and a power outlet. Also, if the power cord is connected to a power strip, make sure that the power strip is switched on, or connect the device directly to a wall outlet to test the power strip. Set the control panel display language and location (if necessary).
Print a configuration report. 1) Press MENU/ENTER. 2) Press the < or the > button to select Reports, and then press MENU/ENTER. 3) Press the < or the > button to select Config report, and then press MENU/ ENTER. Tip: If the page that prints is totally blank, remove the print cartridge, make sure that the sealing tape is removed (see step 10), reinstall the print cartridge, and then try printing the page again. Printige konfiguratsiooniraport. 1) Vajutage MENU/ENTER.
English Eesti Казак Latviešu Lietuviškai Русский Self-test the copier by using the automatic document feeder (ADF) input tray. 1) Load the configuration report that you just printed print-side up into the ADF input tray. 2) Adjust the media guides to sit against the page. 3) Verify that the original is loaded print-side up, and then press START/COPY. Tip: If the copy job produces a blank page, make sure that the original is loaded print-side up and that no jams exist in the ADF and paper path.
Self-test the copier by using the flatbed scanner. 1) Open the scanner lid, place the configuration report print-side down on the flatbed scanner, and then close the scanner lid. 2) Press START/COPY. Tip: If the copy job produces a blank page, make sure that the original is loaded print-side down on the flatbed scanner and that no jams exist in the paper path. For information about removing jams and other troubleshooting tips, see the electronic User Guide on the device CD-ROMs.
English Eesti Казак Latviešu Lietuviškai Русский Complete your device setup. If you are using the device as a standalone copier, the setup is complete. If you are using the device as a standalone fax (HP LaserJet 3030 all-in-one only), see the Fax Guide to set the fax header and complete the device setup. The Fax Guide also includes troubleshooting tips. If you are connecting the device to a network, go to step 20. If you are connecting the device directly to a computer, go to step 21.
Connect to a network. If you want to connect the device to a network, see the instructions that are included with the HP print server (which is not included with the HP LaserJet all-in-one). After completing the instructions, go to the next step. Connect to a computer. Note: To install the software for Macintosh, see step 23. 1) Close all programs running on the computer. 2) Insert the software CD-ROM into the CD drive.
5) The software prompts you to connect the device to a computer. Connect the parallel or USB device cable (A/B) from the device to the correct computer port or the network. Märkus: Tarkvara installeerimiseks peavad Teil Windows NT 4.0 service pack 3, Windows XP, või Windows 2000 puhul olema administraatoriõigused. 3) Valige Install HP LaserJet Software (Installeeri HP LaserJet tarkvara). 4) Printeri ühenduse viisardis (Printer Connection Wizard) valige ühenduse liik.
6) Select the Typical installation type, and then follow the instructions to install the software. Use the Toolbox. Note: The Toolbox does not support Macintosh operating systems. 1) On the computer, click Start, and then click Programs. 2) Click HP LaserJet all-in-one, and then click hp Toolbox to open the Toolbox. Use the Toolbox to perform many device functions from your computer. Go to step 25. 6) Select the Typical installation type, and then follow the instructions to install the software.
5) Follow the onscreen instructions, and then click Install. 6) When prompted, restart the computer. 7) When the HP All-in-One Setup Assistant starts, follow the instructions. Go to step 25. Installeerige Macintoshi tarkvara (OS 9). Märkus: Macintosh OS X kasutajad peaks jätkama sammuga 24. 1) Ühendage USB seadme kaabel (A/B) Macintoshiga. 2) Sulgege kõik arvutil töötavad programmid. 3) Sisestage tarkvara CD-ROM CD draivi. 4) CD kaustas tehke topeltklõps ikoonil HP All-in-One Installer.
Install the Macintosh software (OS X). 1) Connect the USB device cable (A/B) to the Macintosh. 2) Close all of the programs that are running on the computer. 3) Insert the software CD-ROM into the CD drive. 4) In the CD folder, double-click the HP All-inOne Installer icon. 5) Follow the onscreen instructions, and then click Install. 6) When prompted, restart the computer. 7) When the HP All-in-One Setup Assistant starts, follow the instructions. Installeerige Macintoshi tarkvara (OS X).
English Eesti Казак Latviešu Lietuviškai Русский Test the software installation. Print a page from any program to make sure that the software is correctly installed. If the installation failed, reinstall the software. If the reinstallation fails, see the support flyer or see http://www.hp.com/support/lj3020 or http://www. hp.com/support/lj3030 for more information. Register the device.
You can register your device at http://www.hp.com/go/register . Hewlett-Packard and its subsidiaries respect your privacy and are committed to protecting it. Please see the HP privacy statement at the registration website. Support information. For customer support, see the support flyer or see http://www.hp.com/support/lj3020 or http://www.hp.com/ support/lj3030 . Oma seadme saate registreerida aadressil http://www.hp.com/go/ register .
English Eesti Казак Latviešu Lietuviškai Русский Congratulations! The device is ready to use. See the Toolbox (Windows 98, Millennium Edition (ME), 2000, or XP only) to open the electronic User Guide and to use the tools to solve problems. Õnnitleme! Seade on kasutamiseks valmis. Elektroonilise kasutusjuhendi avamiseks ja probleemide lahendamiseks tööriistade kasutamiseks vaadake tööriistakasti (ainult Windows 98, Millennium Edition (ME), 2000 või XP). Құттықтаймыз»! Құрылғы пайдалануға дайын.
30
31
32
ﻣﻌﻠﻮﻣﺎت ﻋﻦ اﻟﺪﻋﻢ .ﺑﺎﻟﻨﺴﺒﺔ ﻟﺪﻋﻢ اﻟﻌﻤﻼء ،اﻧﻈﺮ ﻣﻨﺸﻮر اﻟﺪﻋﻢ أو اﻧﻈﺮ ﻣﻮﻗﻊ http://www.hp.com/support/lj3020أو http://www.hp.com/support/ .lj3030 ﻳﻤﻜﻨﻚ ﺗﺴﺠﻴﻞ ﺟﻬﺎزك ﺑﺎﻟﻤﻮﻗﻊ .http://www.hp.com/go/registerﺗﺤﺘﺮم ﺷﺮﻛﺔ Hewlett-Packardواﻟﺸﺮﻛﺎت اﻟﺘﺎﺑﻌﺔ ﻟﻬﺎ ﺣﻖ اﻟﺨﺼﻮﺻﻴﺔ اﻟﺨﺎص ﺑﻚ وﺗﻠﺘﺰم ﺑﺤﻤﺎﻳﺔ ﻫﺬه اﻟﺨﺼﻮﺻﻴﺔ .اﻟﺮﺟﺎء ،اﻧﻈﺮ ﺑﻴﺎن اﻟﺨﺼﻮﺻﻴﺔ ﻟﺸﺮﻛﺔ HPﻓﻲ ﻣﻮﻗﻊ اﻟﺘﺴﺠﻴﻞ ﻋﻠﻰ ﺷﺒﻜﺔ اﻹﻧﺘﺮﻧﺖ. ﺗﻬﺎﻧﻴﻨﺎ ! اﻟﺠﻬﺎز ﺟﺎﻫﺰ ﻟﻼﺳﺘﺨﺪام .
ﻋﺮﺑﻲ ﻋﺮﺑﻲ ﺗﺜﺒﻴﺖ ﺑﺮﻧﺎﻣﺞ (١ .(OS X ) Macintoshﻗﻢ ﺑﺘﻮﺻﻴﻞ ﻛﺎﺑﻞ ﺟﻬﺎز (A/B) USB ﺑﺠﻬﺎز (٢ .Macintoshأﻏﻠﻖ ﻛﻞ اﻟﺒﺮاﻣﺞ اﻟﺠﺎري ﺗﺸﻐﻴﻠﻬﺎ ﻋﻠﻰ ﺟﻬﺎز اﻟﻜﻤﺒﻴﻮﺗﺮ(٣ . أدﺧﻞ اﻟﻘﺮص اﻟﻤﻀﻐﻮط اﻟﺨﺎص ﺑﺒﺮﻧﺎﻣﺞ ﺗﺸﻐﻴﻞ اﻟﻄﺎﺑﻌﺔ داﺧﻞ ﻣﺤﺮك اﻷﻗﺮاص اﻟﻤﻀﻐﻮﻃﺔ (٤ .ﻣﻦ ﻣﺠﻠﺪ اﻟﻘﺮص اﻟﻤﻀﻐﻮط ،اﻧﻘﺮ ﻓﻮق رﻣﺰ HP All-in-One Installerﻧﻘﺮًا ﻣﺰدوﺟًﺎ. (٥اﺗﺒﻊ اﻹرﺷﺎدات اﻟﺘﻲ ﺗﻈﻬﺮ ﻋﻠﻰ اﻟﺸﺎﺷﺔ ﺛﻢ اﻧﻘﺮ ﻓﻮق (٦ .Installﻗﻢ ﺑﺈﻋﺎدة ﺗﺸﻐﻴﻞ ﺟﻬﺎز اﻟﻜﻤﺒﻴﻮﺗﺮ ،ﻋﻨﺪ اﻟﻄﻠﺐ (٧ .اﺗﺒﻊ اﻹرﺷﺎدات اﻟﺘﺎﻟﻴﺔ ﻋﻨﺪﻣﺎ ﻳﺒﺪأ ﺗﺸﻐﻴﻞ HP .
(٦ﺣﺪد ﺗﺜﺒﻴﺖ ﻣﻦ ﻧﻮع ،Typicalﺛﻢ اﺗﺒﻊ اﻹرﺷﺎدات اﻟﺨﺎﺻﺔ ﺑﺘﺜﺒﻴﺖ اﻟﺒﺮﻧﺎﻣﺞ. اﺳﺘﺨﺪام .Toolboxﻣﻼﺣﻈﺔ :ﻻ ﻳﺪﻋﻢ ﺑﺮﻧﺎﻣﺞ Toolboxأﻧﻈﻤﺔ اﻟﺘﺸﻐﻴﻞ (١ .Macintoshﻣﻦ ﺟﻬﺎز اﻟﻜﻤﺒﻴﻮﺗﺮ ،اﻧﻘﺮ ﻓﻮق Startﺛﻢ اﻧﻘﺮ ﻓﻮق .Programs (٢اﻧﻘﺮ ﻓﻮق HP LaserJet all-in-oneﺛﻢ اﻧﻘﺮ ﻓﻮق hp Toolboxﻟﻔﺘﺢ ﺑﺮﻧﺎﻣﺞ .Toolboxﻳﻤﻜﻨﻚ اﺳﺘﺨﺪام Toolboxﻟﺘﻨﻔﻴﺬ اﻟﻌﺪﻳﺪ ﻣﻦ وﻇﺎﺋﻒ اﻟﺠﻬﺎز ﻣﻦ ﺧﻼل ﺟﻬﺎز اﻟﻜﻤﺒﻴﻮﺗﺮ .اﻧﺘﻘﻞ إﻟﻰ اﻟﺨﻄﻮة .٢٥ ﺗﺜﺒﻴﺖ ﺑﺮﻧﺎﻣﺞ .
ﻋﺮﺑﻲ ﻋﺮﺑﻲ ﺗﻮﺻﻴﻞ اﻟﺠﻬﺎز ﺑﺸﺒﻜﺔ اﺗﺼﺎل .إذا ﻛﻨﺖ ﺗﺮﻳﺪ ﺗﻮﺻﻴﻞ اﻟﺠﻬﺎز ﺑﺸﺒﻜﺔ اﺗﺼﺎل ،اﻧﻈﺮ اﻹرﺷﺎدات اﻟﻤﺮﻓﻘﺔ ﺑﻤﻠﻘﻢ ﻃﺒﺎﻋﺔ ) HPﺣﻴﺚ أﻧﻬﺎ ﻏﻴﺮ ﻣﺮﻓﻘﺔ ﺑﺠﻬﺎز HP LaserJet اﻟﻜﻞ ﻓﻲ واﺣﺪ( .ﺑﻌﺪ ﺗﻨﻔﻴﺬ اﻹرﺷﺎدات ،اﻧﺘﻘﻞ إﻟﻰ اﻟﺨﻄﻮة اﻟﺘﺎﻟﻴﺔ. ﺗﻮﺻﻴﻞ اﻟﺠﻬﺎز ﺑﺎﻟﻜﻤﺒﻴﻮﺗﺮ .ﻣﻼﺣﻈﺔ :ﻟﺘﺜﺒﻴﺖ اﻟﺒﺮﻧﺎﻣﺞ ﺑﻜﻤﺒﻴﻮﺗﺮ ،Macintoshاﻧﻈﺮ اﻟﺨﻄﻮة (١ .٢٣أﻏﻠﻖ ﻛﻞ اﻟﺒﺮاﻣﺞ اﻟﺠﺎري ﺗﺸﻐﻴﻠﻬﺎ ﻋﻠﻰ اﻟﻜﻤﺒﻴﻮﺗﺮ (٢ .أدﺧﻞ اﻟﻘﺮص اﻟﻤﻀﻐﻮط اﻟﺨﺎص ﺑﺒﺮﻧﺎﻣﺞ ﺗﺸﻐﻴﻞ اﻟﻄﺎﺑﻌﺔ داﺧﻞ ﻣﺤﺮك اﻷﻗﺮاص اﻟﻤﻀﻐﻮﻃﺔ .
إﺟﺮاء اﺧﺘﺒﺎر ذاﺗﻲ ﻟﻶﻟﺔ اﻟﻨﺎﺳﺨﺔ ﺑﺎﺳﺘﺨﺪام اﻟﻤﺎﺳﺤﺔ اﻟﻀﻮﺋﻴﺔ ذات اﻟﻘﺎﻋﺪة اﻟﻤﺴﻄﺤﺔ (١ .اﻓﺘﺢ ﻏﻄﺎء اﻟﻤﺎﺳﺤﺔ اﻟﻀﻮﺋﻴﺔ وﺿﻊ ﺗﻘﺮﻳﺮ اﻟﺘﻬﻴﺌﺔ ﻋﻠﻰ اﻟﻤﺎﺳﺤﺔ اﻟﻀﻮﺋﻴﺔ ﺑﺤﻴﺚ ﻳﻜﻮن اﺗﺠﺎه اﻟﻄﺒﺎﻋﺔ ﻷﺳﻔﻞ ﺛﻢ أﻏﻠﻖ ﻏﻄﺎء اﻟﻤﺎﺳﺤﺔ اﻟﻀﻮﺋﻴﺔ(٢ . اﺿﻐﻂ .START/COPY ﺗﻠﻤﻴﺢ :إذا ﻧﺘﺞ ﻋﻦ ﻣﻬﻤﺔ اﻟﻨﺴﺦ ﺻﻔﺤﺔ ﻓﺎرﻏﺔ ،ﺗﺄﻛﺪ ﻣﻦ أﻧﻪ ﻗﺪ ﺗﻢ ﺗﺤﻤﻴﻞ اﻟﻨﺴﺨﺔ اﻷﺻﻠﻴﺔ ﺑﺤﻴﺚ ﻳﻜﻮن اﺗﺠﺎه اﻟﻄﺒﺎﻋﺔ ﻷﺳﻔﻞ ﻓﻲ اﻟﻤﺎﺳﺤﺔ اﻟﻀﻮﺋﻴﺔ ذات اﻟﻘﺎﻋﺪة اﻟﻤﺴﻄﺤﺔ ﺛﻢ ﺗﺄﻛﺪ ﻣﻦ ﻋﺪم وﺟﻮد اﻧﺤﺸﺎر ﻓﻲ ﻣﺴﺎر اﻟﻮرق .
ﻋﺮﺑﻲ ﻋﺮﺑﻲ ﻃﺒﺎﻋﺔ ﺗﻘﺮﻳﺮ اﻟﺘﻬﻴﺌﺔ (١ .اﺿﻐﻂ (٢ .MENU/ENTERاﺿﻐﻂ اﻟﺰر > أو < ﻟﺘﺤﺪﻳﺪ Reportsﺛﻢ اﺿﻐﻂ (٣ .MENU/ENTERاﺿﻐﻂ اﻟﺰر > أو < ﻟﺘﺤﺪﻳﺪ Config report ﺛﻢ اﺿﻐﻂ .MENU/ENTER ﺗﻠﻤﻴﺢ :إذا ﻛﺎﻧﺖ اﻟﺼﻔﺤﺔ اﻟﺘﻲ ﺗﻤﺖ ﻃﺒﺎﻋﺘﻬﺎ ﻓﺎرﻏﺔ ﺗﻤﺎﻣًﺎ ،ﻗﻢ ﺑﺈزاﻟﺔ ﺧﺮﻃﻮﺷﺔ اﻟﻄﺒﺎﻋﺔ وﺗﺄﻛﺪ ﻣﻦ أﻧﻪ ﻗﺪ ﺗﻢ ﻧﺰع ﺷﺮﻳﻂ اﻟﺘﻐﻠﻴﻒ )اﻧﻈﺮ اﻟﺨﻄﻮة ،(١٠ﺛﻢ ﻗﻢ ﺑﺘﺮﻛﻴﺐ ﺧﺮﻃﻮﺷﺔ اﻟﻄﺒﺎﻋﺔ ﻣﺮة أﺧﺮى وﺣﺎول إﻋﺎدة ﻃﺒﺎﻋﺔ اﻟﺼﻔﺤﺔ ﻣﺮة أﺧﺮى. إﺟﺮاء اﺧﺘﺒﺎر ذاﺗﻲ ﻟﻶﻟﺔ اﻟﻨﺎﺳﺨﺔ ﺑﺎﺳﺘﺨﺪام درج إدﺧﺎل وﺣﺪة اﻟﺘﻐﺬﻳﺔ اﻟﺘﻠﻘﺎﺋﻴﺔ ﻟﻠﻤﺴﺘﻨﺪات ) (١ .
(٣ﻗﻢ ﺑﺘﻮﺻﻴﻞ ﺳﻠﻚ اﻟﻔﺎﻛﺲ ﺑﻤﻘﺒﺲ اﻟﻬﺎﺗﻒ .ﻣﻼﺣﻈﺔ :ﻳﺠﺐ اﺳﺘﺨﺪام ﺳﻠﻚ اﻟﻔﺎﻛﺲ اﻟﻤﺮﻓﻖ ﻣﻊ اﻟﺠﻬﺎز ﻓﻘﻂ .ﻟﻠﺤﺼﻮل ﻋﻠﻰ ﻣﺰﻳﺪ ﻣﻦ اﻟﻤﻌﻠﻮﻣﺎت ﺣﻮل ﻋﻤﻠﻴﺔ اﻹرﺳﺎل ﺑﺎﻟﻔﺎﻛﺲ ،اﻧﻈﺮ "دﻟﻴﻞ اﻟﻔﺎﻛﺲ" HP LaserJet 3030 ) .اﻟﻜﻞ ﻓﻲ واﺣﺪ ﻓﻘﻂ(. ﺗﺸﻐﻴﻞ اﻟﺠﻬﺎز .ﻗﻢ ﺑﺘﺸﻐﻴﻞ اﻟﺠﻬﺎز ﻋﻦ ﻃﺮﻳﻖ ﺿﻐﻂ زر اﻟﺘﺸﻐﻴﻞ اﻟﻤﻮﺟﻮد ﺑﺠﻮار ﻣﻘﺒﺲ اﻟﺘﻴﺎر ﻓﻲ اﻟﺠﺰء اﻟﺨﻠﻔﻲ ﻣﻦ اﻟﺠﻬﺎز. ﺗﻠﻤﻴﺢ :إذا ﻛﺎن اﻟﻤﻨﺘﺞ ﻏﻴﺮ ﻣﻮﺻﻞ ﺑﺎﻟﺘﻴﺎر وﻻ ﺗﻮﺟﺪ ﻣﺼﺎﺑﻴﺢ ﻣﻀﺎءة ﻋﻠﻰ ﻟﻮﺣﺔ اﻟﺘﺤﻜﻢ ،ﺗﺄﻛﺪ ﻣﻦ ﺗﻮﺻﻴﻞ ﺳﻠﻚ اﻟﺘﻴﺎر ﺑﻜﻞ ﻣﻦ اﻟﺠﻬﺎز وﻣﺄﺧﺬ اﻟﻄﺎﻗﺔ ﺑﻄﺮﻳﻘﺔ آﻣﻨﺔ.
ﻣﻼﺣﻈﺔ :ﻻ ﺗﻘﻢ ﺑﺘﻮﺻﻴﻞ اﻟﻜﺎﺑﻞ ﺑﺠﻬﺎز ﻛﻤﺒﻴﻮﺗﺮ أو ﺷﺒﻜﺔ اﺗﺼﺎل ﻓﻲ ﻫﺬا اﻟﻮﻗﺖ. ﺗﻮﺻﻴﻞ اﻟﺠﻬﺎز ﺑﺨﻂ اﻟﻬﺎﺗﻒ )ﺟﻬﺎز HP LaserJet 3030اﻟﻜﻞ ﻓﻲ واﺣﺪ ( ﻣﻼﺣﻈﺔ :ﻓﻲ ﺣﺎﻟﺔ ﻋﺪم اﺳﺘﺨﺪام وﻇﻴﻔﺔ اﻟﻔﺎﻛﺲ ﺑﺎﻟﺠﻬﺎز ،اﻧﺘﻘﻞ إﻟﻰ اﻟﺨﻄﻮة .١٤ (١ﺣﺪد ﻣﻨﺎﻓﺬ واﺟﻬﺔ اﻟﻔﺎﻛﺲ ﻋﻠﻰ اﻟﺠﺰء اﻟﺨﻠﻔﻲ ﻟﻠﺠﻬﺎز (٢ .ﻗﻢ ﺑﺘﻮﺻﻴﻞ ﺳﻠﻚ ﻋﺮﺑﻲ ﻋﺮﺑﻲ ﺗﻮﺻﻴﻞ ﺳﻠﻚ اﻟﺘﻴﺎر (١ .ﻗﻢ ﺑﺘﻮﺻﻴﻞ ﺳﻠﻚ اﻟﺘﻴﺎر ﺑﻤﻘﺒﺲ اﻟﺘﻴﺎر اﻟﻤﻮﺟﻮد ﺑﺎﻟﺠﺰء اﻟﺨﻠﻔﻲ ﻟﻠﺠﻬﺎز (٢ .ﻗﻢ ﺑﺘﻮﺻﻴﻞ اﻟﻄﺮف اﻵﺧﺮ ﻣﻦ ﺳﻠﻚ اﻟﺘﻴﺎر ﺑﻤﺄﺧﺬ ﺗﻴﺎر ﻣﺘﺮدد ) (ACﻣﻮﺻﻞ ﺑﻄﺮف أرﺿﻲ .
(٢أﺧﺮج ﺧﺮﻃﻮﺷﺔ اﻟﻄﺒﺎﻋﺔ ﻣﻦ ﻋﺒﻮﺗﻬﺎ ﺛﻢ ﻗﻢ ﺑﺮﺟﻬﺎ ﺧﻤﺲ أو ﺳﺖ ﻣﺮات (٣ .اﻧﺰع ﺷﺮﻳﻂ اﻟﺘﻐﻠﻴﻒ ﻣﻦ ﻋﻠﻰ ﺧﺮﻃﻮﺷﺔ اﻟﻄﺒﺎﻋﺔ. (٤اﻣﺴﻚ ﺧﺮﻃﻮﺷﺔ اﻟﻄﺒﺎﻋﺔ ﻣﻦ ﻣﻘﺒﻀﻬﺎ ﺛﻢ ﻗﻢ ﺑﺈدﺧﺎﻟﻬﺎ ﻛﻤﺎ ﻫﻮ ﻣﻮﺿﺢ (٥ .أﻏﻠﻖ ﺑﺎب ﺧﺮﻃﻮﺷﺔ اﻟﻄﺒﺎﻋﺔ .اﺿﻐﻂ ﻋﻠﻰ اﻟﺒﺎب إﻟﻰ أﺳﻔﻞ ﺣﺘﻰ ﻳﺴﺘﻘﺮ ﻓﻲ ﻣﻜﺎﻧﻪ ﺑﺈﺣﻜﺎم. ﺗﺤﺬﻳﺮ :ﻓﻲ ﺣﺎﻟﺔ ﺗﻠﻄﺦ ﻣﻼﺑﺴﻚ ﺑﺎﻟﺤﺒﺮ ،اﻣﺴﺢ اﻟﺤﺒﺮ ﺑﺎﺳﺘﺨﺪام ﻗﻄﻌﺔ ﻗﻤﺎش ﻧﻈﻴﻔﺔ ﺛﻢ اﻏﺴﻠﻬﺎ ﺑﻤﺎء ﺑﺎرد واﺗﺮﻛﻬﺎ ﺗﺠﻒ ﻓﻲ اﻟﻬﻮاء .ﻗﺪ ﻳﺆدي اﺳﺘﺨﺪام اﻟﻤﺎء اﻟﺴﺎﺧﻦ أو اﻟﺤﺮارة اﻟﻤﻨﺒﻌﺜﺔ ﻣﻦ اﻟﻤﺠﻔﻒ إﻟﻰ ﺗﺜﺒﻴﺖ اﻟﺤﺒﺮ ﻓﻲ اﻷﻧﺴﺠﺔ اﻟﻘﻤﺎﺷﻴﺔ.
ﻋﺮﺑﻲ ﻋﺮﺑﻲ (٦ﺿﻊ وﺳﺎﺋﻂ اﻟﻄﺒﺎﻋﺔ ﻓﻲ درج إدﺧﺎل اﻟﻮﺳﺎﺋﻂ ،ﺛﻢ اﺿﺒﻂ ﻣﻮﺟﻬﺎت اﻟﻮﺳﺎﺋﻂ ﺣﺘﻰ ﺗﺼﺒﺢ ﻣﺤﺎذﻳﺔ ﺗﻤﺎﻣًﺎ ﻟﻠﻮﺳﺎﺋﻂ .ﻣﻼﺣﻈﺔ :ﻻ ﺗﻘﻢ ﺑﻄﻲ أو ﺛﻨﻲ اﻟﻮﺳﺎﺋﻂ ﺑﺼﻮرة ﻣﺮوﺣﻴﺔ ﻗﺒﻞ وﺿﻌﻬﺎ ﻓﻲ اﻟﺪرج (٧ .أﻏﻠﻖ اﻟﺠﺰء اﻟﻌﻠﻮي ﻟﺪرج إدﺧﺎل اﻟﻮﺳﺎﺋﻂ. (٨ﻗﻢ ﺑﺘﺮﻛﻴﺐ دﻋﺎﻣﺔ ﺣﺎوﻳﺔ اﻹﺧﺮاج. ﺗﺮﻛﻴﺐ درج إدﺧﺎل وﺣﺪة اﻟﺘﻐﺬﻳﺔ اﻟﺘﻠﻘﺎﺋﻴﺔ ﻟﻠﻤﺴﺘﻨﺪات ) (١ (ADFﻗﻢ ﺑﻤﺤﺎذاة ﻛﻼ اﻟﻠﺴﺎﻧﻴﻦ اﻟﻤﻮﺟﻮدﻳﻦ ﻋﻠﻰ درج اﻹدﺧﺎل ﻣﻊ اﻟﺘﺠﻮﻳﻔﻴﻦ اﻟﻤﻮﺟﻮدﻳﻦ ﻓﻲ ﻏﻄﺎء وﺣﺪة اﻟﺘﻐﺬﻳﺔ اﻟﺘﻠﻘﺎﺋﻴﺔ ﻟﻠﻤﺴﺘﻨﺪات ) (٢ .
ﺗﺘﻀﻤﻦ ﻟﻮﺣﺔ اﻟﺘﺤﻜﻢ اﻟﻤﻮﺟﻮدة ﺑﺠﻬﺎز HP LaserJet 3020اﻟﻜﻞ ﻓﻲ واﺣﺪ، ﻋﻨﺎﺻﺮ اﻟﺘﺤﻜﻢ اﻟﺘﺎﻟﻴﺔ (١ :ﻋﻨﺎﺻﺮ ﺗﺤﻜﻢ اﻟﻤﺴﺢ اﻟﻀﻮﺋﻲ (٢ ،اﻷزرار اﻷﺑﺠﺪﻳﺔ اﻟﺮﻗﻤﻴﺔ (٣ ،ﻋﻨﺎﺻﺮ ﺗﺤﻜﻢ اﻟﻘﺎﺋﻤﺔ واﻹﻟﻐﺎء (٤ ،ﻋﻨﺎﺻﺮ ﺗﺤﻜﻢ اﻟﻨﺴﺦ. ﺗﺘﻀﻤﻦ ﻟﻮﺣﺔ اﻟﺘﺤﻜﻢ اﻟﻤﻮﺟﻮدة ﺑﺠﻬﺎز HP LaserJet 3030اﻟﻜﻞ ﻓﻲ واﺣﺪ، ﻋﻨﺎﺻﺮ اﻟﺘﺤﻜﻢ اﻟﺘﺎﻟﻴﺔ (١ :ﻋﻨﺎﺻﺮ ﺗﺤﻜﻢ اﻟﻔﺎﻛﺲ (٢ ،اﻷزرار اﻷﺑﺠﺪﻳﺔ اﻟﺮﻗﻤﻴﺔ(٣ ، ﻋﻨﺎﺻﺮ ﺗﺤﻜﻢ اﻟﻘﺎﺋﻤﺔ واﻹﻟﻐﺎء (٤ ،ﻋﻨﺎﺻﺮ ﺗﺤﻜﻢ اﻟﻨﺴﺦ (٥ ،ﻋﻨﺎﺻﺮ ﺗﺤﻜﻢ اﻟﻤﺴﺢ اﻟﻀﻮﺋﻲ. ﺗﺮﻛﻴﺐ درج إدﺧﺎل اﻟﻮﺳﺎﺋﻂ (١ .
ﻋﺮﺑﻲ ﻋﺮﺑﻲ ﺗﺤﺪﻳﺪ ﻣﻮﻗﻊ أﺟﺰاء اﻟﺠﻬﺎز (١ .درج إدﺧﺎل وﺣﺪة اﻟﺘﻐﺬﻳﺔ اﻟﺘﻠﻘﺎﺋﻴﺔ ﻟﻠﻤﺴﺘﻨﺪات ) (٢ ،(ADFﻏﻄﺎء اﻟﻤﺎﺳﺤﺔ اﻟﻀﻮﺋﻴﺔ ذات اﻟﻘﺎﻋﺪة اﻟﻤﺴﻄﺤﺔ وﺣﺎوﻳﺔ إﺧﺮاج ،ADF (٣ﻟﻮﺣﺔ اﻟﺘﺤﻜﻢ (٤،ذراع ﺑﺎب ﺧﺮﻃﻮﺷﺔ اﻟﻄﺒﺎﻋﺔ (٥ ،ﺣﺎوﻳﺔ اﻹﺧﺮاج (٦ ،درج إدﺧﺎل اﻷﻓﻀﻠﻴﺔ (٧ ،درج إدﺧﺎل اﻟﻮﺳﺎﺋﻂ، (٨ﻣﻨﻔﺬ ﻣﺘﻮازي (٩ ،ﻣﻨﺎﻓﺬ واﺟﻬﺔ اﻟﻔﺎﻛﺲ )ﺟﻬﺎز HP LaserJet 3030اﻟﻜﻞ ﻓﻲ واﺣﺪ( (١١ ،ﻣﻔﺘﺎح اﻟﺘﺸﻐﻴﻞ (١٢ ،ﻣﻘﺒﺲ اﻟﺘﻴﺎر. ﺗﺮﻛﻴﺐ اﻟﻐﻄﺎء اﻟﻮاﻗﻲ ﻟﻠﻮﺣﺔ اﻟﺘﺤﻜﻢ )ﻓﻲ ﺣﺎﻟﺔ ﻋﺪم ﺗﺮﻛﻴﺒﻪ ﺑﺎﻟﻔﻌﻞ ( (١ .
ﻣﺤﺘﻮﻳﺎت اﻟﻌﺒﻮة (١ .
ﺗﺠﻬﻴﺰ ﻣﻜﺎن وﺿﻊ اﻟﺠﻬﺎز .ﺿﻊ اﻟﺠﻬﺎز ﻋﻠﻰ ﺳﻄﺢ ﺛﺎﺑﺖ وﻣﺴﺘﻮ ﺑﻤﻜﺎن ﺟﻴﺪ اﻟﺘﻬﻮﻳﺔ .ﺗﺄﻛﺪ ﻣﻦ وﺟﻮد ﻣﺴﺎﺣﺔ ﻛﺎﻓﻴﺔ ﺣﻮل اﻟﺠﻬﺎز ﻟﻀﻤﺎن ﻋﺪم ﺳﺪاد ﻣﻨﺎﻓﺬ اﻟﺘﻬﻮﻳﺔ. ﺗﻬﻴﺌﺔ اﻟﺒﻴﺌﺔ اﻟﻤﺤﻴﻄﺔ ﺑﺎﻟﺠﻬﺎز .ﻻ ﺗﻀﻊ اﻟﺠﻬﺎز ﻓﻲ ﻣﻨﻄﻘﺔ ﺗﺘﻌﺮض ﻷﺷﻌﺔ اﻟﺸﻤﺲ ﺑﺸﻜﻞ ﻣﺒﺎﺷﺮ أو ﻣﻨﻄﻘﺔ ﺑﻬﺎ ﺗﻐﻴﺮات ﻣﻔﺎﺟﺌﺔ ﻓﻲ درﺟﺔ اﻟﺤﺮارة أو اﻟﺮﻃﻮﺑﺔ .ﻳﺘﺮاوح اﻟﻤﺪى اﻟﻤﻮﺻﻰ ﺑﻪ ﻟﺪرﺟﺔ اﻟﺤﺮارة ﻣﻦ ١٥إﻟﻰ ٣٢.٥درﺟﺔ ﻣﺌﻮﻳﺔ ) ٥٩إﻟﻰ ٩٠.٥ ﻓﻬﺮﻧﻬﻴﺖ( ﻓﻲ ﺣﻴﻦ ﻳﺘﺮاوح ﻣﺪى اﻟﺮﻃﻮﺑﺔ اﻟﻨﺴﺒﻴﺔ اﻟﻤﻮﺻﻰ ﺑﻪ ﻣﻦ %١٠إﻟﻰ .%٨٠ ﻋﺮﺑﻲ ﻋﺮﺑﻲ ﺗﻬﻴﺌﺔ اﻟﺠﻬﺎز .
© 2003 Hewlett-Packard Development Company, LP www.hp.com/support/lj3020 www.hp.