hp LaserJet 3020 hp LaserJet 3030 start démarrage inbetriebnahme avvio inicio startgids início lea esto primero
procedures that could affect the operation of the equipment. If this happens, the telephone company will provide advance notice in order for you to make the necessary modifications in order to maintain uninterrupted service. If trouble is experienced with this equipment, please see the numbers in the front of this manual for repair and (or) warranty information.
Descrizioni della periferica. La periferica HP LaserJet 3020 All-inOne viene fornita con un vassoio di alimentazione per i supporti da 150 fogli, un vassoio di alimentazione prioritario da 10 fogli, un alimentatore automatico di documenti (ADF) da 50 fogli e uno scanner piano. Configuraciones del dispositivo.
English Français Italiano Español Nederlands Português Deutsch Prepare the location. Place the device on a sturdy, level surface in a well-ventilated area. Make sure that there is enough space around the device so that the air vents are not blocked. Regulate the environment. Do not place the device in direct sunlight or in an area that has abrupt temperature and humidity changes. The recommended ranges are 15 degrees to 32.5 degrees C (59 degrees to 90.
Package contents. 1) print cartridge; 2) power cord; 3) Start Guide and support flyer; 4) media input tray; 5) CD-ROMs containing the device software and electronic User Guide; 6) automatic document feeder (ADF) input tray; 7) Fax Guide (HP LaserJet 3030 all-in-one only); 8) fax cord (HP LaserJet 3030 all-in-one only); 9) output bin support; 10) HP LaserJet 3020 all-in-one or HP LaserJet 3030 all-inone; 11) control-panel faceplate (if not already installed).
3) electronic User Guide on the device CD-ROMs, for extra information and troubleshooting; 4) Toolbox software Help, for instructions about operating the device through the software. Français Documentation.
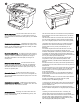
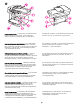
Locate the device parts. 1) ADF input tray; 2) flatbed scanner lid and ADF output bin; 3) control panel; 4) print-cartridge-door release; 5) output bin; 6) priority input tray; 7) media input tray; 8) parallel port; 9) USB port; 10) fax interface ports (HP LaserJet 3030 all-in-one only); 11) power switch; 12) power socket. Localisation des pièces du périphérique.
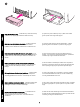
English Français Italiano Español Nederlands Português Deutsch Install the control-panel faceplate (if not already installed). 1) Align the hooks on the top of the faceplate with the slots on the device. 2) Press the far ends of the faceplate onto the device. Continue to press while moving your hands toward the center of the faceplate until it snaps into place. Note: Make sure that the faceplate is aligned correctly and is not pressing any buttons.
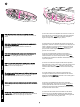
The HP LaserJet 3020 all-in-one control panel includes the following controls: 1) scan controls; 2) alphanumeric buttons; 3) menu and cancel controls; 4) copy controls. The HP LaserJet 3030 all-in-one control panel includes the following controls: 1) fax controls; 2) alphanumeric buttons; 3) menu and cancel controls; 4) copy controls; 5) scan controls.
3) Open the top of the media input tray. 4) Slide out the media guides. 5) Pull out the long-media support. Installez le bac d'alimentation de support. 1) Faites coulisser le bac vers l'intérieur jusqu'à ce qu'il s'emboîte correctement. 2) Retirez le ruban adhésif fixé à l'intérieur et à l'extérieur du bac. 3) Ouvrez la partie supérieure du bac d'alimentation. 4) Faites glisser les guides vers l'extérieur. 5) Enlevez le long support. Installazione del vassoio di alimentazione per i supporti.
6) Place the media in the media input tray, and then adjust the media guides until they are flush with the media. Note: Do not fan the media before placing it in the tray. 7) Close the top of the media input tray. 8) Install the output bin support. 6) Positionnez le support dans le bac d'alimentation de support, puis faites coulisser les guides pour les ajuster. Remarque : Veillez à ne pas déramer le support avant de le placer dans le bac. 7) Fermez la partie supérieure du bac d'alimentation de support.
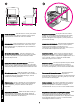
English Français Italiano Español Nederlands Português Deutsch Install the automatic document feeder (ADF) input tray. 1) Align the two tabs on the input tray with the two grooves in the ADF lid. 2) Slide the tray into the grooves until the tray snaps into place. Install the print cartridge. 1) Press the print-cartridge-door release to open the print-cartridge door. Installation du bac d'alimentation automatique (BAA).
2) Remove the print cartridge from its packaging, and then shake the cartridge five or six times. 3) Remove the sealing tape from the cartridge. 4) Hold the print cartridge by the handle and insert the cartridge as shown. 5) Close the print-cartridge door. Press down until it latches completely. 2) Retirez la cartouche d'impression de son emballage, puis agitez la cartouche cinq à six fois. 3) Otez la bande adhésive de la cartouche.
English Français Italiano Español Nederlands Português Deutsch CAUTION: If toner gets on your clothing, wipe the toner off with a clean cloth, wash the items in cold water, and air dry. Using hot water or heat from a dryer will set the toner in the fabric. Note: Hewlett-Packard Company cannot recommend using non-HP print cartridges, whether they are new, refilled, or remanufactured. Because they are not HP products, HP cannot influence their design or control their quality.
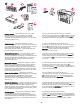
Connect the power cord. 1) Connect the power cord to the power socket on the back of the device. 2) Connect the other end of the power cord to a grounded alternating current (AC) outlet. Note: Use only the power cord that came with the device. Connect a printer cable to the device. Note: If you are using the device as a standalone fax machine or copier, go to step 13. 1) Locate the cable ports on the back of the device. 2) Connect the parallel or USB device cable (A/B) to the correct port.
Connect to a telephone line (HP LaserJet 3030 all-in-one only). Note: If you are not using the device fax functionality, go to step 14. 1) Locate the fax interface ports on the back of the device. 2) Connect the included fax cord to the device "line" port (the port English Note: Do not connect the cable to a computer or the network at this time. that is marked with a Remarque : Ne connectez pas le câble à un ordinateur ou au réseau à ce moment précis. icon).
3) Connect the fax cord to a telephone jack. Note: Use only the fax cord that came with the device. For more information about faxing, see the Fax Guide (HP LaserJet 3030 all-in-one only). Turn on the device. Turn on the device by pressing the power button next to the power socket on the back of the device. 3) Connectez le cordon du télécopieur à une prise téléphonique. Remarque : Utilisez seulement le cordon de télécopieur livré avec le périphérique.
English Suggerimento: se la periferica non è alimentata e le spie sul pannello di controllo non si accendono, accertarsi che il cavo di alimentazione sia collegato correttamente alla periferica e alla presa di corrente. Inoltre, se il cavo di alimentazione è collegato a una basetta di alimentazione, accertarsi che quest'ultima sia accesa o collegare la periferica direttamente a una presa a muro per verificare il funzionamento della basetta.
Print a configuration report. 1) Press MENU/ENTER. 2) Press the < or the > button to select Reports, and then press MENU/ENTER. 3) Press the < or the > button to select Config report, and then press MENU/ ENTER. Tip: If the page that prints is totally blank, remove the print cartridge, make sure that the sealing tape is removed (see step 10), reinstall the print cartridge, and then try printing the page again. Impression d'un rapport de configuration.
English Français Italiano Español Nederlands Português Deutsch Self-test the copier by using the automatic document feeder (ADF) input tray. 1) Load the configuration report that you just printed print-side up into the ADF input tray. 2) Adjust the media guides to sit against the page. 3) Verify that the original is loaded print-side up, and then press START/COPY.
Self-test the copier by using the flatbed scanner. 1) Open the scanner lid, place the configuration report print-side down on the flatbed scanner, and then close the scanner lid. 2) Press START/COPY. Tip: If the copy job produces a blank page, make sure that the original is loaded print-side down on the flatbed scanner and that no jams exist in the paper path. For information about removing jams and other troubleshooting tips, see the electronic User Guide on the device CD-ROMs.
If you are connecting the device to a network, go to step 20. If you are connecting the device directly to a computer, go to step 21. If you are using all of the device functionality, see the Fax Guide to set up the fax (HP LaserJet 3030 all-in-one only), and then go to step 20 (network connection) or step 21 (computer connection) in this Start Guide. Fin de l'installation de votre périphérique. Si vous utilisez le copieur de façon autonome, l'installation est terminée.
Connect to a network. If you want to connect the device to a network, see the instructions that are included with the HP print server (which is not included with the HP LaserJet all-in-one). After completing the instructions, go to the next step. Connect to a computer. Note: To install the software for Macintosh, see step 23. 1) Close all programs running on the computer. 2) Insert the software CD-ROM into the CD drive.
5) The software prompts you to connect the device to a computer. Connect the parallel or USB device cable (A/B) from the device to the correct computer port or the network. Français Remarque : Vous devez disposer de droits administrateur pour installer le logiciel sur Windows NT 4.0 service pack 3, Windows XP ou Windows 2000. 3) Sélectionnez Installer le logiciel HP LaserJet. 4) Dans l'Assistant de connexion de l'imprimante, sélectionnez un type de connexion.
6) Select the Typical installation type, and then follow the instructions to install the software. Use the Toolbox. Note: The Toolbox does not support Macintosh operating systems. 1) On the computer, click Start, and then click Programs. 2) Click HP LaserJet all-in-one, and then click hp Toolbox to open the Toolbox. Use the Toolbox to perform many device functions from your computer. Go to step 25. 6) Sélectionnez le type d'installation par défaut, puis suivez les instructions pour installer le logiciel.
English Français Italiano Español Nederlands Português Deutsch Install the Macintosh software (OS 9). Note: Macintosh OS X users should go to step 24. 1) Connect the USB device cable (A/B) to the Macintosh. 2) Close all of the programs that are running on the computer. 3) Insert the software CD-ROM into the CD drive. 4) In the CD folder, double-click the HP All-in-One Installer icon. 5) Follow the onscreen instructions, and then click Install. 6) When prompted, restart the computer.
Install the Macintosh software (OS X). 1) Connect the USB device cable (A/B) to the Macintosh. 2) Close all of the programs that are running on the computer. 3) Insert the software CD-ROM into the CD drive. 4) In the CD folder, double-click the HP All-inOne Installer icon. 5) Follow the onscreen instructions, and then click Install. 6) When prompted, restart the computer. 7) When the HP All-in-One Setup Assistant starts, follow the instructions. Installation du logiciel Macintosh (OS X).
Register the device. Register with HP to keep your device running smoothly and to receive free device updates and information that is relevant to you, including driver or software update notifications, device support alerts, and tips for using your HP device. Test de l'installation du logiciel. Imprimez une page à partir de tout programme pour vous assurer que le logiciel est correctement installé. Si l'installation échoue, réinstallez le logiciel.
You can register your device at http://www.hp.com/go/register . Hewlett-Packard and its subsidiaries respect your privacy and are committed to protecting it. Please see the HP privacy statement at the registration website. Support information. For customer support, see the support flyer or see http://www.hp.com/support/lj3020 or http://www.hp.com/ support/lj3030 . Vous pouvez inscrire votre périphérique sur le site http://www.hp. com/go/register.
English Français Italiano Español Nederlands Português Deutsch Congratulations! The device is ready to use. See the Toolbox (Windows 98, Millennium Edition (ME), 2000, or XP only) to open the electronic User Guide and to use the tools to solve problems. Félicitations ! Votre périphérique est prêt à être utilisé.
30
© 2003 Hewlett-Packard Development Company, LP www.hp.com/support/lj3020 www.hp.