hp LaserJet 3020 hp LaserJet 3030 start start aloitus ᡒᡗᡗ䵨ᡚᡔᡟᡔ innføring inledning
procedures that could affect the operation of the equipment. If this happens, the telephone company will provide advance notice in order for you to make the necessary modifications in order to maintain uninterrupted service. If trouble is experienced with this equipment, please see the numbers in the front of this manual for repair and (or) warranty information.
Enhetskonfigurasjoner. HP LaserJet 3020 alt-i-ett leveres med en 150 arks papirskuff, en 10 arks prioritetspapirskuff, en 50 arks automatisk dokumentmaterskuff (ADF) og en flatbed-skanner. HP LaserJet 3030 alt-i-ett har de samme spesifikasjonene og funksjonene som HP LaserJet 3020 alt-i-ett, i tillegg til faksgrensesnittporter. HP LaserJet 3020 alt-i-ett og HP LaserJet 3030 alt-i-ett inneholder også parallellgrensesnittporter og USB-porter (universal serial bus), og 32 MB minne (RAM).
English Dansk Suomi Norsk Svenska Ελληνικά Prepare the location. Place the device on a sturdy, level surface in a well-ventilated area. Make sure that there is enough space around the device so that the air vents are not blocked. Regulate the environment. Do not place the device in direct sunlight or in an area that has abrupt temperature and humidity changes. The recommended ranges are 15 degrees to 32.5 degrees C (59 degrees to 90.5 degrees F) and 10 percent to 80 percent relative humidity.
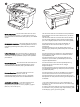
Package contents. 1) print cartridge; 2) power cord; 3) Start Guide and support flyer; 4) media input tray; 5) CD-ROMs containing the device software and electronic User Guide; 6) automatic document feeder (ADF) input tray; 7) Fax Guide (HP LaserJet 3030 all-in-one only); 8) fax cord (HP LaserJet 3030 all-in-one only); 9) output bin support; 10) HP LaserJet 3020 all-in-one or HP LaserJet 3030 all-inone; 11) control-panel faceplate (if not already installed).
3) electronic User Guide on the device CD-ROMs, for extra information and troubleshooting; 4) Toolbox software Help, for instructions about operating the device through the software.
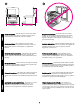
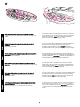
Locate the device parts. 1) ADF input tray; 2) flatbed scanner lid and ADF output bin; 3) control panel; 4) print-cartridge-door release; 5) output bin; 6) priority input tray; 7) media input tray; 8) parallel port; 9) USB port; 10) fax interface ports (HP LaserJet 3030 all-in-one only); 11) power switch; 12) power socket. Delenes placering på enheden.
English Dansk Suomi Norsk Svenska Ελληνικά Install the control-panel faceplate (if not already installed). 1) Align the hooks on the top of the faceplate with the slots on the device. 2) Press the far ends of the faceplate onto the device. Continue to press while moving your hands toward the center of the faceplate until it snaps into place. Note: Make sure that the faceplate is aligned correctly and is not pressing any buttons. Monter kontrolpanelets faceplate (hvis den ikke allerede er monteret).
The HP LaserJet 3020 all-in-one control panel includes the following controls: 1) scan controls; 2) alphanumeric buttons; 3) menu and cancel controls; 4) copy controls. The HP LaserJet 3030 all-in-one control panel includes the following controls: 1) fax controls; 2) alphanumeric buttons; 3) menu and cancel controls; 4) copy controls; 5) scan controls.
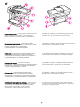
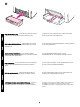
3) Open the top of the media input tray. 4) Slide out the media guides. 5) Pull out the long-media support. Installer medieindføringsbakken. 1) Skub bakken ind, indtil den sidder ordentligt. 2) Tag eventuel emballeringstape inden og uden på bakkerne af. 3) Åbn det øverste af medieindføringsbakken. 4) Skub papirstyrene ud. 5) Træk papirstøtten ud. Asenna materiaalinsyöttölokero. 1) Liu'uta lokeroa laitteen sisään, kunnes se on tukevasti paikoillaan.
6) Place the media in the media input tray, and then adjust the media guides until they are flush with the media. Note: Do not fan the media before placing it in the tray. 7) Close the top of the media input tray. 8) Install the output bin support. 6) Læg papir i papirbakken, og tilpas papirstyrene, så de flugter med papiret. Bemærk! Luft ikke mediet, før det anbringes i bakken. 7) Luk det øverste af medieindføringsbakken. 8) Monter støtten til udskriftsbakken.
English Dansk Suomi Norsk Svenska Ελληνικά Install the automatic document feeder (ADF) input tray. 1) Align the two tabs on the input tray with the two grooves in the ADF lid. 2) Slide the tray into the grooves until the tray snaps into place. Install the print cartridge. 1) Press the print-cartridge-door release to open the print-cartridge door. Monter den automatiske papirindføringsbakke (ADF). 1) Juster de to tappe på papirbakken i forhold til de to riller i ADF-låget.
2) Remove the print cartridge from its packaging, and then shake the cartridge five or six times. 3) Remove the sealing tape from the cartridge. 4) Hold the print cartridge by the handle and insert the cartridge as shown. 5) Close the print-cartridge door. Press down until it latches completely. 2) Tag tonerkassetten ud af emballagen, og ryst den fem eller seks gange. 3) Tag forseglingstapen af kassetten. 4) Hold fast i kassettens håndtag, og monter kassetten som vist. 5) Luk tonerkassettedækslet.
English Dansk Suomi Norsk Svenska Ελληνικά CAUTION: If toner gets on your clothing, wipe the toner off with a clean cloth, wash the items in cold water, and air dry. Using hot water or heat from a dryer will set the toner in the fabric. Note: Hewlett-Packard Company cannot recommend using non-HP print cartridges, whether they are new, refilled, or remanufactured. Because they are not HP products, HP cannot influence their design or control their quality.
Connect the power cord. 1) Connect the power cord to the power socket on the back of the device. 2) Connect the other end of the power cord to a grounded alternating current (AC) outlet. Note: Use only the power cord that came with the device. Connect a printer cable to the device. Note: If you are using the device as a standalone fax machine or copier, go to step 13. 1) Locate the cable ports on the back of the device. 2) Connect the parallel or USB device cable (A/B) to the correct port.
Connect to a telephone line (HP LaserJet 3030 all-in-one only). Note: If you are not using the device fax functionality, go to step 14. 1) Locate the fax interface ports on the back of the device. 2) Connect the included fax cord to the device "line" port (the port English Note: Do not connect the cable to a computer or the network at this time. that is marked with a Bemærk! Tilslut ikke kablet til en computer eller til netværket endnu.
3) Connect the fax cord to a telephone jack. Note: Use only the fax cord that came with the device. For more information about faxing, see the Fax Guide (HP LaserJet 3030 all-in-one only). Turn on the device. Turn on the device by pressing the power button next to the power socket on the back of the device. 3) Tilslut faxledningen til et telefonstik. Bemærk! Brug kun den faxledning, der fulgte med enheden.
English Dansk Suomi Norsk Svenska Ελληνικά Tip: If the device has no power and no lights are lit on the control panel, make sure that the power cord is attached securely to both the device and a power outlet. Also, if the power cord is connected to a power strip, make sure that the power strip is switched on, or connect the device directly to a wall outlet to test the power strip. Set the control panel display language and location (if necessary).
Print a configuration report. 1) Press MENU/ENTER. 2) Press the < or the > button to select Reports, and then press MENU/ENTER. 3) Press the < or the > button to select Config report, and then press MENU/ ENTER. Tip: If the page that prints is totally blank, remove the print cartridge, make sure that the sealing tape is removed (see step 10), reinstall the print cartridge, and then try printing the page again. Udskriv en konfigurationsrapport: 1) Tryk på MENU/INDTAST.
English Dansk Suomi Norsk Svenska Ελληνικά Self-test the copier by using the automatic document feeder (ADF) input tray. 1) Load the configuration report that you just printed print-side up into the ADF input tray. 2) Adjust the media guides to sit against the page. 3) Verify that the original is loaded print-side up, and then press START/COPY. Tip: If the copy job produces a blank page, make sure that the original is loaded print-side up and that no jams exist in the ADF and paper path.
Self-test the copier by using the flatbed scanner. 1) Open the scanner lid, place the configuration report print-side down on the flatbed scanner, and then close the scanner lid. 2) Press START/COPY. Tip: If the copy job produces a blank page, make sure that the original is loaded print-side down on the flatbed scanner and that no jams exist in the paper path. For information about removing jams and other troubleshooting tips, see the electronic User Guide on the device CD-ROMs.
If you are connecting the device to a network, go to step 20. If you are connecting the device directly to a computer, go to step 21. If you are using all of the device functionality, see the Fax Guide to set up the fax (HP LaserJet 3030 all-in-one only), and then go to step 20 (network connection) or step 21 (computer connection) in this Start Guide. Fuldfør opsætningen af enheden. Hvis du kun bruger enheden som enkeltstående kopimaskine, er opsætningen fuldført.
Connect to a network. If you want to connect the device to a network, see the instructions that are included with the HP print server (which is not included with the HP LaserJet all-in-one). After completing the instructions, go to the next step. Connect to a computer. Note: To install the software for Macintosh, see step 23. 1) Close all programs running on the computer. 2) Insert the software CD-ROM into the CD drive.
5) The software prompts you to connect the device to a computer. Connect the parallel or USB device cable (A/B) from the device to the correct computer port or the network. Bemærk! Du skal have administratorrettigheder for at installere softwaren til Windows NT 4.0 service pack 3, Windows XP eller Windows 2000. 3) Marker Installer HP LaserJet-software. 4) Vælg en forbindelsestype i forbindelsesopsætningsguiden. 5) Softwaren beder dig tilslutte enheden til en computer.
6) Select the Typical installation type, and then follow the instructions to install the software. Use the Toolbox. Note: The Toolbox does not support Macintosh operating systems. 1) On the computer, click Start, and then click Programs. 2) Click HP LaserJet all-in-one, and then click hp Toolbox to open the Toolbox. Use the Toolbox to perform many device functions from your computer. Go to step 25. 6) Vælg installationstypen Standard, og følg derefter vejledningen for at installere softwaren.
English 5) Follow the onscreen instructions, and then click Install. 6) When prompted, restart the computer. 7) When the HP All-in-One Setup Assistant starts, follow the instructions. Go to step 25. Dansk Installer Macintosh-softwaren (OS 9). Bemærk! Brugere af Macintosh OS X skal gå videre til trin 24. 1) Tilslut enhedens USBkabel (A/B) til Macintosh. 2) Luk alle de programmer, der kører på computeren. 3) Indsæt software-cd-rom’en i cd-rom-drevet.
Install the Macintosh software (OS X). 1) Connect the USB device cable (A/B) to the Macintosh. 2) Close all of the programs that are running on the computer. 3) Insert the software CD-ROM into the CD drive. 4) In the CD folder, double-click the HP All-inOne Installer icon. 5) Follow the onscreen instructions, and then click Install. 6) When prompted, restart the computer. 7) When the HP All-in-One Setup Assistant starts, follow the instructions. Installer Macintosh-softwaren (OS X).
English Dansk Suomi Norsk Svenska Ελληνικά Test the software installation. Print a page from any program to make sure that the software is correctly installed. If the installation failed, reinstall the software. If the reinstallation fails, see the support flyer or see http://www.hp.com/support/lj3020 or http://www. hp.com/support/lj3030 for more information. Register the device.
You can register your device at http://www.hp.com/go/register . Hewlett-Packard and its subsidiaries respect your privacy and are committed to protecting it. Please see the HP privacy statement at the registration website. Support information. For customer support, see the support flyer or see http://www.hp.com/support/lj3020 or http://www.hp.com/ support/lj3030 . Du kan registrere enheden på http://www.hp.com/go/register.
English Dansk Suomi Norsk Svenska Ελληνικά Congratulations! The device is ready to use. See the Toolbox (Windows 98, Millennium Edition (ME), 2000, or XP only) to open the electronic User Guide and to use the tools to solve problems. Tillykke! Enheden er nu klar til brug. Se Værktøjskasse (kun Windows 98, Millennium Edition (ME), 2000 eller XP) for at åbne den elektroniske brugervejledning og bruge værktøjerne til at løse problemerne. Onnittelut! Voit nyt käyttää laitetta.
30
31
32
מידע אודות תמיכה .לתמיכת לקוחות ,עיין בעלון התמיכה או באתרים: http://www.hp.com/support/lj3020או http://www.hp.com/support/ . lj3030 אפשר לרשום את המכשיר בכתובת האינטרנטhttp://www.hp.com/go/ : .registerחברת Hewlett-Packardוחברות הבת שלה מכבדות את פרטיותך ומחויבות לשמור עליה .באתר האינטרנט בו תירשם תוכל למצוא גם את הצהרת HPעל שמירת הפרטיות. ברכותינו! המכשיר מוכן לשימוש .
עברית עברית התקנת תוכנת (1 .(OS X ) Macintoshחבר את כבל ה (A/B) USB-של המכשיר אל ה (2 .Macintosh-סגור את כל התוכניות הפעילות במחשב. (3הכנס את תקליטור התוכנה לכונן התקליטורים (4 .בתיקיית התקליטור לחץ לחיצה כפולה על הסמל .HP All-in-One Installer (5פעל על פי ההוראות שעל המסך ולאחר מכן לחץ על ) Installהתקנה(. (6כאשר תונחה לכך ,הפעל את המחשב מחדש (7 .כאשר HP All-in-One ) Setup Assistantעוזר ההתקנה( מתחיל ,פעל על פי ההוראות. בדיקת התקנת התוכנה .
(6בחר את סוג ההתקנה ) Typicalרגיל( ופעל על פי ההוראות להתקנת התוכנה. השימוש ב) Toolbox-ארגז הכלים( .הערה :ארגז הכלים אינו תומך במערכות ההפעלה של (1 .Macintoshבמחשב לחץ על ) Startהתחל( ואחר כך על ) Programsתוכניות( (2 .לחץ על HP LaserJet all-in-oneואחר כך על hp Toolboxכדי לפתוח את ארגז הכלים .באמצעות ארגז הכלים אפשר לבצע פעולות רבות של המכשיר מהמחשב .עבור לשלב .25 התקנת תוכנת .(OS 9 ) Macintoshהערה :משתמשי Macintosh OS X צריכים לעבור לשלב (1 .
עברית עברית חיבור לרשת .אם ברצונך לחבר את המכשיר לרשת ,קרא את ההוראות המצורפות לשרת ההדפסה של ) HPשאינו נכלל במכשיר HP LaserJet .(all-in-oneלאחר השלמת הוראות אלה עבור לשלב הבא. חיבור למחשב .הערה :להתקנת התוכנה עבור ,Macintoshראה שלב .23 (1סגור את כל התוכניות הפעילות במחשב (2 .הכנס את תקליטור התוכנה לכונן התקליטורים .אם תכנית ההתקנה אינה מתחילה אוטומטית ,לחץ על ) Startהתחל( ,לחץ על ) Runהפעלה( ודפדף לקובץ ההתקנה " "HPSetup.exeבתקליטור.
ביצוע בדיקה -עצמית של המעתיק באמצעות הסורק השטוח (1 .פתח את מכסה הסורק ,הנח את דוח התצורה על הסורק השטוח כשצדו המודפס כלפי מטה וסגור חזרה את המכסה (2 .לחץ על התחל/העתק. עצה :אם עבודת ההעתקה הפיקה דף לבן ,עליך לוודא שהדף המקורי אכן מונח כשצדו המודפס כלפי מטה על גבי הסורק השטוח ושאין כל חסימה בנתיב הנייר .לקבלת מידע על שחרור חסימות ועצות אחרות לפתרון בעיות, עיין במדריך האלקטרוני למשתמש על גבי תקליטורי המכשיר. השלמת התקנת המכשיר .
עברית עברית הדפסת דוח תצורה (1 .לחץ על תפריט (2 .ENTER/לחץ על הלחצנים > או < כדי לבחור את ) Reportsדוחות( ,ולאחר מכן לחץ על תפריט (3 .ENTER/לחץ על הלחצנים > או < כדי לבחור את ) Config reportדוח תצורה( ,ולחץ על תפריט.ENTER/ עצה :אם הדף המודפס ריק לגמרי ,הסר את מחסנית ההדפסה ,ודא שסרט האיטום אכן הוסר )ראה שלב ,(10התקן מחדש את המחסנית ונסה שוב להדפיס את הדף. ביצוע בדיקה -עצמית של המעתיק באמצעות מגש ההזנה של מזין המסמכים האוטומטי ) (1 .
(3חבר את כבל הפקס לשקע הטלפון .הערה :השתמש אך רק בכבל הפקס המצורף למכשיר .לקבלת מידע נוסף על משלוח פקסים ,עיין במדריך הפקס )המצורף אל HP LaserJet 3030 all-in-oneבלבד(. הפעלת המכשיר .הפעל את המכשיר בלחיצה על לחצן ההפעלה שליד שקע החשמל בגב המכשיר. עצה :אם המכשיר אינו פועל ואף נורה לא נדלקת בלוח הבקרה ,ודא שכבל החשמל אכן מחובר היטב למכשיר ומצדו השני -לשקע החשמל .כמו כן ,אם כבל החשמל מחובר ללוח שקעים ,ודא שלוח השקעים אכן הופעל .
הערה :אין לחבר את הכבל למחשב או לרשת עכשיו. חיבור לקו טלפון )עבור HP LaserJet 3030 all-in-oneבלבד( .הערה: אם אינך משתמש בתפקודי הפקס של המכשיר ,עבור לשלב (1 .14מצא את יציאות ממשק הפקס שבגב המכשיר (2 .חבר את כבל הפקס המצורף ליציאת עברית עברית חיבור כבל החשמל (1 .חבר את כבל החשמל לשקע החשמל שבגב המכשיר (2 .את הקצה השני של כבל החשמל חבר לשקע של זרם חלופין ) (ACמוארק .הערה :השתמש אך רק בכבל החשמל המצורף למכשיר. חיבור כבל מדפסת למכשיר .
(2הוצא את מחסנית ההדפסה מתוך האריזה ונער את המחסנית כחמש או שש פעמים (3 .הסר את פס האיטום מהמחסנית. (4אחוז את מחסנית ההדפסה בידית והכנס את המחסנית כפי שמוצג באיור. (5סגור את דלת מחסנית ההדפסה .לחץ כלפי מטה עד שהיא תינעל לחלוטין. זהירות :אם נשפך טונר על בגדיך ,נגב את הטונר במטלית בד נקיה ,כבס את הבגדים במים קרים ותלה לייבוש .אם תכבסם במים חמים או תייבש במכונת ייבוש ,החומר יתקבע בתוך הבד.
עברית עברית (6הנח את חומרי ההדפסה במגש הזנת החומרים ויישר את גובלי הנייר עד שיתישרו לחלוטין עם חומרי ההדפסה .הערה :אין לנפנף בחומרי ההדפסה לפני שמניחים אותם במגש (7 .סגור את החלק העליון של מגש חומרי ההדפסה. (8התקן את תומך סל הפלט. התקנת מגש ההזנה של מזין המסמכים האוטומטי ) (1 .(ADFיישר את שני הזיזים של מגש ההזנה מול שני החריצים במכסה של (2 .ADFהחלק את המגש לתוך החריצים עד שהוא נכנס למקומו בנקישה. התקנת מחסנית ההדפסה (1 .
לוח הבקרה של HP LaserJet 3020 all-in-oneכולל את הבקרות הבאות: (1בקרות סריקה; (2לחצנים אלפאנומריים; (3בקרות תפריט וביטול; (4בקרות העתקה. לוח הבקרה של HP LaserJet 3030 all-in-oneכולל את הבקרות הבאות: (1בקרות הפקס; (2לחצנים אלפאנומריים; (3בקרות תפריט וביטול; (4בקרות העתקה; (5בקרות סריקה. התקנת מגש הזנת חומרי ההדפסה (1 .החלק את המגש למקומו עד שהוא מותקן היטב (2 .הסר כל סרט אריזה שנמצא בתוך המגש ומחוצה לו. (3הרם את החלק העליון של המגש (4 .
התקנת תבנית לוח הבקרה )אם טרם הותקנה( (1 .יישר את הווים שעל התבנית כנגד החריצים שעל המכשיר. לחץ את שני קצוות התבנית אל המכשיר .המשך ללחוץ בעודך מזיז את ידיך אל מרכז התבנית ,עד שהיא תיכנס למקומה בנקישה .הערה :ודא שהתבנית מיושרת כהלכה ואינה לוחצת על אף לחצן. עברית עברית איתור חלקי המכשיר (1 .
תכולת האריזה (1 .מחסנית הדפסה; (2כבל חשמל; (3מדריך 'התחלה' ועלון תמיכה; (4מגש הזנת חומרי הדפסה; (5תקליטורים המכילים את תוכנת המכשיר ואת המדריך האלקטרוני למשתמש; (6מגש ההזנה של מזין המסמכים האוטומטי ) (7 ;(ADFמדריך הפקס )למכשיר HP LaserJet 3030 all-in-oneבלבד(; (8כבל פקס )עבור HP LaserJet 3030 all-in-oneבלבד(; (9תומך סל פלט; HP LaserJet 3020 all-in-one (10או ; HP LaserJet 3030 all-in-one (11תבנית לוח בקרה )אם טרם הותקנה( .
עברית עברית תצורות המכשיר .המכשיר HP LaserJet 3020 all-in-oneכולל מגש הזנת חומרים ל 150-גליונות ,מגש הזנה מועדף ל 10-גיליונות ,מגש הזנת 50 גליונות של מזין המסמכים האוטומטי ) (ADFוסורק שטוח. המכשיר HP LaserJet 3030 all-in-oneכולל את המפרטים והתפקודים של ,HP LaserJet 3020 all-in-oneבתוספת יציאות ממשק של פקס.
© 2003 Hewlett-Packard Development Company, LP www.hp.com/support/lj3020 www.hp.