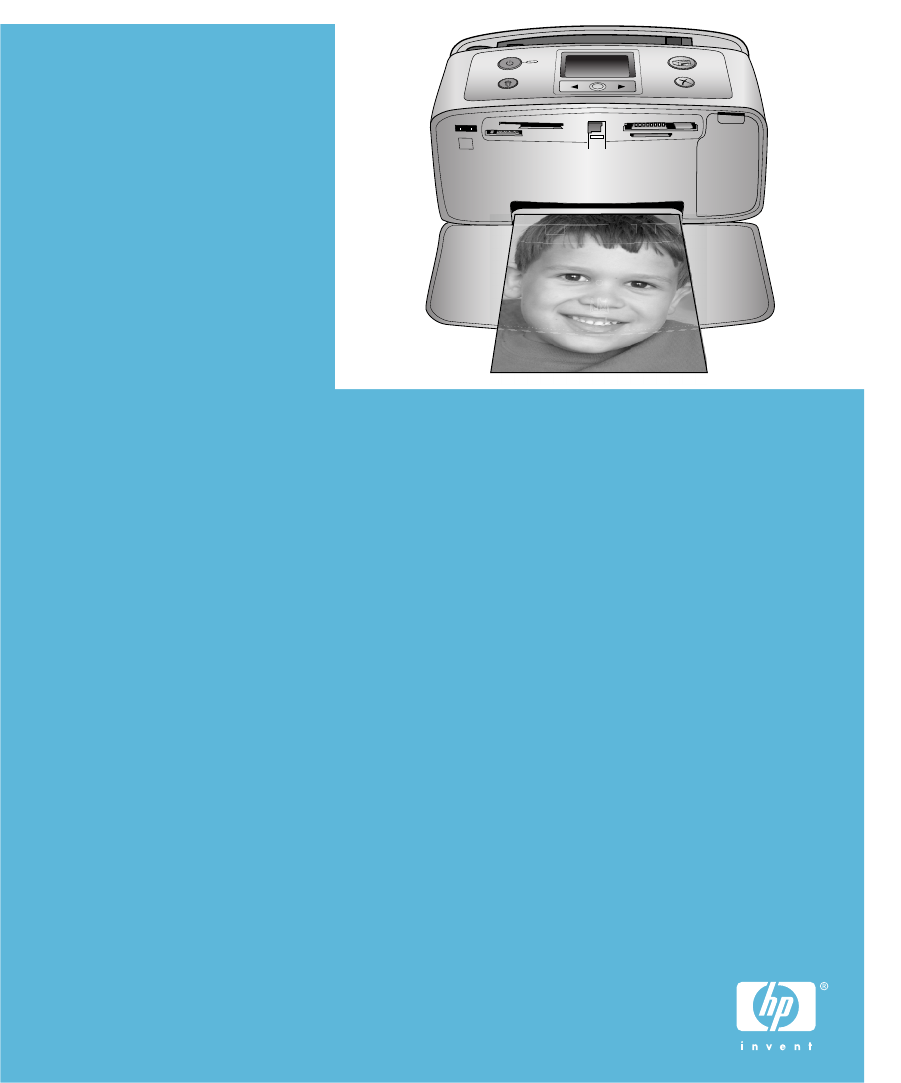
HP Photosmart 320 series User's Guide English
Copyrights and trademarks © Copyright 2004 Hewlett-Packard Development Company, L.P. The information contained herein is subject to change without notice. Reproduction, adaptation or translation without prior written permission is prohibited, except as allowed under the copyright laws. Notice The only warranties for HP products and services are set forth in the express warranty statements accompanying such products and services. Nothing herein should be construed as constituting an additional warranty.
Plastics Plastic parts over 24 grams (0.88 ounces) are marked according to international standards that enhance the ability to identify plastics for recycling purposes at the end of the printer life. Material safety data sheets Material Safety Data Sheets (MSDS) can be obtained from the HP website at www.hp.com/go/msds. Customers without Internet access should contact Customer Care.
Contents 1 2 3 4 5 6 Welcome ...............................................................................................................3 Printer parts ...........................................................................................................4 Available accessories ............................................................................................7 Printer menu ..........................................................................................................
7 Specifications ....................................................................................................45 System requirements ...........................................................................................45 Printer specifications ...........................................................................................46 8 HP Customer Care .............................................................................................49 HP Customer Care by phone ...................
1 Welcome Thank you for purchasing an HP Photosmart 320 series printer! With your new, compact photo printer you can easily print beautiful photos with or without a computer. This guide explains how to print photos from the printer without connecting it to a computer. To learn how to print from your computer, install the printer software and view the onscreen Help. See Installing the software. Among other things, you'll learn how to: Print beautiful borderless photos. See Printing your photos.
Chapter 1 Printer parts Front of printer 1 2 Control panel Control the basic functions of the printer from here. Out tray (closed) Open this to print, insert a memory card, or connect a compatible digital camera. Inside front of printer 1 2 3 4 5 6 7 In tray Load paper here. In tray extender Pull out to support paper. Paper-width guide Move to width of current paper to position the paper properly.
(continued) Rear of printer 1 2 USB port Use this port to connect the printer to a computer or to an HP direct-printing digital camera. Power cord connection Connect the power cord here. Indicator lights 1 On light – – – 2 Green: printer is on Green and flashing: printer is busy Red and flashing: printer requires attention Memory Card light The light indicates the memory card status. See Inserting memory cards.
Chapter 1 (continued) 6 View photos and menus here. Cancel Press to deselect photos, exit a menu, or stop an action. Idle screen 1 2 Battery indicator Displays the charge level of the HP Photosmart Internal battery, if installed. Ink level indicator Displays the ink level of the print cartridge. Select Photos screen 1 2 3 Selection box Displays a check mark if photo is selected. Copies Displays number of copies to be printed of the current photo.
(continued) Internal battery compartment 1 2 3 4 Cover of the battery compartment Open this cover on the bottom of the printer to insert the optional HP Photosmart Internal Battery. HP Photosmart Internal Battery (Model number: Q5599A) A fully-charged battery has sufficient charge to print approximately 75 photos. You must purchase the battery separately. Internal battery compartment Insert the optional HP Photosmart Internal Battery here.
Chapter 1 (continued) Accessory name Description The HP Photosmart Automobile DC Adapter lets you plug into your automobile for backup power and to recharge an optional HP Photosmart Internal Battery inserted in the printer. (Model: Q3448A) HP Photosmart Automobile DC Adapter The lightweight, durable HP Photosmart Carrying Case for Compact Printers holds and protects everything needed for hassle-free printing on the go.
Printer menu structure Top level menu Submenus/options Additional submenus/ options Tools Print quality Print quality: ● ● Best (default) Normal Print sample page (Sample page for use in a demo of the printer.) Print test page Page of information about the printer: serial number, firmware version, and so on.
Chapter 1 Printer menu structure (continued) Top level menu Submenus/options Additional submenus/ options the printer must enter before they can print, if the printer Bluetooth Security level is set to High. The default passkey is 0000.) Accessibility Accessibility: ● ● Visible to all Not visible When Accessibility is set to Not visible, only devices that know the device address can print to it.
Printer menu structure (continued) Top level menu Submenus/options Additional submenus/ options Paper jam Camera connect Preferences Smart focus Smart focus: ● ● Digital flash Digital Flash: ● ● Date/time On Off (default) Date/time stamp: ● ● ● Colorspace On (default) Off Date/time Date only Off (default) Choose colorspace: ● ● ● Adobe RGB sRGB Auto-select (default) The Auto-select default tells the printer to use the Adobe RGB colorspace, if available.
Chapter 1 Printer menu structure (continued) Top level menu Submenus/options Additional submenus/ options (if enough space is available). Auto-save Turn auto-save: ● ● On (default) Off The default setting tells the printer to transfer all photos from a memory card to the computer, whenever you first insert a card. The printer must be connected to a computer where you have already installed the HP Photosmart software. See Installing the software.
2 Getting ready to print Before you can begin printing, there are three easy procedures you need to become familiar with: ● ● ● Loading paper (see Loading paper) Inserting print cartridges (see Inserting print cartridges) Inserting a memory card (see Inserting memory cards) You must load paper and insert a print cartridge before inserting a memory card. Loading paper Learn how to choose the right paper for your print job and how to load it into the In tray for printing.
Chapter 2 Loading your paper Paper loading tips: ● ● ● You can print photos on photo paper, index cards, L-size cards, or Hagaki cards. Before loading paper, slide out the paper-width guide to make room for the paper. Load only one type and size of paper at a time. Do not mix paper types or sizes in the In tray. Paper type How to load 10 x 15 cm (4 x 6 inch) photo paper Index cards L-size cards Hagaki cards 1 2 3 4 Open the In tray and pull out the In tray extender.
Use the right print cartridge (continued) To print… Insert this print cartridge in the cartridge cradle (Eastern Europe, Russia, Middle East, Africa, Japan), #343 (Western Europe), #855 (China, India) Tri-color (14 ml) HP #97 (North America, Latin America, Asia Pacific), #134 (Eastern Europe, Russia, Middle East, Africa, Japan), #344 (Western Europe), #857 (China, India) Black and white photos Gray Photo HP #100 (worldwide) Sepia or antique photos Tri-color (7 ml) HP #95 (North America, Latin America,
Chapter 2 Insert or replace the print cartridge Prepare the printer and cartridge 1 2 3 Make sure the power is on and you have removed the cardboard from inside the printer. Open the print cartridge access door of the printer. Remove the bright pink tape from the cartridge. Remove the pink tape Do not touch here Insert the cartridge 1 2 3 If you are replacing a cartridge, push down and pull outward on the cartridge in the cradle to remove it. Hold the replacement cartridge with the label on top.
Insert or replace the print cartridge (continued) Each time you install or replace a print cartridge, a message appears on the printer screen asking you to load plain paper so the printer can align the cartridge. This ensures high-quality prints. Align the cartridge 1 2 Load paper in the In tray and press OK. Follow the onscreen instructions to align the cartridge. See Aligning the print cartridge.
Chapter 2 Caution Using any other type of memory card may damage the memory card and the printer. To learn about other ways of transferring photos from a digital camera to the printer, see Connecting to other devices. Supported file formats The printer can recognize and print the following file formats directly from a memory card: JPEG, uncompressed TIFF, Motion JPEG AVI, Motion JPEG Quicktime, and MPEG-1.
(continued) Memory card Slot How to insert the memory card Secure Digital Bottom right slot ● ● Angled corner is on the right Metal contacts face down SmartMedia Upper portion of the top left double slot ● ● Angled corner is on the left Metal contacts face down Memory Stick Bottom left slot ● ● ● Angled corner is on the left Metal contacts face down If you are using a Memory Stick Duo™ or Memory Stick PRO Duo™ card, attach the adapter that came with the card before you insert the card into th
Chapter 2 (continued) Memory card Slot How to insert the memory card xD-Picture Card Lower right portion of the top left double slot ● ● Curved side of card points toward you Metal contacts face down Removing a memory card Wait until the Memory Card light stops flashing, then gently pull the memory card to remove it from the printer. Caution Do not pull out a memory card while the Memory Card light is flashing. A flashing light means that the printer is accessing the memory card.
3 Printing without a computer The HP Photosmart 320 series printer lets you print amazing photos without even going near a computer. After setting up the printer using the instructions in the HP Photosmart 320 series Setup Guide, refer to these steps for start-to-finish printing. Getting your photos from camera to printer Use these steps for start-to-finish printing in minutes! Step 1 Insert a memory card See Inserting memory cards. Step 2 Decide which photos to print See Deciding which photos to print.
Chapter 3 (continued) Use these steps for start-to-finish printing in minutes! Step 5 Select photos to print See Selecting photos to print. Step 6 Improve the quality of your photos See Improving the quality of your photos. Step 7 Print your photos See Printing your photos. Deciding which photos to print To view photos Do this One by one 1 2 Insert a memory card. Press or to view the photos one by one. Press and hold the button to view the photos rapidly.
(continued) If you want to… Print more than one copy of a photo Do this 2 Press Print to print the photo displayed on the printer screen, using the current print layout. 1 Insert a memory card and select a print layout. Press OK once for each copy of the current photo you want to print. Press Cancel to decrease the number of copies by one or deselect a selected photo. Press Print. 2 3 Print several photos 1 2 3 Print all photos 1 2 3 Insert a memory card and select a print layout.
Chapter 3 (continued) Problem and solution How to do it Improve the lighting and contrast in prints. This preference affects all printed photos. 4 Press or press OK. to highlight On, then Printing your photos Printing your photos involves three steps: selecting a print layout, setting print quality, and selecting a print method. Selecting a layout The printer prompts you to select a print layout each time you insert a memory card. Layout options Do this 1 2 Insert a memory card.
(continued) Print from Do this unmarked or camera-selected (Digital Print Order Format, or DPOF). Printing from a memory card requires no computer and does not drain your digital camera's batteries. See Inserting memory cards. 2 3 Select one or more photos. See Selecting photos to print. Press Print. To print camera-selected photos 1 2 Insert a memory card that contains camera-selected (DPOF) photos.
Chapter 3 26 HP Photosmart 320 series
4 Getting connected Use the printer to stay connected to other devices and people. Connecting to other devices This printer offers several ways of connecting to computers or other devices. Each connection type lets you do different things. Connection type and what you need What this lets you do USB ● ● ● A Universal Serial Bus (USB) 2.0 full-speed compliant cable 3 meters (10 feet) or less in length. For instructions about connecting the printer with a USB cable, see the Setup Guide.
Chapter 4 or configured, a message prompts you through the required steps. See Installing the software. To use HP Instant Share to send photos 1 2 3 Insert a memory card that contains the photos you want to share. Follow the prompts on your computer to save the photos to the computer. Use the HP Instant Share features of the HP Image Zone software to share your photos with others. See the onscreen HP Image Zone Help for information about using HP Instant Share.
5 Maintaining and transporting the printer The HP Photosmart 320 series printer requires very little maintenance. Follow the guidelines in this chapter to extend the life span of the printer and printing supplies, and to ensure that the photos you print are always of the highest quality. Cleaning and maintaining the printer Keep the printer and print cartridges clean and well maintained using the simple procedures in this section.
Chapter 5 You can clean the cartridge up to three times. Each successive cleaning is more thorough and uses more ink. If you complete all three levels of cleaning using this procedure and you still notice white streaks or missing colors on the test page, you may need to clean the print cartridge copper-colored contacts. For more information, see the following section. Note If the cartridge or printer has been recently dropped, you may also see white streaks or missing colors in your prints.
5 Following the directions on the printer screen, load paper so the printer can print a test page. Use plain paper or index cards to conserve photo paper. Press OK to begin printing the test page. 6 The test page contains the following information: HP Photosmart 320 series 1. 2. 3. 4. 5. 6. Serial Number: CN3C011006IU Service ID: 08218 FW Revision: EF1L415A Total Engine Page Count: 14 Error Code: 00B7E5E8 Pen Status Information 6a. Pen Type: ??? 6b. Pen ID: 0 0x000000 00000000000000000 7.
Chapter 5 6 Press OK to begin aligning the print cartridge. When the printer finishes aligning the cartridge, it prints an alignment page to confirm that the alignment was successful. – – The check marks verify that the print cartridge is installed correctly and functioning properly. If an “x” appears to the left of any of the bars, align the print cartridge again. If the “x” still appears, replace the print cartridge.
Caution Make sure the printer completes its power-down cycle before you unplug the power cord or remove the internal battery. This allows the printer to store the print cartridge properly. Follow these tips to help maintain HP print cartridges and ensure consistent print quality: ● ● ● When you remove a print cartridge from the printer, store it in a print cartridge protector to prevent the ink from drying out.
Chapter 5 To transport the printer: 1 2 3 Turn off the printer. Remove any memory cards from the memory card slots. Remove all paper from the In and Out trays, then close the In and Out tray doors. Note Make sure the printer completes its power-down cycle before you unplug the power cord. This allows the printer to store the print cartridge properly. 4 5 6 Unplug the power cord. If the printer is connected to a computer, disconnect the USB cable from the computer. Always carry the printer upright.
6 Troubleshooting The HP Photosmart printer is designed to be reliable and easy to use. This section answers frequently asked questions about using the printer and printing without a computer. It contains information about the following topics: ● ● ● ● Printer hardware problems. See Printer hardware problems. Printing problems. See Printing problems. Bluetooth printing problems. See Bluetooth printing problems. Error messages. See Error messages.
Chapter 6 The Status light is flashing amber. A printer error has occurred. Try the following: ● ● Check the printer screen for instructions. If you have a digital camera connected to the printer, check the camera screen for instructions. If the printer is connected to a computer, check the computer monitor for instructions. Turn off the printer. If the optional HP Photosmart Internal Battery is not installed in the printer: Unplug the printer power cord.
If the optional HP Photosmart Internal Battery is installed in the printer: Unplug the printer power cord, if it is plugged in. Open the battery compartment cover and remove the battery. Wait about 10 seconds, then reinstall the battery. If desired, plug in the power cord. Turn on the printer. ● The memory card may contain file types the printer cannot read directly from the memory card. – – Save the photos to a computer, then print them from the computer.
Chapter 6 The optional HP Photosmart Internal Battery low-power warning appears. I plug the printer into my automobile with the optional HP Photosmart Automobile DC Adapter, but the printer does not recognize the new power source. ● ● ● Before you plug the printer into the automobile with the adapter turn the printer off. Plug the printer into the automobile with the HP Photosmart Automobile DC Adapter. Turn the printer on.
The photo printed at an angle or is off-center. ● ● The paper may not be loaded correctly. Reload the paper, making sure that the paper is correctly oriented in the In tray and that the paper-width guide fits close to the edge of the paper. For paper-loading instructions, see Loading paper. The print cartridge may need to be aligned. For more information, see Aligning the print cartridge. No page came out of the printer. ● ● ● ● The printer may need attention. Read the printer screen for instructions.
Chapter 6 paper in preparation for printing. The next time you print, the printer will eject the blank page before starting the new printing project. The photo did not print using the printer's default print settings. You may have changed the print settings for the selected photo. Print settings you apply to an individual photo override the printer's default print settings. Discard all print settings that have been applied to an individual photo by deselecting the photo.
My Bluetooth device cannot find the printer. ● ● Make sure the HP Bluetooth wireless printer adapter is plugged into the camera port on the front of the printer. The light on the adapter flashes when the adapter is ready to receive data. Bluetooth Accessibility may be set to Not visible. Change this setting to Visible to all as follows: – Remove any memory cards from the printer memory card slots. Caution Do not pull out a memory card while the Memory Card light is flashing.
Chapter 6 Error messages Before contacting Customer Care, read this section for troubleshooting tips or go to the online support services at www.hp.com/support. The following error messages may appear on the printer screen. Follow the instructions to resolve the problem. Error message: Paper jam. Clear jam then press OK. To clear a paper jam, try the following: ● ● If the paper came part way through the front of the printer, gently pull the paper towards you to remove it.
Error message: Cartridge service station is stuck. The print cartridge service station is the component located beneath the print cartridge cradle that wipes and caps the print cartridge for storage. Follow these steps to clear the obstruction blocking the print cartridge service station: 1 2 3 4 Open the print cartridge door. Gently push the print cartridge and print cartridge cradle to the left to access the print cartridge service station. Remove any obstruction.
Chapter 6 44 HP Photosmart 320 series
7 Specifications This section lists the minimum system requirements for installing the HP Photosmart printer software, and provides selected printer specifications. For a complete list of printer specifications and system requirements, see the onscreen Help. For information about viewing the onscreen Help, see Welcome. System requirements Component Windows PC minimum Macintosh minimum Operating system Microsoft® Windows 98, 2000 Professional, ME, XP Home, and XP Professional Mac® OS X 10.
Chapter 7 Printer specifications Category Specifications Connectivity USB 2.0 full-speed: Microsoft Windows 98, 2000 Professional, ME, XP Home, and XP Professional; Mac OS X 10.1 through 10.
(continued) Category Specifications Operating temperature 0–45 degrees C (32–113 degrees F) [15–35 degrees C (59–95 degrees F) recommended] Paper tray One 10 x 15 cm (4 x 6 inch) photo paper tray Paper tray capacity 20 sheets, maximum thickness 292 µm (11.5 mil) per sheet Power consumption U.S. Printing: 12.3 W Idle: 6.29 W Off: 4.65 W International Printing: 11.4 W Idle: 5.67 W Off: 4.
Chapter 7 48 HP Photosmart 320 series
8 HP Customer Care If you have a problem, follow these steps: 1 Check the documentation that came with the printer. – – – 2 If you are unable to solve the problem using the information in the documentation, visit www.hp.com/support to do the following: – – – – 3 4 Setup Guide: The HP Photosmart 320 series Setup Guide explains how to set up the printer and print your first photo. User's Guide: The HP Photosmart 320 series User's Guide is the book you are reading.
Chapter 8 www.hp.
● ● Messages displayed on the printer screen or on the computer monitor. Answers to the following questions: – – Has the situation you are calling about happened before? Can you recreate the situation? Did you install any new hardware or software on your computer around the time that the situation occurred? Return to HP repair service HP will arrange to have your product picked up and delivered to an HP Central Repair Center. We pay for the round-trip shipping and handling.
Chapter 8 52 HP Photosmart 320 series
a Installing the software The printer comes with optional software you can install on a computer. Windows users Macintosh users Important: Do not connect the USB cable until you are prompted. Important: Do not connect the USB cable until you are prompted. HP Image Zone software and full printer functionality is installed automatically when you choose the Typical installation of your HP software. 1 1 3 2 3 4 Insert the HP Photosmart CD into your computer's CD-ROM drive.
Appendix a 54 HP Photosmart 320 series
Index A accessories 7, 33 aligning print cartridges 16, 31 alignment page 31 automobile adapter 8, 33 B batteries compartment 7 digital camera 24 model 7 black-and-white photos 14 Bluetooth connecting to printer 27 troubleshooting 40 wireless printer adapter 8 borderless photos do not print 38 print with borders 41 buttons 5 C cameras connecting to printer 27 photos do not print 40 port 4 printing from 24 carrying case model 8 transporting printer 33 cartridges.
from cameras 24 from computer 3 from memory cards 24 multiple copies 22 multiple photos 22 photo index 22 photos 24 selecting layout 24 test page 30 thumbnails 22 without computer 21 Q quality photo paper 33 photos 23 print 24 printing test page 30 troubleshooting 40 paper problems 38 power problems 37 printer noises 38 quality problems 40 U USB connection type 27 port 4 specifications 46 V viewing photos 22 X xD-Picture Card 17 R regulatory notices 57 removing memory cards 20 replacing print cartridges 1
Declaration of conformity According to ISO/IEC Guide 22 and EN 45014 Manufacturer’s name and address: Hewlett-Packard Company, 16399 West Bernardo Drive, San Diego, CA 92127-1899, USA Regulatory model number: SDGOB-0304-01 Declares that the product: Product name: Photosmart 320 series (Q3414A) Model number(s): Photosmart 325 (Q3414A) Power adapters: HP Part # Q3419-60040 (domestic) HP Part # Q3419-60041 (international) Conforms to the following product specifications: Safety: IEC 60950: 3rd Edition