HP Photosmart 370 series User's Guide English
Copyrights and trademarks © Copyright 2004 Hewlett-Packard Development Company, L.P. The information contained herein is subject to change without notice. Reproduction, adaptation or translation without prior written permission is prohibited, except as allowed under the copyright laws. Notice The only warranties for HP products and services are set forth in the express warranty statements accompanying such products and services. Nothing herein should be construed as constituting an additional warranty.
international standards that enhance the ability to identify plastics for recycling purposes at the end of the printer life. Material safety data sheets Material Safety Data Sheets (MSDS) can be obtained from the HP website at www.hp.com/go/msds. Customers without Internet access should contact Customer Care. Recycling program HP offers an increasing number of product return and recycling programs in many countries, and partners with some of the largest electronics recycling centers throughout the world.
Contents 1 2 3 4 5 6 Welcome................................................................................................................3 Printer parts............................................................................................................4 Available accessories.............................................................................................7 Printer menu...........................................................................................................
7 Specifications.....................................................................................................51 System requirements............................................................................................51 Printer specifications............................................................................................51 8 Customer Care....................................................................................................55 Customer Care by phone....................
1 Welcome Thank you for purchasing an HP Photosmart 370 series printer! With your new, compact photo printer you can easily print beautiful photos with or without a computer. This guide explains how to print photos from the printer without connecting it to a computer. To learn how to print from your computer, install the printer software and click Help in the HP Director. See Installing the software. Among other things, you'll learn how to: Print borderless photos with colorful, customized frames.
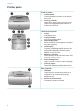
Chapter 1 Printer parts Front of printer 1. Control panel Control the basic functions of the printer from here. 2. Out tray (closed) Open this to print, insert a memory card, connect a compatible digital camera, or connect an HP iPod. Inside front of printer 1. In tray Load paper here. 2. In tray extender Pull out to support paper. 3. Paper-width guide Move to width of current paper to position the paper properly. 4.
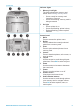
(continued) Indicator lights 1. Memory Card light The light indicates the memory card status. See Inserting memory cards. – Green: ready for memory card insertion or removal – Green and flashing: memory card is being accessed 2. On light – Green: printer is on – Green and flashing: printer is busy – Red and flashing: printer requires attention Control panel 1. Menu Press to access the printer menu. 2. Delete Press to delete the currently selected photo from a memory card. 3.
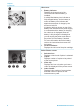
Chapter 1 (continued) Idle screen 1. Battery indicator Displays the charge level of the HP Photosmart Internal battery, if installed. A solidly-filled battery icon indicates a fully-charged battery. As the battery is used, the battery icon indicates the approximate amount of charge by the amount of solid fill. A lightning bolt icon shown on top of the battery icon indicates that a power supply is connected and the battery is charging.
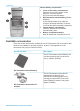
(continued) Internal battery compartment 1. Cover of the battery compartment Open this cover on the bottom of the printer to insert the optional HP Photosmart Internal Battery. 2. HP Photosmart Internal Battery (Model: Q5599A) A fully-charged battery has sufficient charge to print approximately 75 photos. You must purchase the battery separately. 3. Internal battery compartment Insert the optional HP Photosmart Internal Battery here. 4. Battery compartment button Slide to release the compartment cover.
Chapter 1 (continued) Accessory name Description The lightweight, durable HP Photosmart Carrying Case for Compact Printers holds and protects everything needed for hassle-free printing on the go. (Model: Q3424A) HP Photosmart Carrying Case for Compact Printers HP Bluetooth® wireless printer adapter The HP Bluetooth® wireless printer adapter goes into the camera port on the front of the printer and lets you use Bluetooth wireless technology for printing.
Printer menu structure (continued) Top level menu Submenus/options Additional submenus/ options Rotate photo Press to rotate photo 90° clockwise Press to rotate photo 90° counterclockwise Photo brightness Photo brightness: Select -3 to +3. The default is 0 and represents no change.
Chapter 1 Printer menu structure (continued) Top level menu Submenus/options Additional submenus/ options enter the address of the device they are trying to locate. This menu option shows the device address. Device name You can select a device name for the printer that appears on other devices with Bluetooth wireless technology when they locate the printer. Passkey You can assign a Bluetooth numerical passkey to the printer. The default passkey is 0000.
Printer menu structure (continued) Top level menu Submenus/options Additional submenus/ options devices with Bluetooth wireless technology by changing this accessibility option. Reset Bluetooth options Reset Bluetooth options: ● ● Security level Security Level: ● ● Help Cartridges Yes No (default) Low (default) The printer does not require users of other devices with Bluetooth wireless technology to enter the printer passkey.
Chapter 1 Printer menu structure (continued) Top level menu Submenus/options Additional submenus/ options Camera connect Camera Connect Help: Select to see where to connect a PictBridge compatible digital camera to the printer.
Printer menu structure (continued) Top level menu Submenus/options Additional submenus/ options Passport photo mode Turn passport photo mode: ● ● On Off (default) Select Size: Passport mode tells the printer to print all selected photos in the selected passport photo size. A separate page is printed for each selected photo. Each printed page contains the number of photos of the selected size that will fit on the page.
Chapter 1 14 HP Photosmart 370 series
2 Getting ready to print Before you can begin printing, there are three easy procedures you should become familiar with: ● ● ● Loading paper Inserting print cartridges Inserting memory cards You must load paper and insert a print cartridge before inserting a memory card. Loading paper Learn how to choose the right paper for your print job and how to load it into the In tray for printing.
Chapter 2 Paper type How to load 4 x 6 inch (10 x 15 cm) photo paper Index cards L-size cards Hagaki cards 1. 2. 3. 4. Open the In tray and pull out the In tray extender. Load up to 20 sheets of paper with the print side or glossy side facing towards you. When loading, push the paper down firmly until it stops. If you are using tabbed paper, insert it so the tabbed end feeds in last. Adjust the paperwidth guide to fit close to the edge of the paper without bending the paper.
Use the right print cartridge (continued) To print… Insert this print cartridge in the cartridge cradle Sepia or antique photos Tri-color (7 ml) HP #95 (North America, Latin America, Asia Pacific), #135 (Eastern Europe, Russia, Middle East, Africa, Japan), #343 (Western Europe), #855 (China, India) Tri-color (14 ml) HP #97 (North America, Latin America, Asia Pacific), #134 (Eastern Europe, Russia, Middle East, Africa, Japan), #344 (Western Europe), #857 (China, India) Text and colored line drawings Tr
Chapter 2 Insert or replace the print cartridge (continued) Do not touch here Insert the cartridge 1. If you are replacing a cartridge, push down and pull outward on the cartridge in the cradle to remove it. 2. Hold the replacement cartridge with the label on top. Slide the cartridge at a slight upward angle into the cradle so the copper-colored contacts go in first. Push the cartridge until it snaps into place. 3. Close the print cartridge access door.
When you are not using a print cartridge (continued) Storing the cartridge improperly can cause the cartridge to malfunction. In some countries/regions the cartridge protector is not included with the printer, but comes with the Gray Photo cartridge that can be purchased separately. In other countries/regions, the protector is included with the printer. ➔ To insert a cartridge into the cartridge protector, slide the cartridge into the protector at a slight angle and snap it securely into place.
Chapter 2 Caution 2 Do not pull out a memory card while the Memory Card light is flashing. For more information, see Removing a memory card.
(continued) Memory card Slot How to insert the memory card came with the card before you insert the card into the printer xD-Picture Card Lower right portion of the top left double slot ● ● Curved side of card points toward you Metal contacts face down Removing a memory card Wait until the Memory Card light stops flashing, then gently pull the memory card to remove it from the printer. Caution Do not pull out a memory card while the Memory Card light is flashing.
Chapter 2 22 HP Photosmart 370 series
3 Printing without a computer The HP Photosmart 370 series printer lets you print amazing photos without even going near a computer. After setting up the printer using the instructions in the HP Photosmart 370 series Setup Guide refer to these steps for start-to-finish printing. Getting your photos from camera to printer Use these steps for start-to-finish printing in minutes! Step 1 Insert a memory card See Inserting memory cards. Step 2 Decide which photos to print See Deciding which photos to print.
Chapter 3 (continued) Use these steps for start-to-finish printing in minutes! Step 6 Get creative! See Getting creative. Step 7 Improve the quality of your photos See Improving the quality of your photos. Step 8 Print your photos See Printing your photos. Deciding which photos to print To view photos... Do this One by one 1. 2. Insert a memory card. Press Select Photos or to view the photos one by one. Press and hold the button to view the photos rapidly.
(continued) To view photos... Do this a memory card (2000 maximum). You can use the index numbers to print specific photos or a range of photos. Use an index card instead of photo paper to cut costs when printing a photo index. Selecting photos to print If you want to… Do this Print one photo 1. 2. Print more than one copy of a photo 1. 2. 3. Print several photos 1. 2. 3. Print a continuous range of photos 1. 2. 3. 4. 5. 6. 7. Print one selected frame from a video clip 1. 2.
Chapter 3 (continued) If you want to… Do this 3. 4. 5. appears at the bottom of the printer screen. Press OK to select the video clip. The Video selection menu appears, with Select frames selected. Press OK to choose Select frames. The video will load slowly, frame by frame, to allow you to pick a frame to print. When the frame you want to print is displayed, press OK, then press Print.
(continued) If you want to… Do this Note 1 The image resolution in video clips is typically lower than that of digital photos; therefore, you may notice that the print quality of your video clip frames is lower than the print quality of your photos. Note 2 Not all video file formats are supported by this printer. For a list of supported video file formats, see Printer specifications. Getting creative The printer provides a variety of tools and effects that let you use your photos in creative ways.
Chapter 3 (continued) Things to try Do this Add a color effect 1. Set the printer to change the color effect of your prints to Black and White, Sepia, Antique, or None (default). 2. 3. 4. 5. Add the date and time to your prints You can print a stamp on the front of your photos that shows when the photo was taken. This preference affects all prints. 1. 2. 3. 4. 5. Navigate to the photo you want to change, then press OK to select it. Press Menu. Select Edit, then press OK.
(continued) Problem and solution How to do it Photos with poor lighting and contrast 1. 2. Digital Flash 3. Improve the lighting and contrast in 4. prints. This preference affects all printed photos. Press Menu. Select Preferences, then press OK. Select Digital Flash, then press OK. Use the Select Photos arrows to highlight On, then press OK. 1. 2. 3. Press Menu. Select Preferences, then press OK. Select Video Enhancement, then press OK. Use the Select Photos arrows to highlight On, then press OK.
Chapter 3 Setting print quality Best quality is the default and produces the highest quality photos. Normal quality conserves ink and prints faster. To change the print quality to Normal 1. Press Menu. 2. Select Tools, then press OK. 3. Select Print Quality, then press OK. 4. Select Normal, then press OK. Print quality reverts to Best after the next print job.
(continued) To print from a... Do this To print from an HP direct-printing camera 1. Turn on the HP direct-printing digital camera and select the photos you want to print. 2. Connect the camera to the USB port on the back of the printer using the USB cable that came with the camera. 3. Follow the instructions on the camera screen. HP iPod Print photos that are stored on an HP iPod. See Connecting to other devices.
Chapter 3 (continued) To print from a... Do this 2. Verify that photos are on your HP iPod by selecting “Photo Import” on the HP iPod menu. Photos will appear as “Rolls.” To print photos from an HP iPod 1. Connect the HP iPod to the camera port on the front of the printer using the USB cable that came with the HP iPod. The printer screen will display Reading Device for up to several minutes while the photos are read. Then the photos will be displayed on the printer screen. 2.
4 Getting connected Use the printer to stay connected to other devices and to family and friends. Connecting to other devices This printer offers several ways of connecting to computers or other devices. Each connection type lets you do different things. Connection type and what you need What this lets you do USB ● ● ● A Universal Serial Bus (USB) 1.1 or 2.0 full speed compliant cable 10 feet (3 meters) or less in length.
Chapter 4 Connecting through HP Instant Share Use HP Instant Share to share photos with friends and relatives using e-mail, online albums, or an online photo finishing service. The printer must be connected through a USB cable to a computer with Internet access and have all the HP software installed. If you try to use HP Instant Share and do not have all the required software installed or configured, a message prompts you through the required steps. To use HP Instant Share 1.
5 Maintaining and transporting the printer The HP Photosmart 370 series printer requires very little maintenance. Follow the guidelines in this chapter to extend the life span of the printer and printing supplies, and to ensure that the photos you print are always of the highest quality. Cleaning and maintaining the printer Keep the printer and print cartridges clean and well maintained using the simple procedures in this section. Cleaning the outside of the printer 1. 2. 3.
Chapter 5 6. When the printer finishes cleaning the cartridge and prints a test page, it asks whether you want to Continue to second level cleaning. Check the test page and select from the following options: – If the test page has white streaks or missing colors, the print cartridge needs to be cleaned again. Select Yes, then press OK. – If the print quality of the test page looks good, select No, then press OK. You can clean the cartridge up to three times.
page does not print correctly when you install a new print cartridge, use the following procedure to align the print cartridge. 1. 2. 3. 4. 5. Press Menu. Select Tools, then press OK. Select Align cartridge, then press OK. A message appears on the printer screen reminding you to load plain paper. Load paper so the printer can print a calibration page. Use plain paper or index cards to conserve photo paper. Press OK to begin aligning the print cartridge.
Chapter 5 Storing the print cartridges When you store or transport the printer, always leave the active print cartridge inside the printer. The printer stores the print cartridge in a protective cap during the powerdown cycle. Caution Make sure the printer completes its power-down cycle before you unplug the power cord or remove the internal battery. This allows the printer to store the print cartridge properly.
Transporting the printer It's easy to transport and set up the printer almost anywhere. Take it with you on vacations and to family gatherings and social events to instantly print and share photos with family and friends. To make it even easier to print on the go, you can purchase these accessories: ● ● ● HP Photosmart Internal Battery: Power the printer with a rechargeable battery so you can print anywhere HP Photosmart Automobile DC Adapter: Power the printer from the cigarette lighter in a car.
Chapter 5 40 HP Photosmart 370 series
6 Troubleshooting The HP Photosmart printer is designed to be reliable and easy to use. This section answers frequently asked questions about using the printer and printing without a computer. It contains information about the following topics: ● ● ● ● Printer hardware problems Printing problems Bluetooth printing problems Error messages For troubleshooting information about using the printer software and printing from a computer, see the onscreen HP Photosmart Printer Help.
Chapter 6 The On light flashed amber briefly after I turned the printer off. This is a normal part of the power-down process. It does not indicate a problem with the printer. The On light is flashing amber. A printer error has occurred. Try the following: ● ● ● Check the printer screen for instructions. If you have a digital camera connected to the printer, check the camera screen for instructions. If the printer is connected to a computer, check the computer monitor for instructions.
● If the optional HP Photosmart Internal Battery is installed in the printer: Unplug the printer power cord, if it is plugged in. Open the battery compartment cover and remove the battery. Wait about 10 seconds, then reinstall the battery. If desired, plug in the power cord. Turn on the printer. The memory card may contain file types the printer cannot read directly from the memory card. – Save the photos to a computer, then print them from the computer.
Chapter 6 The optional HP Photosmart Internal Battery low-power warning appears. I plug the optional HP Photosmart Automobile DC Adapter into the printer, but the printer does not recognize the new power source. ● Turn the printer off before you plug the adapter into the printer. ● Plug the adapter into the printer. ● Turn the printer on. The printer makes noises when I turn it on, or starts making noises on its own after it has been sitting unused for a while.
The photo printed at an angle or is off-center. ● The paper may not be loaded correctly. Reload the paper, making sure that the paper is correctly oriented in the In tray and that the paper-width guide fits close to the edge of the paper. For paper-loading instructions, see Loading paper. ● The print cartridge may need to be aligned. For more information, see Aligning the print cartridge. No page came out of the printer. ● The printer may need attention. Read the printer screen for instructions.
Chapter 6 A blank page came out of the printer. ● Check the ink-level icon on the printer screen. If the print cartridge is out of ink, replace it. See Inserting print cartridges. Print a test page to check the print cartridge. See Printing a test page. ● You may have begun printing and then cancelled the process. If you cancelled the process before the photo started printing, the printer may have already loaded paper in preparation for printing.
memory to the memory card, the marks do not transfer. Mark photos for printing after you transfer them from the digital camera's internal memory to the memory card. Bluetooth printing problems Before contacting Customer Care, read this section for troubleshooting tips, or go to the online support services at www.hp.com/support. Be sure to also read the documentation that came with your HP Bluetooth wireless printer adapter and your device with Bluetooth wireless technology.
Chapter 6 The photo printed with borders. The printing application installed on your device with Bluetooth wireless technology may not support borderless printing. Contact the vendor of the device, or go to their support website to obtain the latest updates for the printing application. My computer cannot set the device name using the Bluetooth wireless connection. Use a USB cable to connect your computer to the printer in order to set the printer Bluetooth device name using the driver Toolbox.
Error message: Automatic paper sensor failed. The automatic paper sensor is obstructed or damaged. Try moving the printer out of direct sunlight, then press OK and try printing again. If this does not work, go to www.hp.com/support or contact Customer Care. Error message: Cartridge is not compatible. Use appropriate HP cartridge. Replace the print cartridge with one that is compatible with the printer. For more information, see Inserting print cartridges. Error message: Print cartridge cradle is stuck.
Chapter 6 50 HP Photosmart 370 series
7 Specifications This section lists the minimum system requirements for installing the HP Photosmart printer software, and provides selected printer specifications. For a complete list of printer specifications and system requirements, see the onscreen Help. For information about viewing the onscreen Help, see Welcome. System requirements Component Windows PC minimum Macintosh minimum Operating system Microsoft® Windows 98, 2000 Professional, ME, XP Home, and XP Professional Mac® OS X 10.
Chapter 7 (continued) Category Specifications TIFF 24-bit YCbCr uncompressed interleaved TIFF 24-bit RGB packbits interleaved TIFF 8-bit gray uncompressed/packbits TIFF 8-bit palette color uncompressed/packbits TIFF 1-bit uncompressed/packbits/1D Huffman Margins Borderless printing: Top 0.0 inch (0.0 mm) ; Bottom 0.50 inch (12.5 mm); Left/right 0.0 inch (0.0 mm) Bordered printing: Top 0.16 inch (4 mm); Bottom 0.50 inch (12.5 mm); Left/right 0.
(continued) Category Specifications Idle: 6.76 W Off: 5.16 W International Printing: 12.0 W Idle: 6.06 W Off: 4.
Chapter 7 54 HP Photosmart 370 series
8 Customer Care If you have a problem, follow these steps: 1. 2. 3. 4. Check the documentation that came with the printer. – Setup Guide: The HP Photosmart 370 series Setup Guide explains how to set up the printer and print your first photo. – User's Guide: The HP Photosmart 370 series User's Guide is the book you are reading. This book describes the basic features of the printer, explains how to use the printer without connecting a computer, and contains hardware troubleshooting information.
Chapter 8 www.hp.
● ● Messages displayed on the printer screen or on the computer monitor.
Chapter 8 58 HP Photosmart 370 series
a Installing the software The printer comes with optional software you can install on a computer. After using the Setup Guide instructions to setup the printer hardware, use the instructions in this section to install the software. Windows users Macintosh users Important: Do not connect the USB cable until you are prompted. Important: Do not connect the USB cable until you are prompted.
Appendix a 60 HP Photosmart 370 series
Index Symbols/Numerics 9–up view 24 A accessories 7, 39 aligning print cartridges 17, 36 alignment page 36 antique coloration 27 automobile adapter 7, 39 B batteries charge indicator 6 compartment 7 model 7 black-and-white photos 16 Bluetooth connecting to printer 33 device name 48 menu settings 8 troubleshooting 47 wireless printer adapter 8 borderless photos do not print 44 print with borders 48 selecting layout 29 buttons 5 C cameras connecting to printer 33 photos do not print 46 port 4 printing from 30
inserting 17 replacing 17 storing 18, 38 testing 36 printer accessories 7, 39 cleaning 35 connecting 33 documentation 3 error messages 48 menu 8 parts 4 power problems 43 specifications 51 storing 37 transporting 39 warnings 2 printing from cameras 30 from computer 3 from memory cards 30 multiple copies 25 multiple photos 25 new photos 25 photo index 24 photos 29 range of photos 25 selecting layout 29 test page 36 thumbnails 24 without computer 23 specifications 51 storing photo paper 38 print cartridges 1
Regulatory notices Hewlett-Packard Company This device complies with part 15 of the FCC Rules. Operation is subject to the following two conditions: ● ● This device may not cause harmful interference, and This device must accept any interference received, including interference that may cause undesired operation. Pursuant to Part 15.