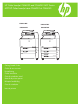
HP Color LaserJet CM6030 and CM6040 MFP Series MFP HP Color LaserJet série CM6030 et CM6040 CM6030 MFP CM6030f MFP CM6040 MFP CM6040f MFP Getting Started Guide Guide de mise en route Kurzanleitung Guida introduttiva Guía de instalación inicial Manual de primers passos Beknopte handleiding Guia de introdução Lea esto primero
Copyright and License Copyright et licence © 2008 Copyright Hewlett-Packard Development Company, L.P. © 2008 Copyright Hewlett-Packard Development Company, L.P. Reproduction, adaptation or translation without prior written permission is prohibited, except as allowed under the copyright laws. Toute reproduction, adaptation ou traduction sans autorisation expresse par écrit est interdite, sauf dans les cas permis par les lois régissant les droits d'auteur.
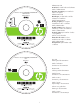
Administrator CD Insert first for install video and software CD de l'administrateur A insérer en premier pour installer la vidéo et le logiciel HP Color LaserJet CM6030/CM6040 MFP Administrator Administrateur Administrations-CD CD einlegen, um das Video und die Software zu installieren CD dell'amministratore Inserire per primo per eseguire l'installazione video e software CD de administrador Insértelo primero para obtener el software y el vídeo de instalación CD de l'administrador Inseriu-lo primer per in
EN Getting Started Guide Contents IT Contenuto della guida introduttiva NL Inhoud beknopte handleiding FR Contenu du Guide de mise en route Kurzanleitung – Inhalt ES Contenido de la guía de instalación inicial Contingut de la Manual de primers passos PT Conteúdo do Guia de introdução DE In-box documentation..................p.4 Documentation fournie.................. 4 Mitgelieferte Dokumentation.......... 4 CA Documentazione acclusa alla confezione........................... pag.
Install the send fax driver........... p.36 Installation du pilote d'envoi de télécopie....................................36 Installieren des Send Fax-Treibers...36 Installazione del driver di invio fax.................................... pag. 36 Instalación del controlador de envío de fax......................... p. 36 De driver voor het verzenden van faxen installeren.................. pag. 36 Instale o driver de envio de fax... p. 36 Instal·lació del controlador d'enviament de faxos........... pàg.
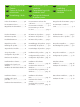
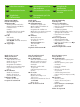
EN In-box documentation IT FR Documentation fournie ES DE Mitgelieferte Dokumentation CA Documentazione acclusa alla confezione Documentación incluida NL PT Meegeleverde documentatie Documentação contida na caixa Documentació que hi ha a la caixa Getting Started Guide Instructional wall poster Administrator-CD • Getting Started Install video • Getting Started Install Guide • Software Drivers • Installer • Embedded Web Server Guide • Easy Printer Care software • Fonts User CD • User Guide • Ins
Erste Schritte Hinweise (Poster) Administrator-CD • Erste Schritte – Installationsvideo • Erste Schritte – Installationshandbuch • Softwaretreiber • Installationsprogramm • Anleitung für den eingebetteten Webserver • HP Easy Printer Care-Software • Schriftarten Benutzer-CD • Benutzerhandbuch • Anweisungen – Job Aids • Eigenen MFP verwenden – Animation • Faxanleitung Faltblatt zum HP Support Guia de primers passos Cartell d'instruccions CD de l'administrador • Vídeo de primers passos • Guia de primers passo
EN Product information IT Informazioni sul prodotto NL Productinformatie FR Informations produit ES Información del producto PT Informações sobre o produto DE Produktinformationen CA Informació del producte 1 Select a well-ventilated, dust-free area to position the product. Choisissez une zone correctement ventilée et exempte de poussière pour installer le produit. Stellen Sie das Produkt an einem gut belüfteten, staubfreien Ort auf.
2 Space requirements. NOTE: ����� The back of the product must be at least 152 mm (6 in) from the wall. Espace requis. REMARQUE : ��������� � l’arrière du produit doit se trouver à une distance minimum de 152 mm du mur. Platzbedarf. HINWEIS: �������� Die Rückseite des Produkts muss mindestens 152 mm (6 Zoll) von der Wand entfernt sein. Requisiti di spazio. NOTA: ����� il retro del prodotto deve essere posizionato a una distanza di almeno 152 mm dal muro. Requisitos de espacio.
EN Unpack the Product IT FR Déballage du produit ES DE Auspacken des Produkts CA 3 Disimballaggio del prodotto Desembalaje del producto Desembalatge del producte Remove packing material. Retirez les matériaux d'emballage. Entfernen Sie das Verpackungsmaterial. Rimuovere il materiale di imballaggio. Retire el material de embalaje. Traieu el material d'embalatge. Verwijder het verpakkingsmateriaal. Remova o material da embalagem.
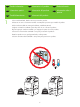
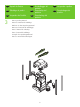
4 Install the ramps and remove the plastic bag. Use two people to gently roll the device off of the pallet. Installez les rampes et retirez le sac en plastique. Faites que deux personnes se chargent de faire glisser doucement le périphérique hors du plateau de chargement. Installieren Sie die Rampenelemente, und entfernen Sie die Plastikverpackung. Rollen Sie das Gerät mit einer weiteren Person langsam von der Palette. Installare i piani inclinati e rimuovere la busta in plastica.
5 Remove all orange shipping tape and packing material, including all cardboard and tape inside the paper trays. Retirez tout le matériel d'emballage et le ruban adhésif orange utilisé pour l'expédition, y compris les cartons et le ruban adhésif à l'intérieur des bacs papier. Entfernen Sie alle orangefarbenen Klebestreifen sowie das komplette Verpackungsmaterial einschließlich Pappe und Klebestreifen in den Papierfächern.
6 Unlock the scanner head by moving the scanner lock under the scanner bed into the unlocked position. Déverrouillez la tête du scanner en plaçant le verrou qui se trouve sous la vitre du scanner en position déverrouillée. Entriegeln Sie den Scanner, indem Sie den Verschluss unten am Scanner entsichern. Sbloccare la testina dello scanner spostando il blocco situato sotto il letto dello scanner in posizione di sblocco.
EN Set up the product IT Installazione del prodotto NL Het product installeren FR Configuration du produit ES PT Configuração do produto DE Einrichten des Produkts CA Configuración del producto Configuració del producte 7 Remove protective film from the control panel. Retirez le film protecteur du panneau de commande. Entfernen Sie die Schutzfolie vom Bedienfeld. Rimuovere la pellicola protettiva dal pannello di controllo. Retire la película protectora del panel de control.
NOTE: Four print cartridges and imaging drums are already installed; no action is required. REMARQUE : quatre cartouches d'impression et tambours d'imagerie sont déjà installés ; aucune action n'est requise. HINWEIS: Vier Druckpatronen und Bildtrommeln sind bereits eingesetzt; es sind keine Maßnahmen erforderlich. NOTA: nella periferica sono già installate quattro cartucce di stampa e tamburi fotosensibili; pertanto non è richiesta alcuna azione.
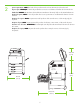
9 Connect a network cable (optional). Branchez le câble réseau (facultatif). Anschließen eines Netzwerkkabels (optional). Collegare il cavo di rete (opzionale). Conecte un cable de red (opcional). Connecteu un cable de xarxa (opcional). Sluit een netwerkkabel aan (optioneel). Conecte um cabo de rede (opcional). LA� NOTE: Do not connect the USB cable until prompted during software installation. REMARQUE : ne branchez pas le câble USB avant d'y avoir été invité lors de l'installation du logiciel.
10 Connect a fax phone line (optional, for the f model only). Branchez un cordon de ligne téléphonique (facultatif, pour le modèle f). Schließen Sie das Fax an (optional nur für f-Modell). Collegare la linea telefonica fax (opzionale, solo per il modello f). Conecte una línea telefónica de fax (opcional; sólo para el modelo f). Connecteu una línia de telèfon per al fax (opcional, només per al model f). Sluit een faxlijn aan (optioneel, alleen voor het f-model).
11 When the product is in its final location, face the wheels forward and lock them. Lorsque le produit est installé dans son emplacement final, placez les roulettes vers l'avant et verrouillez-les. Vergewissern Sie sich, dass die vorderen Rollen nach vorne zeigen, sobald das Produkt an der gewünschten Stelle aufgestellt ist. Arretieren Sie anschließend die Rollen. Quando il prodotto si trova nella posizione finale, assicurarsi che le rotelle siano rivolte in avanti, quindi bloccarle.
12 Open the scanner lid and wipe the glass wth a dry lint-free cloth to remove any particles. Ouvrez le couvercle du scanner et essuyez la vitre avec un chiffon sec et non pelucheux. Öffnen Sie die Scannerabdeckung, und reinigen Sie das Glas mit einem trockenen, fusselfreien Tuch, um alle Staubpartikel zu entfernen. Aprire il coperchio dello scanner e pulire il vetro con un panno asciutto e privo di lanugine per rimuovere gli eventuali residui.
13 Plug in the power cord, turn on the product, and wait for the green ready light. Branchez le cordon d'alimentation, mettez le produit sous tension et attendez que le voyant vert s'allume. Schließen Sie das Netzkabel an, schalten Sie das Produkt ein, und warten Sie, bis die grüne Bereitschaftsanzeige aufleuchtet. Collegare il cavo di alimentazione, accendere il prodotto e attendere l'accensione della spia verde Pronta.
14 If prompted, set up the control panel language, date, time, e-mail settings, and optional fax settings, following the instructions on the display. Si vous y êtes invité, configurez la langue du panneau de commande, la date, l'heure, les paramètres de messagerie électrique, les paramètres de télécopie (facultatif), en suivant les instructions à l'écran. Wenn Sie auf dem Bedienfeld dazu aufgefordert werden, stellen Sie Sprache, Datum, Uhrzeit, E-Mail und Fax (optional) für das Produkt ein.
15 One at a time, open each paper tray and adjust the paper guides. Ouvrez un bac papier, réglez les guides du papier et passez au bac suivant. Öffnen Sie nacheinander jedes Papierfach, und stellen Sie die Papierzuführungen ein. Aprire i vassoi della carta uno alla volta e regolare le guide della carta. Abra las bandejas de papel una a una y ajuste las guías de papel. Una a una, obriu cadascuna de les safates de paper i ajusteu-ne les guies. Open een voor een de papierladen en stel de papiergeleiders bij.
16 Load the paper. Chargez le papier. Legen Sie das Papier ein. Caricare la carta. Cargue el papel. Carregueu el paper. Plaats het papier. Coloque o papel.
17 Close the paper tray. Fermez le bac papier. Schließen Sie das Papierfach. Chiudere il vassoio della carta. Cierre la bandeja de papel. Tanqueu la safata de paper. Sluit de papierlade. Feche a bandeja de papel.
18 After you close each paper tray, verify that the paper size and type displayed on the control panel is correct for that tray. This must be done for each tray as it is loaded. Après avoir fermé chaque bac à papier, vérifiez que le format et le type de papier affiché à l'écran correspond au papier chargé dans le bac. Cela doit être fait pour chaque bac lors du chargement.
19 Assign an IP address: By default, an IP Address will automatically be assigned using DHCP. To assign a static IP address for a network connection, do the following: On the control panel touch Administration. Scroll to and touch Initial Setup, and then touch Networking and I/O. Touch Embedded Jetdirect, and touch TCP/IP. Touch IPV4 Settings, touch Config Method, and then touch Manual. Touch Save. Touch Manual Settings, touch the IP Address text box, type in the assigned IP address.
20 To verify print function, print a configuration page. On the control panel scroll to and touch Administration, touch Information, touch Configuration/Status Pages, touch Configuration Page, and then touch Print to print the Jetdirect configuration page. Keep this configuration page for use during the software install process. Pour tester la fonction d'impression, imprimez une page de configuration.
21 If you have an optional output accessory to install, use the Installation Guide attached to the accessory box. Si vous devez installer un accessoire de sortie optionnel, consultez le Guide d'installation fourni avec la boîte de l'accessoire. Wenn Sie optionales Ausgabezubehör installieren möchten, befolgen Sie dazu die Installationsanleitung, die an der Zubehörverpackung befestigt ist. Per installare un accessorio di uscita opzionale, utilizzare la Guida all'installazione fornita con l'accessorio.
EN Install Windows software IT FR Installation du logiciel pour Windows Installieren der WindowsSoftware ES DE 22 CA Installazione del software Windows Instalación del software en Windows Instal·lació del programari per al Windows NL PT Windows-software installeren Instalação do Windows Install the product software from the Administrator CD. Windows users, continue to Step 23. Macintosh users, skip to Step 26. Installez le logiciel produit depuis le CD de l'administrateur.
Note: Do not connect the USB cable until prompted during the software installation. Remarque : ne branchez pas le câble USB avant d'y avoir été invité lors de l’installation du logiciel. Hinweis: Schließen Sie das USB-Kabel erst an, wenn Sie während der Softwareinstallation dazu aufgefordert werden. Nota: non collegare il cavo USB finché non viene richiesto durante l'installazione del software. Nota: No conecte el cable USB hasta que se le solicite durante la instalación.
23 HP Color LaserJet CM6040 MFP Series Install software. A) Insert the Administration CD that came with the printer. B) Click Install, and then select the print driver to be installed. C) Follow the on screen instructions. D) At the the end of the driver install, click Finish. E) From the Next Steps screen, select additional options if desired. F) Click Exit to close installer. If prompted, restart the computer.
Note: If the software welcome screen does not appear when you insert the CD, click Start and then click Run. Type X:\SETUP, where X corresponds to the CD-ROM drive letter, and then click OK. Remarque : si l'écran d'accueil du logiciel ne s'affiche pas lorsque vous insérez le CD, cliquez sur Démarrer puis Exécuter. Saisissez X:\SETUP, où X correspond à la lettre du lecteur de CD-ROM, puis cliquez sur OK.
24 Test the software installation. Print a page from any program to verify software is correctly installed. Note: If the installation failed, reinstall the software, see the Solve Problems section of the User Guide on the User CD, or go to http://www.hp.com/go/cljcm6030mfp_software or http://www.hp.com/go/cljcm6040mfp_software. Test de l'installation du logiciel. Imprimez une page de n'importe quel programme pour vérifier que le logiciel a été correctement installé.
25 Register your product. Register at http://www.register.hp.com to receive technical support updates, additional support options, ideas for how to use your HP product, and news about new technology. Skip to Step 30 and 31 to set up the product send fax driver and digital send features. Enregistrement de votre produit. Enregistrez votre produit à l'adresse http://www.register.hp.
EN Install Mac software IT FR Installation du logiciel pour Mac Installieren der MacSoftware ES DE 26 CA Installazione del software Mac Instalación del software en Mac Instal·lació del programari per al Mac NL Mac-software installeren PT Instalação do Mac Note: Do not connect the USB cable until prompted during the software installation. Remarque : ne branchez pas le câble USB avant d’y avoir été invité lors de l’installation du logiciel.
28 Test the software installation. Print a page from any program to verify software is correctly installed. Test de l'installation du logiciel. Imprimez une page de n'importe quel programme pour vérifier que le logiciel a été correctement installé. Testen Sie die Softwareinstallation. Drucken Sie über ein beliebiges Programm eine Seite, um sicherzustellen, dass die Software richtig installiert wurde. Verificare l'installazione del software.
29 Register your product. Register at http://www.register.hp.com to receive technical support updates, additional support options, ideas for how to use your HP product, and news about new technology. Enregistrement de votre produit. Enregistrez votre produit à l'adresse http://www.register.hp.
EN FR DE Install the send fax driver Installation du pilote d'envoi de télécopie Installieren des Send Fax-Treibers 30 IT ES CA Installazione del driver di invio fax Instalación del controlador de envío de fax NL PT De driver voor het verzenden van faxen installeren Instale o driver de envio de fax Instal·lació del controlador d'enviament de faxos CM6030f CM6040f only: Install the send fax driver.
EN Set up the embedded digital send features IT Configurazione delle funzioni di invio digitale incorporate NL De geïntegreerde digitale verzendfuncties instellen FR Configuration des fonctions d'envoi numérique intégrées ES Configuración de las funciones de envío digital incorporado PT Configure os recursos de envio digital integrados DE Einrichten der integrierten Funktionen für digitales Senden CA Configuració de les opcions d'enviament digital incrustat The HP embedded Web server (EWS) p
The product includes a trial version of the HP Digital Sending Software (HP DSS), which can be used to carry out digital sending tasks. If you install HP DSS, all HP EWS Digital Sending screens are available for read-only access, but all configuration changes must be made within HP DSS. This centralizes the configuration tasks and helps control security. Le produit comprend une version d'essai du logiciel HP Digital Sending (HP DSS), qui permet d'effectuer des tâches d'envoi numérique.
31 Open the embedded Web server. A) Open a web browser. B) Type the product IP address or hostname (found on the embedded Jetdirect configuration page) in the the URL window. Ouvrez le serveur Web intégré. A) Ouvrez un navigateur Web. B) Saisissez l'adresse IP ou le nom d'hôte du produit (qui se trouve sur la page de configuration Jetdirect intégré) dans la fenêtre URL. Öffnen Sie den eingebetteten Webserver. A) Öffnen Sie einen Webbrowser.
32 Configure the General Settings. A) Select the Digital Sending tab. B) Complete the information under General Settings: name, e-mail address, phone number, and location. C) Click Apply. Configurez les Paramètres généraux. A) Sélectionnez l'onglet Envoi numérique. B) Indiquez les informations sous Paramètres généraux : nom, adresse électronique, numéro de téléphone et emplacement. C) Cliquez sur Appliquer. Konfigurieren Sie die Optionen unter „Allgemeine Einstellungen“.
33 Use the Scan Setup Wizard to set up Send to Folder. Note: To set up Send To Folder without using the Scan Seup Wizard, go to Step 34. A) Open the Embedded Web Server by opening a Web browser and typing the product IP address or hostname in the URL window. The IP address can be found on the Configuration Page you printed in Step 20. B) Click the Digital Sending tab. C) In the left column, click Send to Folder. D) On the Send to Folder Page, click the Enable Scan Setup Wizard checkbox.
Utilice el asistente de configuración del escaneado para configurar el Envío a carpeta. Nota: Para configurar el Envío a carpeta sin utilizar el asistente de configuración del escaneado, vaya al paso 34. A) Abra el navegador Web y escriba la dirección IP o el nombre de host en la ventana de URL para abrir el servidor Web incorporado. La dirección IP se encuentra en la página de configuración que imprimió en el paso 20. B) Haga clic en la ficha Envío digital.
34 Set up Send to Folder. A) To set up a Shared folder on your computer or network drive, right click the folder you would like to share. Click Sharing and Security... and follow the instructions. B) Open the Embedded Web server by opening a Web browser and typing the product IP address or hostname in the URL window. The IP address can be found on the Configuration Page you printed in Step 20. C) Click the Digital Sending tab. D) In the left column, click Send to Folder.
Configure el Envío a carpeta. A) Para configurar una carpeta compartida en su equipo o en su unidad de red, haga clic en el botón derecho en la carpeta que desea compartir. Haga clic en Compartir y seguridad... y siga las instrucciones. B) Abra el navegador Web y escriba la dirección IP o el nombre de host en la ventana de URL para abrir el servidor Web incorporado. La dirección IP se encuentra en la página de configuración que imprimió en el paso 20. C) Haga clic en la ficha Envío digital.
35 Set up E-mail Settings. A) Open the Embedded Web server by opening a Web browser and typing the product IP address or hostname in the URL window. The IP address can be found on the Configuration Page you printed in Step 20. B) Click the Digital Sending tab and complete the information under General Settings: name, E-mail address, phone number, and location. C) Click OK. D) On the left navigation menu, select Send to E-mail. E) To find the SMTP Gateway, click the Find Gateways button.
Ajuste la configuración de correo electrónico. A) Abra el navegador Web y escriba la dirección IP o el nombre de host en la ventana de URL para abrir el servidor Web incorporado. La dirección IP se encuentra en la página de configuración que imprimió en el paso 20. B) Haga clic en la ficha Envío digital y complete la información en Configuración general: nombre, dirección de correo electrónico, teléfono y ubicación. C) Haga clic en Aceptar.
36 Click the Fax tab to configure the optional fax settings (f model only). Cliquez sur l'onglet Télécopie pour configurer les paramètres de télécopie facultatifs (modèle f uniquement). Klicken Sie auf die Registerkarte Fax, um die optionalen Faxeinstellungen zu konfigurieren (nur f-Modell). Fare clic sulla scheda Fax per configurare le impostazioni del fax opzionali (solo per il modello f). Haga clic en la ficha Fax para ajustar la configuración opcional de fax (sólo modelo f).
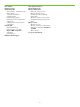
EN Contents of the User Guide IT Contenu du Guide de l'utilisateur ES Benutzerhandbuch – Inhalt CA (on the User CD) FR (auf der Benutzer-CD) Ch. 1. Product Basics Ch. 1. Informations de base sur le produit Kapitel 1.
Ch. 10. Utilisation de la couleur Cap. 10. Uso del colore Cap. 10. Uso del color Kapitel 10. Farben Capítol 10. Ús del color Ch. 11. Copy Cap. 11. Copia Hoofdstuk 11. Kopiëren Ch. 11. Copier Cap. 11. Copia Cap. 11. Cópia Kapitel 11. Kopieren Capítol 11. Còpia Ch. 12. Scan and send to e-mail Ch. 12. Numérisation et envoi par courrier électronique Kapitel 12. Scannen und Senden per E-Mail Cap. 12. Scansione e invio tramite e-mail Cap. 12. Escaneado y envío a correo electrónico Capítol 12.
http://www.hp.com/support http://www.hp.com/go/usemy6030mfp http://www.hp.com/go/usemy6040mfp http://www.hp.com/go/cljcm6030mfp_manuals http://www.hp.com/go/cljcm6040mfp_manuals http://www.hp.com/go/cljcm6030mfp_software http://www.hp.com/go/cljcm6040mfp_software http://www.hp.
© 2008 Hewlett-Packard Development Company, L.P. www.hp.