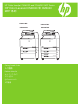
HP Color LaserJet CM6030 and CM6040 MFP Series HP Color LaserJet CM6030 和 CM6040 MFP 系列 CM6030 MFP CM6030f MFP CM6040 MFP CM6040f MFP Getting Started Guide 入门指南 Panduan Memulai セットアップ ガイド 시작 설명서 คูมื่ อเริ่มตนอย ว ้ างรวดเร็ ่ 入門指南
Copyright and License 版权与许可 © 2008 Copyright Hewlett-Packard Development Company, L.P. © 2008 Copyright Hewlett-Packard Development Company, L.P. Reproduction, adaptation or translation without prior written permission is prohibited, except as allowed under the copyright laws. The information contained herein is subject to change without notice.
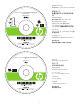
Administrator CD Insert first for install video and software 管理员 CD 先插入该 CD 以安装视频和软 件 HP Color LaserJet CM6030/CM6040 MFP Administrator Administrateur CD Administrator Masukkan dulu untuk video dan perangkat lunak instalasi Administrator CD (管理者 CD) ビデオおよびソフトウェアをインストー ルするために、最初に挿入してください 관리자 CD 설치 비디오 및 소프트웨어를 위해 먼 저 넣습니다.
EN Getting Started Guide Contents JA セットアップ ガイドの目次 CN 《入门指南》目录 KO 시작 설명서 목차 Isi Panduan Memulai TH สารบัญคูม่ ือเริ่มตน้ อยา่ งรวดเร็ว ID In-box documentation..................p.4 同梱されている文書...................................p.4 随附文档..........................第 4 页 제품 설명서............................. p.4 Dokumentasi dalam kotak............h.4 เอกสารที่อยู่ในกล่อง.......................................... หน้า 4 Product information.....................p.6 製品情報................................
Install the send fax driver........... p.36 安装发送传真驱动程 序...................................第 36 页 ファックス送信ドライバのインス トール............................................................ p.36 팩스 전송 드라이버 설치.............p.36 Menginstal driver pengiriman faks........................................ h.36 ติดตั้งไดรเวอร์ส่งโทรสาร................................. หน้า 36 Set up the embedded digital send features................................... p.37 内蔵デジタル送信のセットアップ........ p.37 设置内嵌式数字发送功 能........................
EN In-box documentation JA 同梱されている文書 CN 随附文档 KO 제품 설명서 Dokumentasi dalam kotak TH เอกสารที่อยู่ในกล่อง ID Getting Started Guide Instructional wall poster Administrator-CD • Getting Started Install video • Getting Started Install Guide • Software Drivers • Installer • Embedded Web Server Guide • Easy Printer Care software • Fonts User CD • User Guide • Instructional Job Aids • Use My MFP animated instructions • Fax Guides HP Support Flyer セットアップ ガイド 手順早見表 Administrator CD (管理者 CD) • セットアップ インストー
Panduan Persiapan Poster dinding instruksi CD Administrator • Video Panduan Persiapan Instalasi • Panduan Persiapan Instalasi • Driver Perangkat Lunak • Penginstal • Panduan Server Web Tertanam • Perangkat lunak Easy Printer Care • Font CD Pengguna • Panduan Pengguna • Bantuan Pekerjaan Instruksional • Menggunakan My MFP, animasi petunjuk • Panduan Faks Pamflet Dukungan HP คูมื่ อเริ่มต้นอย่างรวดเร็ว โปสเตอร์คำแนะนำติดผนัง แผน่ ซีดีผูด้ ูแลระบบ • วิดีโอเริ่มต้นอย่างรวดเร็ว • คู่มือเริ่มต้นอย่างรวดเร็ว • ได
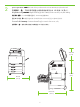
EN Product information JA 製品情報 CN 产品信息 KO 제품 정보 Informasi produk TH ขอ้ มูลผลิตภัณฑ์ ID 1 TW 產品資訊 Select a well-ventilated, dust-free area to position the product. 请选择一个通风良好、无尘的区域来放置本产品。 Pilih tempat yang berventilasi cukup dan bebas debu untuk menempatkan produk. プリンタの設置場所には、通気がよく埃の少ない場所を選びます。 환기가 잘 되고 먼지가 없는 지역을 선택하여 제품을 내려 놓습니다.
2 Space requirements. NOTE: ����� The back of the product must be at least 152 mm (6 in) from the wall. 空间要求。 �� 注: 产品后部与墙壁之间的距离必须至少为 152 毫米(6 英寸)。 Persyaratan ruang. CATATAN: �������� Bagian belakang produk sedikitnya harus 152 mm (6 in) dari dinding. 設置要件 注記: ���プリンタの背面を壁から 152 mm 以上離します。 공간 요구 사항. �� 주: 제품 뒷면과 벽 사이에 적어도 152mm의 공간이 있어야 합니다. ขอ้ กำหนดดา้ นพื้นที่ ��������� หมายเหตุ: ดา้ นหลังของเครื่องพิมพต์ อ้ งอยูห่ า่ งจากผนังอยา่ งนอ้ ย 152 มม. (6 นิว้ ) 空間需求。�� 註: 產品背面必須至少距離牆壁 152 公釐 (6 英吋)。 444.
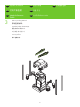
EN Unpack the Product JA 製品の開梱 CN 打开产品包装 KO 제품 개봉 TH นำเครื่องพิมพอ์ อกจากกลอ่ ง ID 3 Membuka Kemasan Produk Remove packing material. 取出包装材料。 Lepaskan bahan kemasannya. 梱包材を取り除きます。 포장재를 제거합니다.
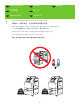
4 Install the ramps and remove the plastic bag. Use two people to gently roll the device off of the pallet. 安装坡道并取下塑料袋。 由两个人轻轻将设备滚离货盘。 Pasang landasan dan lepaskan kantung plastiknya. Gunakan dua orang untuk mendorong perangkat dengan perlahan dari palet. スロープを取り付け、ビニール袋を取り除きます。2 人で本体をゆっくりと荷台から降ろします。 램프를 설치하고 비닐을 벗깁니다. 두 사람이 팔레트에서 장치를 밀어 옮깁니다.
5 Remove all orange shipping tape and packing material, including all cardboard and tape inside the paper trays. 取出所有橙色装运胶带和包装材料,包括纸盘内的所有纸板和胶带。 Lepaskan semua pita pengiriman warna jingga dan bahan kemasan, termasuk semua kardus dan pita dalam baki kertas. オレンジ色の搬送用テープとボール紙などの梱包材をすべて取り外します。用紙トレイの搬送用テープもはが します。 주황색 포장용 테이프와 용지함 내의 보드지 및 테이프 등 포장재를 제거합니다.
6 Unlock the scanner head by moving the scanner lock under the scanner bed into the unlocked position. 将扫描仪锁移到扫描仪底座下的解锁位置,解除扫描仪头锁定。 Buka kunci kepala pemindai dengan memindah posisi kunci pemindai di bawah alas pemindai ke posisi terbuka. スキャナ ベッドの下にあるスキャナ ロックをロック解除位置に移動して、 スキャナ ヘッドのロックを解除し ます。 스캐너 베드 아래의 스캐너 잠금 장치를 풀어 스캐너 헤드의 잠금을 풉니다.
EN Set up the product JA プリンタの設定 CN 安装产品 KO 제품 설정 Mengatur produk TH ติดตั้งเครื่องพิมพ์ ID 7 TW Remove protective film from the control panel. 取下控制面板上的保护膜。 Lepaskan lapisan pelindung dari panel kontrol. コントロール パネルの保護フィルムをはがします。 제어판에서 보호용 필름을 제거합니다. แกะแผ่นฟิล์มป้องกันออกจากแผงควบคุม 從控制面板取下防護薄膜。 8 Change control panel language overlay if necessary. 更改控制面板的语言贴面(如有必要)。 Ubah bahasa lapisan panel kontrol jika perlu. 必要に応じて、 コントロール パネルの言語オーバーレイを交換します。 필요에 따라 제어판 언어 오버레이를 변경합니다.
NOTE: Four print cartridges and imaging drums are already installed; no action is required. 注: 已经安装四个打印碳粉盒和成像鼓;不需要执行任何操作。 CATATAN: Ada empat kartrid cetak dan drum pencitraan yang sudah dipasang; tidak perlu melakukan apa-apa. 注記:プリント カートリッジ (4 個) とイメージ ドラムは、出荷時にあらかじめ取り付けられています。 주: 토너 카트리지와 이미지 드럼 4개가 이미 설치되어 있습니다. 별도의 조치가 필요하지 않습니다.
9 Connect a network cable (optional). 连接网络电缆(可选)。 Hubungkan kabel jaringan (opsional). ネットワーク ケーブルを接続します (オプション)。 네트워크 케이블을 연결합니다(옵션). ตอสายเคเบิ ลเครือขา่ ย (เลือกทำ) ่ 連接網路電纜 (選用)。 LA� NOTE: Do not connect the USB cable until prompted during software installation. 注: 在软件安装期间提示连接 USB 电缆之前,不要连接 USB 电缆。 CATATAN: Jangan hubungkan kabel USB hingga diminta selama instalasi perangkat lunak. 注記:ソフトウェアのインストール中に、画面に指示が表示されるまで USB ケーブルを接続しないでください。 주: 소프트웨어를 설치하는 동안 메시지가 나타날 때까지 USB 케이블을 연결하지 마십시오.
10 Connect a fax phone line (optional, for the f model only). 连接传真电话线(可选,仅适用于 f 型号)。 Hubungkan saluran telepon untuk faks (opsional, untuk model f saja). ファックスを電話線に接続します (オプション、f モデルでのみ必要な手順です)。 팩스 전화선을 연결합니다(f모델만 선택적으로 해당).
11 When the product is in its final location, face the wheels forward and lock them. 将产品移至最终安装位置后,请使脚轮朝前并锁定它们。 Bila produk telah berada di lokasi akhirnya, hadapkan roda ke arah depan dan kuncilah. 目的の場所にプリンタを置き、キャスターを前向きにして、ロックします。 제품의 자리를 잡고 나면 바퀴가 정면을 향하도록 해 고정합니다.
12 Open the scanner lid and wipe the glass wth a dry lint-free cloth to remove any particles. 打开扫描仪盖板并用无绒干布擦拭玻璃板,以去除任何颗粒。 Buka tutup pemindai dan lap kacanya dengan kain kering yang tidak berbulu untuk menyingkirkan semua partikel. スキャナ カバーを開き、 ガラス面を糸くずの出ない乾いた布で拭き、ほこりをすべて取り除きます。 스캐너 덮개를 열고 보풀이 없는 마른 천으로 유리 위의 먼지 등을 닦아 냅니다.
13 Plug in the power cord, turn on the product, and wait for the green ready light. 插入电源线,打开产品并等待绿色的就绪指示灯亮起。 Tancapkan kabel listriknya, nyalakan produk, dan tunggu lampu hijau tanda siap menyala. 電源コードを接続し、 プリンタの電源を入れ、緑の印字可ランプが点灯するまで待ちます。 전원 코드를 연결하고 장치를 켠 후 녹색 준비 표시등이 켜질 때까지 기다립니다.
14 If prompted, set up the control panel language, date, time, e-mail settings, and optional fax settings, following the instructions on the display. 如果出现提示,请按照显示屏上的说明设置控制面板语言、日期、时间、电子邮件设 置和可选的传真设置。 Jika diminta, atur bahasa panel kontrol, tanggal, waktu, pengaturan e-mail, dan pengaturan faks opsional, dengan mengikuti petunjuk pada layar. 画面の指示に従って、 コントロール パネルの言語、 日付、時刻、電子メールを設定します。必要に応じて、 ファッ クスも設定します。 메시지가 나타나면 디스플레이에 표시된 지침에 따라 제어판 언어, 날짜, 시간, 전자 우편 설정, 팩스 설 정(옵션)을 설정합니다.
15 One at a time, open each paper tray and adjust the paper guides. 每次打开一个纸盘,调整各纸盘的纸张导板。 Satu per satu, buka setiap baki kertas dan sesuaikan pemandu kertasnya. 用紙トレイを一度に 1 つずつ開けて、用紙ガイドを調節します。 용지함을 한번에 하나씩 열어 용지 조정대를 조정합니다.
16 Load the paper. 装入纸张。 Muat kertas. 用紙をセットします。 용지를 넣습니다.
17 Close the paper tray. 合上纸盘。 Tutup baki kertas. 用紙トレイを閉じます。 용지함을 닫습니다.
18 After you close each paper tray, verify that the paper size and type displayed on the control panel is correct for that tray. This must be done for each tray as it is loaded. 合上各个纸盘后,检查控制面板为该纸盘显示的纸张尺寸和类型是否正确。 必须在装 入各个纸盘时完成此操作。 Setelah Anda menutup setiap baki kertas, pastikan bahwa ukuran dan jenis kertas yang ditampilkan pada panel kontrol telah benar untuk baki itu. Ini harus dilakukan untuk setiap baki saat dimuat.
19 Assign an IP address: By default, an IP Address will automatically be assigned using DHCP. To assign a static IP address for a network connection, do the following: On the control panel touch Administration. Scroll to and touch Initial Setup, and then touch Networking and I/O. Touch Embedded Jetdirect, and touch TCP/IP. Touch IPV4 Settings, touch Config Method, and then touch Manual. Touch Save. Touch Manual Settings, touch the IP Address text box, type in the assigned IP address.
20 To verify print function, print a configuration page. On the control panel scroll to and touch Administration, touch Information, touch Configuration/Status Pages, touch Configuration Page, and then touch Print to print the Jetdirect configuration page. Keep this configuration page for use during the software install process. 要验证打印功能,请打印配置页。 在控制面板上,滚动查看并轻触管理,然后依次轻 触信息、配置/状态页和配置页,最后轻触打印以打印 Jetdirect 配置页。 保存好此配置 页,以备安装软件时使用。 Untuk verifikasi fungsi cetak, cetak halaman konfigurasi.
21 If you have an optional output accessory to install, use the Installation Guide attached to the accessory box. 如果要安装可选输出附件,请按照附件箱中随附的《安装指南》进行操作。 Jika Anda punya aksesori keluaran opsional untuk dipasang, gunakan Installation Guide [Panduan Instalasi] yang dipasang pada kotak aksesori. オプションの排紙アクセサリを取り付ける場合は、 アクセサリの箱に付属している 『インストール ガイド』の手 順に従ってください。 선택사양 출력 부속품을 설치하려면 부속품 상자와 함께 제공되는 설치 설명서를 따르십시오.
EN Install Windows software JA CN 安装 Windows 软件 KO ID Menginstal perangkat lunak Windows 22 TH Windows ソフトウェア のインストール Windows 소프트웨어 설치 TW 安裝 Windows 軟體 ติดตั้งซอฟต์แวร์ของ Windows Install the product software from the Administrator CD. Windows users, continue to Step 23. Macintosh users, skip to Step 26. 从“管理员 CD”安装产品软件。 Windows 用户,请继续执行步骤 23。 Macintosh 用户,请跳至步 骤 26。 Instal perangkat lunak produk dari CD Administrator. Pengguna Windows, lanjutkan ke Langkah 23.
Note: Do not connect the USB cable until prompted during the software installation. 注: 在软件安装期间提示连接 USB 电缆之前,不要连接 USB 电缆。 Catatan: Jangan hubungkan kabel USB hingga diperintahkan saat instalasi perangkat lunak. 注記:画面に指示が表示されるまで USB ケーブルを接続しないでください。 주: 소프트웨어를 설치하는 동안 메시지가 나타날 때까지 USB 케이블을 연결하지 마십시오.
23 HP Color LaserJet CM6040 MFP Series Install software. A) Insert the Administration CD that came with the printer. B) Click Install, and then select the print driver to be installed. C) Follow the on screen instructions. D) At the the end of the driver install, click Finish. E) From the Next Steps screen, select additional options if desired. F) Click Exit to close installer. If prompted, restart the computer.
Note: If the software welcome screen does not appear when you insert the CD, click Start and then click Run. Type X:\SETUP, where X corresponds to the CD-ROM drive letter, and then click OK. 注: 如果插入 CD 后未出现软件欢迎屏幕,请单击开始,然后单击运行。 键入 X:\SETUP(其中 X 对应于 CD-ROM 驱动器盘符),然后单击确定。 Catatan: Jika layar pembuka perangkat lunak tidak muncul saat Anda memasukkan CD, klik Start [Mulai] kemudian klik Run [Jalankan]. Ketikkan X:SETUP, di mana X adalah huruf drive CD-ROM, kemudian klik OK.
24 Test the software installation. Print a page from any program to verify software is correctly installed. Note: If the installation failed, reinstall the software, see the Solve Problems section of the User Guide on the User CD, or go to http://www.hp.com/go/cljcm6030mfp_software or http://www.hp.com/go/cljcm6040mfp_software. 测试软件安装是否成功。 通过任意程序打印一页,检查软件是否安装正确。 注: 如果安装失败,请重新安装软件。可参阅“用户 CD”上《用户指南》中的 “解决问题”部分,或者访问 http://www.hp.com/go/cljcm6030mfp_software 或 http://www.hp.
25 Register your product. Register at http://www.register.hp.com to receive technical support updates, additional support options, ideas for how to use your HP product, and news about new technology. Skip to Step 30 and 31 to set up the product send fax driver and digital send features. 注册产品。 通过 http://www.register.hp.com 注册产品,以便接收技术支持更新、附 加支持选项、如何使用 HP 产品的说明以及有关新技术的新闻。 跳至步骤 30 和 31 以安装产品发送传真驱动程序和数字发送功能。 Daftarkan produk Anda. Daftarkan pada http://www.register.hp.
EN Install Mac software JA CN 安装 Mac 软件 KO Menginstal perangkat lunak Mac TH ID 26 Mac ソフトウェアのインス トール Mac 소프트웨어 설치 TW 安裝 Mac 軟體 ติดตั้งซอฟต์แวร์สำหรับเครื่อง Mac Note: Do not connect the USB cable until prompted during the software installation. 注: 在软件安装期间提示连接 USB 电缆之前,不要连接 USB 电缆。 Catatan: Jangan hubungkan kabel USB hingga diperintahkan saat instalasi perangkat lunak. 注記:画面に指示が表示されるまで USB ケーブルを接続しないでください。 주: 소프트웨어를 설치하는 동안 메시지가 나타날 때까지 USB 케이블을 연결하지 마십시오.
28 Test the software installation. Print a page from any program to verify software is correctly installed. 测试软件安装是否成功。 通过任意程序打印一页,检查软件是否安装正确。 Uji instalasi perangkat lunak. Cetak halaman dari program apa saja untuk memastikan perangkat lunak telah diinstal dengan benar. ソフトウェアのインストール状態をテストします。任意のアプリケーションで適当なページを印刷し、 ソフトウェア が正常にインストールされたことを確認します。 소프트웨어 설치 상태를 검사합니다. 아무 프로그램에서나 페이지를 인쇄하여 소프트웨어가 제대로 설 치되었는지 확인합니다.
29 Register your product. Register at http://www.register.hp.com to receive technical support updates, additional support options, ideas for how to use your HP product, and news about new technology. 注册产品。 通过 http://www.register.hp.com 注册产品,以便接收技术支持更新、 附加支持选项、如何使用 HP 产品的说明以及有关新技术的新闻。 Daftarkan produk Anda. Daftarkan pada http://www.register.hp.com untuk menerima pembaruan dukungan teknis, opsi dukungan tambahan, ide untuk cara menggunakan produk HP Anda, dan berita tentang teknologi baru.
EN CN ID Install the send fax driver 安装发送传真驱动 程序 Menginstal driver pengiriman faks 30 JA ファックス送信ドライバ のインストール KO 팩스 전송 드라이버 설치 TH ติดตั้งไดรเวอร์ส่งโทรสาร TW 安裝傳送傳真驅動程式 CM6030f CM6040f only: Install the send fax driver. If you did not install the send fax driver during the software installation, you can install it now. A) Insert the Administrator CD. B) On the Welcome screen, click Install, and then click Install HP MFP Send Fax Driver. C) Follow the onscreen instructions. http://www.hp.
EN Set up the embedded digital send features JA 内蔵デジタル送信 のセットアップ CN 设置内嵌式数字发送 功能 KO 내장 디지털 전송 기능 설정 TH ตั้งคา่ คุณสมบัติการสง่ แบบดิจิตอ ลในตัว ID Mengatur fitur pengiriman digital tertanam TW 設定嵌入式數位傳送功能 The HP embedded Web server (EWS) provides an interface to the product that can be used by anyone with a network connected computer and a standard Web browser. It provides the ability to view the product status, change settings, and manage product supplies.
The product includes a trial version of the HP Digital Sending Software (HP DSS), which can be used to carry out digital sending tasks. If you install HP DSS, all HP EWS Digital Sending screens are available for read-only access, but all configuration changes must be made within HP DSS. This centralizes the configuration tasks and helps control security.
31 Open the embedded Web server. A) Open a web browser. B) Type the product IP address or hostname (found on the embedded Jetdirect configuration page) in the the URL window. 打开内嵌式 Web 服务器。 A) 打开 Web 浏览器。 B) 在 URL 窗口中键入产品 IP 地 址或主机名(可在嵌入式 Jetdirect 配置页上找到)。 Buka server Web tertanam. A) Buka browser Web. B) Ketikkan alamat IP produk atau nama host (ada pada halaman konfigurasi Jetdirect tertanam) dalam jendela URL.
32 Configure the General Settings. A) Select the Digital Sending tab. B) Complete the information under General Settings: name, e-mail address, phone number, and location. C) Click Apply. 配置常规设置。 A) 选择数字发送选项卡。 B) 填写“常规设置”下的信息:名称、 电子邮件地址、电话号码和位置。 C) 单击“应用”。 Konfigurasi Pengaturan Umum. A) Pilih tab Digital Sending [Pengiriman Digital]. B) Lengkapi informasi pada General Settings [Pengaturan Umum]: nama, alamat e-mail, nomor telepon, dan lokasi. C) Klik Apply [Terapkan].
33 Use the Scan Setup Wizard to set up Send to Folder. Note: To set up Send To Folder without using the Scan Seup Wizard, go to Step 34. A) Open the Embedded Web Server by opening a Web browser and typing the product IP address or hostname in the URL window. The IP address can be found on the Configuration Page you printed in Step 20. B) Click the Digital Sending tab. C) In the left column, click Send to Folder. D) On the Send to Folder Page, click the Enable Scan Setup Wizard checkbox.
스캔 설정 마법사에서 폴더로 전송을 설정합니다. 주: 스캔 설정 마법사를 사용하지 않고 폴더로 전송을 설정하려면 34단계를 참고하십시오. A) 웹 브라우저를 열고 URL 창에 제품 IP 주소나 호스트 이름을 입력하여 내장 웹 서버를 엽니다. IP 주소는 단계 20에서 인쇄해 놓은 구성 페이지에서 확인 가능합니다. B) 디지털 전송 탭을 누릅니다. C) 왼쪽 열에서 폴더로 전송을 누릅니다. D) 폴더로 전송 페이지에서 스캔 설정 마법사 활성화 확인 란을 선택합니다. E) 적용 단추를 누릅니다. F) 컴퓨터에 인쇄 시스템 CD를 넣습니다. G) 시작 화면 에서 스캔 설정 마법사를 누릅니다. H) 설정 도구의 단계를 따릅니다. 장치에 연결된 네트워크 폴더 가 생성됩니다. 이제 생성한 폴더로 스캔 문서를 전송할 수 있습니다. 그 외 기능을 설정하려면 관리 자 CD의 내장 웹 서버 설명서를 참조하십시오.
34 Set up Send to Folder. A) To set up a Shared folder on your computer or network drive, right click the folder you would like to share. Click Sharing and Security... and follow the instructions. B) Open the Embedded Web server by opening a Web browser and typing the product IP address or hostname in the URL window. The IP address can be found on the Configuration Page you printed in Step 20. C) Click the Digital Sending tab. D) In the left column, click Send to Folder.
폴더로 전송을 설정합니다. A) 컴퓨터나 네트워크 드라이브에 공유 폴더를 설정하려면 마우스 오 른쪽 단추로 공유할 폴더를 누릅니다. 공유 및 보안...을 누르고 지침을 따릅니다. B) 웹 브라우저 를 열고 URL 창에 제품 IP 주소나 호스트 이름을 입력하여 내장 웹 서버를 엽니다. IP 주소는 단계 20에서 인쇄해 놓은 구성 페이지에서 확인 가능합니다. C) 디지털 전송 탭을 누릅니다. D) 왼쪽 열 에서 폴더로 전송을 누릅니다. E) 폴더로 전송 활성화 확인란을 선택합니다. F) 미리 지정한 폴더 영역에서 추가를 누르고 공유 폴더를 선택합니다. G) 확인을 누릅니다. H) 폴더 경로 필드에 \\ MyComputerName\SharedFolderName을 입력합니다. (컴퓨터 이름을 확인하려면 마우스 오른쪽 단 추로 Windows 시작 메뉴의 내 컴퓨터를 누른 후 속성을 누릅니다. 컴퓨터 이름 탭을 누릅니다. 컴퓨 터 이름 전체를 복사합니다.
35 Set up E-mail Settings. A) Open the Embedded Web server by opening a Web browser and typing the product IP address or hostname in the URL window. The IP address can be found on the Configuration Page you printed in Step 20. B) Click the Digital Sending tab and complete the information under General Settings: name, E-mail address, phone number, and location. C) Click OK. D) On the left navigation menu, select Send to E-mail. E) To find the SMTP Gateway, click the Find Gateways button.
전자 우편 설정을 설정합니다. A) 웹 브라우저를 열고 URL 창에 제품 IP 주소나 호스트 이름을 입력하여 내장 웹 서버를 엽니다. IP 주소는 단계 20에서 인쇄해 놓은 구성 페이지에서 확인 가능합니다. B) 디지털 전송 탭을 누르고 일반 설정의 이름, 전자 우편 주소, 전화 번호 및 위치 관련 정보를 입력합니다. C) 확인을 누릅니다. D) 왼쪽 탐색 메뉴에서 전자 우편으로 전송을 선택합니다. E) SMTP 게이트웨이를 찾으려면, 게이트웨이 검색 단추를 누릅니다. 게이트웨이를 찾으면 선택한 후 확인을 누릅니다. 주: 게이 트웨이를 찾을 수 없거나 게이트웨이가 하나 이상 있을 경우 네트워크 관리자나 ISP 업체에 문의하여 게 이트웨이 관련 정보를 제공 받고 SMTP 인증을 위해 계정 이름과 암호를 입력해야 하는지 확인합니다. F) 기본 "보내는 사람" 전자 우편 주소 및 표시 이름을 입력합니다. G) 적용 단추를 누릅니다.
36 Click the Fax tab to configure the optional fax settings (f model only). 单击传真选项卡可配置可选的传真设置(仅限于 f 型号)。 Klik tab Fax untuk mengkonfigurasi pengaturan faks opsional (model f saja). オプションのファックス設定を行う場合は、[ファックス] タブをクリックします (f モデルのみ)。 비필수 팩스 설정을 구성하려면 팩스 탭을 누릅니다(f 모델만 해당).
EN CN Contents of the User Guide JA 《用户指南》的目录 KO Isi Panduan Pengguna TH (on the User CD) (ユーザー CD に収録) (pada CD Pengguna) TW 使用者指南目錄 (在使用者光碟上) 사용 설명서 목차 (사용자 CD (在“用户 CD”上) ID ユーザー ガイドの内容 สารบัญคูม่ ือผู้ใช้ (ในแผนซี ่ ดีผูใช้ ้ ) Ch. 1. Product Basics 1. 章 製品の基本情報 第 1. 章 产品基本信息 Ch. 1. 제품 기본 사항 Bab 1. Dasar-Dasar Produk บทที่ 1. ขอ้ มูลเบื้องตน้ ของเครื่องพิมพ์ Ch. 2. Control Panel 2. 章 コントロール パネル 第 2. 章 控制面板 Ch. 2. 제어판 Bab 2. Panel Kontrol บทที่ 2. แผงควบคุม Ch. 3.
Ch. 10. Using Color 10. 章 カラー印刷 第 10. 章 使用颜色 Ch. 10. 컬러 사용 Bab 10. Menggunakan Warna บทที่ 10. การใช้สี Ch. 11. Copy 11. 章 コピー 第 11. 章 复印 Ch. 11. 복사 Bab 11. Menyalin บทที่ 11. สำเนา Ch. 12. Scan and send to e-mail 12. 章 スキャンして電子メールに送信 第 12. 章 扫描并发送至电子 邮件 Ch. 12. 스캔하여 전자 우편으로 전송 Bab 12. Memindai dan mengirim ke e-mail 第 10. 章 使用色彩 第 11. 章 影印 第 12. 章 掃描並傳送至電子郵件 บทที่ 12. สแกนและส่งอีเมล Ch. 13. Fax 13. 章 ファックス 第 13. 章 传真 Ch. 13. 팩스 Bab 13. Faks บทที่ 13. โทรสาร Ch. 14.
http://www.hp.com/support http://www.hp.com/go/usemy6030mfp http://www.hp.com/go/usemy6040mfp http://www.hp.com/go/cljcm6030mfp_manuals http://www.hp.com/go/cljcm6040mfp_manuals http://www.hp.com/go/cljcm6030mfp_software http://www.hp.com/go/cljcm6040mfp_software http://www.hp.
© 2008 Hewlett-Packard Development Company, L.P. www.hp.