HP Color LaserJet CM6030/6040 MFP Series Quick Reference Guide How to: Copy Digital Send Fax Store Jobs www.hp.com/support/cljcm6030mfp www.hp.com/support/cljcm6040mfp www.hp.
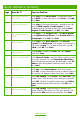
Quick reference summary Page How do I? Steps to Perform 1 Make black & white or color copies Touch Copy. Touch Color/Black. To make black copies, touch Black. To make color copies, touch Color. Touch OK. Press Start. 2 Make two-sided copies Touch Copy. If the original document is printed on one side, touch 1-sided original, 2-sided output. Or, if the original document is printed on both sides, touch 2-sided original, 2-sided output. Touch OK. Press Start.
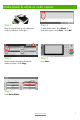
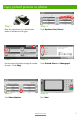
12 3 Make black & white or color copies Step 1 Step 4 Place the original face-up in the document feeder or face-down on the glass. To make black copies, touch Black. To make color copies, touch Color. Touch OK. Step 2 Step 5 Use the numeric keypad to change the number of copies. Touch Copy. Press Start. Step 3 Touch Color/Black. www.hp.
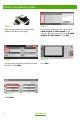
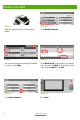
12 3 Make two-sided copies Step 1 Step 4 Place the original face-up in the document feeder or face-down on the glass. If the original is printed on one side, touch 1sided original, 2-sided output. If the original is printed on both sides, touch 2-sided original, 2-sided output. Touch OK. Step 2 Step 5 Use the numeric keypad to change the number of copies. Touch Copy. Press Start. Step 3 Touch Sides. 2 www.hp.
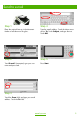
12 3 Copy printed pictures or photos Step 1 Step 4 Place the original face-up in the document feeder or face-down on the glass. Touch Optimize Text/Picture. Step 2 Step 5 Use the numeric keypad to change the number of copies. Touch Copy. Touch Printed Picture or Photograph. Step 3 Step 6 Touch More Options. Press Start. www.hp.
12 3 Make a booklet 4 Step 1 Step 4 Place the original face-up in the document feeder. Touch Booklet Format. Step 2 Step 5 Use the numeric keypad to change the number of copies. Touch Copy. Touch Booklet on. If the original is printed on one side, touch 1-sided. If it is printed on both sides, touch 2-sided. Touch OK. Step 3 Step 6 Touch More Options. Press Start. www.hp.
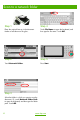
12 3 Send to e-mail Step 1 Step 4 Place the original face-up in the document feeder or face-down on the glass. Type the e-mail address. Touch the down arrow next to To. Touch Subject, and type the text. Touch OK. Step 2 Step 5 Touch E-mail. If prompted, type your user name and password. Press Start. Step 3 Touch the From field, and type your e-mail address. Touch the To field. www.hp.
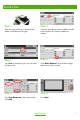
12 3 Scan to a network folder Step 1 Step 4 Place the original face-up in the document feeder or face-down on the glass. Touch File Name to open the keyboard, and then type the file name. Touch OK. Step 2 Step 5 Touch Network Folder. Press Start. Step 3 Select the folder in which you want to save the document. Or, touch Network Folder Path to open the keyboard, and then type the folder path. Touch OK. 6 www.hp.
12 3 Send a fax Step 1 Step 4 Place the original face-up in the document feeder or face-down on the glass. Touch the down-arrow button to add the number to the recipients list. Repeat to add more numbers. Step 2 Step 5 Touch Fax. If prompted, type your user name and password. Touch More Options. Verify that the settings match those of your original. Step 3 Step 6 Touch Fax Recipients. Enter a fax number. Touch OK. Press Start. www.hp.
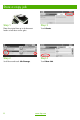
12 3 Store a copy job Step 1 Step 3 Place the original face-up in the document feeder or face-down on the glass. Touch Create. Step 2 Step 4 Scroll down and touch Job Storage. Touch New Job. 8 www.hp.
Store a copy job (continued) Step 5 Step 7 Type a name for the folder. Touch the down arrow next to Folder Name. Touch Job Name, and type a name for the job. Touch OK. Press Start. The job is saved on the product until you delete it. Step 6 Optional: To make the job private, touch PIN to print, and then type the PIN for the job. Touch OK. www.hp.
Retrieve a stored job Step 1 Step 3 Scroll down and touch Job Storage. Select the job from the list. If the job is private, touch the box below PIN: and type the correct PIN. Step 2 Step 4 Select the folder in which the job is stored. Press Start. 10 www.hp.
www.hp.
12 www.hp.
www.hp.
© 2008 Hewlett-Packard Development Company, L.P. www.hp.com Reproduction, adaptation, or translation without prior written permission is prohibited, except as allowed under the copyright laws. The information contained herein is subject to change without notice. The only warranties for HP products and services are set forth in the express warranty statements accompanying such products and services. Nothing herein should be construed as constituting an additional warranty.